Pfaff creative 4874 Owner's Manual - Page 24
Threading stitch programs 01-20, Thread guides
 |
View all Pfaff creative 4874 manuals
Add to My Manuals
Save this manual to your list of manuals |
Page 24 highlights
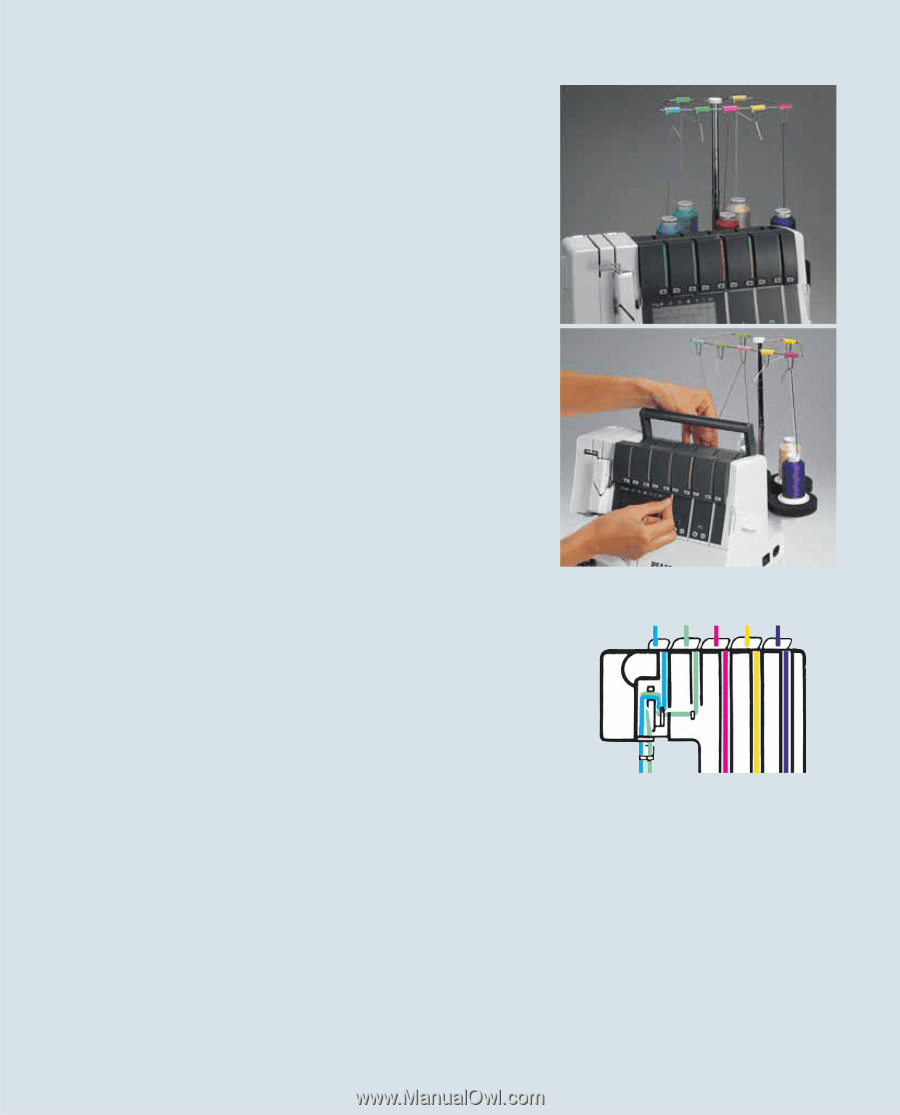
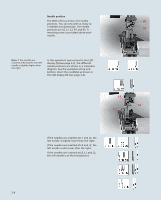
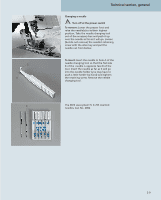
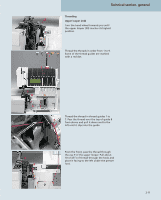
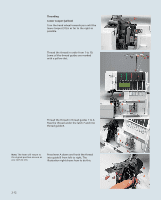
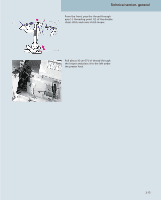
Threading (stitch programs 01-20) Thread guides Slide the thread stand (49) backwards and pull the thread guide (44) up as far as it will go. Place the spools on the spool pins (50). For notes on the spool net, the thread run-off disc, the foam pads and the cone holders, please see page 2-5. Thread the threads from the back to the front through the thread guides (43) as indicated by the color codes. Lift the carrying handle (3). Thread the threads underneath the carrying handle into the rear thread guides (58). To do this, pull the thread down with both hands until it slips under the thread guide. Pass the thread between the tension discs and pull it down so that it is between the tension discs. Fold the carrying handle forwards. Note: The thread tensions for threading are shown in the LCD display (9) (see page 3-5). The sticker behind the front cover is also provided to make threading easier. Thread single threads in order from 1 to 5. The open thread guides make threading easy. To ease the task further, use the tweezers located behind the swivel table. Remove the trim catcher and open the front cover. 4512 3 2-10
-
 1
1 -
2
-
3
-
4
-
5
-
6
-
7
-
8
-
9
-
10
-
11
-
12
-
13
-
14
-
15
-
16
-
17
-
18
-
 19
19 -
 20
20 -
 21
21 -
 22
22 -
 23
23 -
 24
24 -
 25
25 -
 26
26 -
 27
27 -
 28
28 -
 29
29 -
30
-
31
-
32
-
33
-
34
-
35
-
36
-
37
-
38
-
39
-
40
-
41
-
42
-
43
-
44
-
45
-
46
-
47
-
48
-
49
-
50
-
51
-
52
-
53
-
54
-
55
-
56
-
57
-
58
-
59
-
60
-
61
-
62
-
63
-
64
-
65
-
66
-
67
-
68
-
69
-
70
-
71
-
72
-
73
-
74
-
75
-
76
-
77
-
78
-
79
-
80
-
81
-
82
-
83
-
84
-
85
-
86
-
87
-
88
-
89
-
90
-
91
-
92
-
93
-
94
-
95
-
96
-
97
-
98
-
99
-
100
-
101
-
102
-
103
-
104
-
105
-
106
-
107
-
108
-
109
-
110
-
111
-
112
-
113
-
114
-
115
-
116
-
117
-
118
-
119
-
120
-
121
-
122
-
123
-
124
-
125
-
126
-
127
-
128
-
129
-
130
-
131
-
132
-
133
-
134
-
135
-
136
-
137
-
138
-
139
-
140
-
141
-
142
-
143
-
144
 |
 |