Pfaff creative icon User Guide - Page 14
Storing a Needle Plate, Embroidery Unit, Embroidery unit release button underside
|
View all Pfaff creative icon manuals
Add to My Manuals
Save this manual to your list of manuals |
Page 14 highlights
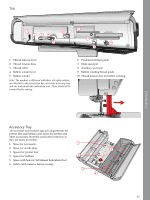
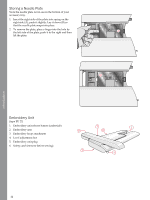
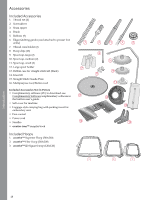
Storing a Needle Plate Store the needle plate not in use in the bottom of your accessory tray. 1. Insert the right side of the plate into spring on the right side (A), push it slightly. Lay it down (B) so that the needle plate snaps into place. 2. To remove the plate, place a finger into the hole by A the left side of the plate, push it to the right and then lift the plate. B Embroidery Unit (type EU 22) 1. Embroidery unit release button (underside) 2. Embroidery arm 3. Embroidery hoop attachment 4. Level adjustment feet 5. Embroidery unit plug 6. Safety catch (remove before sewing) 3 5 2 6 1 4 Introduction 14
-
 1
1 -
2
-
3
-
4
-
5
-
6
-
7
-
8
-
 9
9 -
 10
10 -
 11
11 -
 12
12 -
 13
13 -
 14
14 -
 15
15 -
 16
16 -
 17
17 -
 18
18 -
 19
19 -
20
-
21
-
22
-
23
-
24
-
25
-
26
-
27
-
28
-
29
-
30
-
31
-
32
-
33
-
34
-
35
-
36
-
37
-
38
-
39
-
40
-
41
-
42
-
43
-
44
-
45
-
46
-
47
-
48
-
49
-
50
-
51
-
52
-
53
-
54
-
55
-
56
-
57
-
58
-
59
-
60
-
61
-
62
-
63
-
64
-
65
-
66
-
67
-
68
-
69
-
70
-
71
-
72
-
73
-
74
-
75
-
76
-
77
-
78
-
79
-
80
-
81
-
82
-
83
-
84
-
85
-
86
-
87
-
88
-
89
-
90
-
91
-
92
-
93
-
94
-
95
-
96
-
97
-
98
-
99
-
100
-
101
-
102
-
103
-
104
-
105
-
106
-
107
-
108
-
109
-
110
-
111
-
112
-
113
-
114
-
115
-
116
-
117
-
118
-
119
-
120
-
121
-
122
-
123
-
124
-
125
-
126
-
127
-
128
-
129
-
130
-
131
-
132
-
133
-
134
-
135
-
136
-
137
-
138
-
139
-
140
-
141
-
142
-
143
-
144
-
145
-
146
-
147
-
148
-
149
-
150
-
151
-
152
-
153
-
154
-
155
-
156
-
157
-
158
-
159
-
160
-
161
-
162
-
163
-
164
-
165
-
166
-
167
-
168
-
169
-
170
-
171
-
172
-
173
-
174
-
175
-
176
-
177
-
178
-
179
-
180
-
181
-
182
-
183
-
184
-
185
-
186
-
187
-
188
-
189
-
190
-
191
-
192
-
193
-
194
-
195
-
196
-
197
-
198
-
199
-
200
-
201
-
202
-
203
-
204
-
205
-
206
-
207
-
208
-
209
-
210
-
211
 |
 |
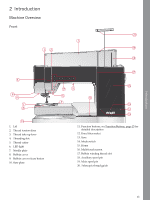
Introduction
Storing a Needle Plate
Store the needle plate not in use in the bottom of your
accessory tray.
1.
Insert the right side of the plate into spring on the
right side (A), push it slightly. Lay it down (B) so
that the needle plate snaps into place.
2.
To remove the plate, place a finger into the hole by
the left side of the plate, push it to the right and then
lift the plate.
Embroidery Unit
(type EU 22)
1.
Embroidery unit release button (underside)
2.
Embroidery arm
3.
Embroidery hoop attachment
4.
Level adjustment feet
5.
Embroidery unit plug
6.
Safety catch (remove before sewing)
B
A
1
2
3
4
5
6
14