Pfaff creative icon User Guide - Page 50
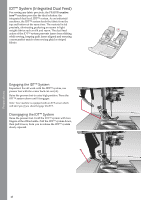
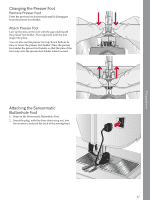
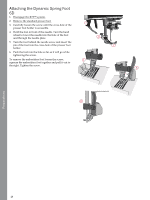
Embroidery Preparations, Embroidery Unit, Embroidery Hoop Overview, Dynamic Spring Foot 6D
|
View all Pfaff creative icon manuals
Add to My Manuals
Save this manual to your list of manuals |
Page 50 highlights
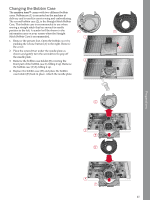
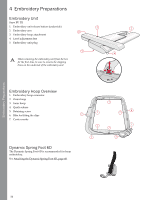
Embroidery Preparations 4 Embroidery Preparations Embroidery Unit (type EU 22) 1. Embroidery unit release button (underside) 3 5 2. Embroidery arm 2 3. Embroidery hoop attachment 4. Level adjustment feet 5. Embroidery unit plug 1 4 When removing the embroidery unit from the box for the first time, be sure to remove the shipping brace on the underside of the embroidery unit. Embroidery Hoop Overview 1. Embroidery hoop connector 2. Outer hoop 3. Inner hoop 4. Quick release 5. Retaining screw 6. Ribs for fitting the clips 7. Center marks Dynamic Spring Foot 6D The Dynamic Spring Foot 6D is recommended for hoop embroidery. See Attaching the Dynamic Spring Foot 6D, page 48. 50
-
 1
1 -
2
-
3
-
4
-
5
-
6
-
7
-
8
-
9
-
10
-
11
-
12
-
13
-
14
-
15
-
16
-
17
-
18
-
19
-
20
-
21
-
22
-
23
-
24
-
25
-
26
-
27
-
28
-
29
-
30
-
31
-
32
-
33
-
34
-
35
-
36
-
37
-
38
-
39
-
40
-
41
-
42
-
43
-
44
-
 45
45 -
 46
46 -
 47
47 -
 48
48 -
 49
49 -
 50
50 -
 51
51 -
 52
52 -
 53
53 -
 54
54 -
 55
55 -
56
-
57
-
58
-
59
-
60
-
61
-
62
-
63
-
64
-
65
-
66
-
67
-
68
-
69
-
70
-
71
-
72
-
73
-
74
-
75
-
76
-
77
-
78
-
79
-
80
-
81
-
82
-
83
-
84
-
85
-
86
-
87
-
88
-
89
-
90
-
91
-
92
-
93
-
94
-
95
-
96
-
97
-
98
-
99
-
100
-
101
-
102
-
103
-
104
-
105
-
106
-
107
-
108
-
109
-
110
-
111
-
112
-
113
-
114
-
115
-
116
-
117
-
118
-
119
-
120
-
121
-
122
-
123
-
124
-
125
-
126
-
127
-
128
-
129
-
130
-
131
-
132
-
133
-
134
-
135
-
136
-
137
-
138
-
139
-
140
-
141
-
142
-
143
-
144
-
145
-
146
-
147
-
148
-
149
-
150
-
151
-
152
-
153
-
154
-
155
-
156
-
157
-
158
-
159
-
160
-
161
-
162
-
163
-
164
-
165
-
166
-
167
-
168
-
169
-
170
-
171
-
172
-
173
-
174
-
175
-
176
-
177
-
178
-
179
-
180
-
181
-
182
-
183
-
184
-
185
-
186
-
187
-
188
-
189
-
190
-
191
-
192
-
193
-
194
-
195
-
196
-
197
-
198
-
199
-
200
-
201
-
202
-
203
-
204
-
205
-
206
-
207
-
208
-
209
-
210
-
211
 |
 |
Embroidery Preparations
4 Embroidery Preparations
Embroidery Unit
(type EU 22)
1.
Embroidery unit release button (underside)
2.
Embroidery arm
3.
Embroidery hoop attachment
4.
Level adjustment feet
5.
Embroidery unit plug
When removing the embroidery unit from the box
for the first time, be sure to remove the shipping
brace on the underside of the embroidery unit.
Embroidery Hoop Overview
1.
Embroidery hoop connector
2.
Outer hoop
3.
Inner hoop
4.
Quick release
5.
Retaining screw
6.
Ribs for fitting the clips
7.
Center marks
Dynamic Spring Foot 6D
The Dynamic Spring Foot 6D is recommended for hoop
embroidery.
See Attaching the Dynamic Spring Foot 6D, page 48.
1
2
3
4
5
50