Pfaff creative icon User Guide - Page 142
Precise Positioning, Getting Started with Precise Positioning
|
View all Pfaff creative icon manuals
Add to My Manuals
Save this manual to your list of manuals |
Page 142 highlights
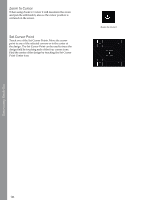
Precise Positioning Use Precise Positioning to place a design on an exact location on your fabric without re-hooping. It can also be useful when you want to embroider a design to exactly match a specific spot on your project or next to a previously embroidered design. Embroidery Stitch-Out 1. Precise Positioning Window 2. Zoom to All 3. Zoom to Hoop 4. Zoom to Cursor 5. Zoom Slider 6. Settings 7. Select a Locking Point on Screen 8. Set Matching Point on Screen 9. Rotate Design on Fabric 10. Move Locked Point on Fabric 11. Cancel 12. OK 13. Full View 14. Set Cursor Point 15. Control Wheel Getting Started with Precise Positioning Touch to open the Precise Positioning window. To move your design in the hoop without selecting a specific locking point, touch and move your design until you are satisfied with the placement. You can also touch the Set Cursor Point Center to quickly find the center of your design and move the design to the center of your hoop if needed. 142
-
 1
1 -
2
-
3
-
4
-
5
-
6
-
7
-
8
-
9
-
10
-
11
-
12
-
13
-
14
-
15
-
16
-
17
-
18
-
19
-
20
-
21
-
22
-
23
-
24
-
25
-
26
-
27
-
28
-
29
-
30
-
31
-
32
-
33
-
34
-
35
-
36
-
37
-
38
-
39
-
40
-
41
-
42
-
43
-
44
-
45
-
46
-
47
-
48
-
49
-
50
-
51
-
52
-
53
-
54
-
55
-
56
-
57
-
58
-
59
-
60
-
61
-
62
-
63
-
64
-
65
-
66
-
67
-
68
-
69
-
70
-
71
-
72
-
73
-
74
-
75
-
76
-
77
-
78
-
79
-
80
-
81
-
82
-
83
-
84
-
85
-
86
-
87
-
88
-
89
-
90
-
91
-
92
-
93
-
94
-
95
-
96
-
97
-
98
-
99
-
100
-
101
-
102
-
103
-
104
-
105
-
106
-
107
-
108
-
109
-
110
-
111
-
112
-
113
-
114
-
115
-
116
-
117
-
118
-
119
-
120
-
121
-
122
-
123
-
124
-
125
-
126
-
127
-
128
-
129
-
130
-
131
-
132
-
133
-
134
-
135
-
136
-
 137
137 -
 138
138 -
 139
139 -
 140
140 -
 141
141 -
 142
142 -
 143
143 -
 144
144 -
 145
145 -
 146
146 -
 147
147 -
148
-
149
-
150
-
151
-
152
-
153
-
154
-
155
-
156
-
157
-
158
-
159
-
160
-
161
-
162
-
163
-
164
-
165
-
166
-
167
-
168
-
169
-
170
-
171
-
172
-
173
-
174
-
175
-
176
-
177
-
178
-
179
-
180
-
181
-
182
-
183
-
184
-
185
-
186
-
187
-
188
-
189
-
190
-
191
-
192
-
193
-
194
-
195
-
196
-
197
-
198
-
199
-
200
-
201
-
202
-
203
-
204
-
205
-
206
-
207
-
208
-
209
-
210
-
211
 |
 |