Pfaff creative icon User Guide - Page 143
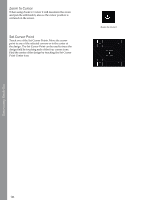
Precise Positioning Exercise, Select a Locking Point on Screen, Move Locked Point on Fabric
|
View all Pfaff creative icon manuals
Add to My Manuals
Save this manual to your list of manuals |
Page 143 highlights
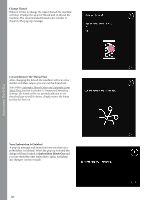
Precise Positioning Exercise 1. Select a Locking Point on Screen Touch number 1 to select a locking point. Move the green cursor with your finger to the point in the design on your screen that you want to match to a point on your fabric/previously stitched design. Fine tune with the arrows in the Control Wheel. If you want to place the locking point in a corner or center of the design, touch Zoom to Cursor to maximize the zoom and pan the embroidery area for exact position of the cursor. 2. Move Locked Point on Fabric Touch number 2. The black cursor will be locked to the design. It will change color from green to black with a ring around the center of the locking point. Touch and move with your finger on the screen to position your design exactly where you want it to match on the fabric or to the previously stitched design. Use the arrows in the Control Wheel to fine tune. Watch the hoop until the needle is exactly where you want it to be on the fabric or the previously stitched design. The locking point on the fabric shows the position of the needle in the design. Note: If satisfied with the placement of your design, touch OK to close Precise Positioning. If you also need to adjust the angle of the design, continue with step 3. 3. Set Matching Point on Screen Touch number 3 to select another matching point on the design to match a second position on the fabric or previously stitched design. Touch and move the green cursor on the screen to where you would like the matching point to be in your design. Fine tune with the arrows in the control wheel. Use Zoom to Cursor to maximize the zoom and pan the embroidery area for exact position of the cursor. 4. Rotate Design on Fabric Touch number 4. The touch function rotate is automatically selected. Touch and move using your finger on the screen, or use the arrows in the Control Wheel, to rotate the design until the needle is exactly where you want it to be on the fabric or the previously stitched design. Touch OK to close Precise Positioning. Select a Locking Point on Screen Move Locked Point on Fabric Set Matching Point on Screen Rotate Design on Fabric Embroidery Stitch-Out 143
-
 1
1 -
2
-
3
-
4
-
5
-
6
-
7
-
8
-
9
-
10
-
11
-
12
-
13
-
14
-
15
-
16
-
17
-
18
-
19
-
20
-
21
-
22
-
23
-
24
-
25
-
26
-
27
-
28
-
29
-
30
-
31
-
32
-
33
-
34
-
35
-
36
-
37
-
38
-
39
-
40
-
41
-
42
-
43
-
44
-
45
-
46
-
47
-
48
-
49
-
50
-
51
-
52
-
53
-
54
-
55
-
56
-
57
-
58
-
59
-
60
-
61
-
62
-
63
-
64
-
65
-
66
-
67
-
68
-
69
-
70
-
71
-
72
-
73
-
74
-
75
-
76
-
77
-
78
-
79
-
80
-
81
-
82
-
83
-
84
-
85
-
86
-
87
-
88
-
89
-
90
-
91
-
92
-
93
-
94
-
95
-
96
-
97
-
98
-
99
-
100
-
101
-
102
-
103
-
104
-
105
-
106
-
107
-
108
-
109
-
110
-
111
-
112
-
113
-
114
-
115
-
116
-
117
-
118
-
119
-
120
-
121
-
122
-
123
-
124
-
125
-
126
-
127
-
128
-
129
-
130
-
131
-
132
-
133
-
134
-
135
-
136
-
137
-
 138
138 -
 139
139 -
 140
140 -
 141
141 -
 142
142 -
 143
143 -
 144
144 -
 145
145 -
 146
146 -
 147
147 -
 148
148 -
149
-
150
-
151
-
152
-
153
-
154
-
155
-
156
-
157
-
158
-
159
-
160
-
161
-
162
-
163
-
164
-
165
-
166
-
167
-
168
-
169
-
170
-
171
-
172
-
173
-
174
-
175
-
176
-
177
-
178
-
179
-
180
-
181
-
182
-
183
-
184
-
185
-
186
-
187
-
188
-
189
-
190
-
191
-
192
-
193
-
194
-
195
-
196
-
197
-
198
-
199
-
200
-
201
-
202
-
203
-
204
-
205
-
206
-
207
-
208
-
209
-
210
-
211
 |
 |