Pfaff creative icon User Guide - Page 45
Changing the Bobbin Case, Stitch Bobbin Case is recommended.
|
View all Pfaff creative icon manuals
Add to My Manuals
Save this manual to your list of manuals |
Page 45 highlights
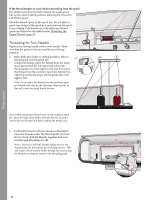
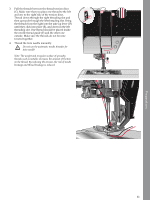
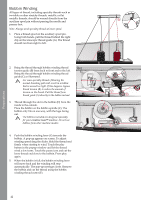
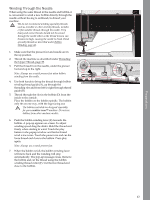
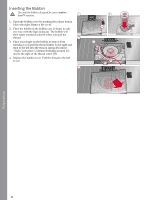
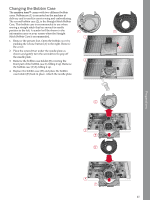
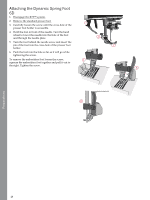
Changing the Bobbin Case The creative icon™ comes with two different bobbin cases. Bobbincase (1) is mounted on the machine at delivery and is used for most sewing and embroidering. The second bobbin case (2), is the Straight Stitch Bobbin Case. This bobbin case is recommended to use when sewing a straight stitch that has moved its needle position to the left. A symbol will be shown in the 1 2 information area on your screen when the Straight Stitch Bobbin Case is recommended. 1. Remove the presser foot. Open the bobbin cover by pushing the release button (A) to the right. Remove the cover. 2. Place the screwdriver under the needle plate as shown and gently turn the screwdriver to pop off the needle plate. 3. Remove the bobbin case holder (B) covering the front part of the bobbin case by lifting it up. Remove the bobbin case (C) by lifting it up. 4. Replace the bobbin case (D) and place the bobbin case holder (E) back in place. Attach the needle plate. C 3 B D Preparations 4 E 45
-
 1
1 -
2
-
3
-
4
-
5
-
6
-
7
-
8
-
9
-
10
-
11
-
12
-
13
-
14
-
15
-
16
-
17
-
18
-
19
-
20
-
21
-
22
-
23
-
24
-
25
-
26
-
27
-
28
-
29
-
30
-
31
-
32
-
33
-
34
-
35
-
36
-
37
-
38
-
39
-
 40
40 -
 41
41 -
 42
42 -
 43
43 -
 44
44 -
 45
45 -
 46
46 -
 47
47 -
 48
48 -
 49
49 -
 50
50 -
51
-
52
-
53
-
54
-
55
-
56
-
57
-
58
-
59
-
60
-
61
-
62
-
63
-
64
-
65
-
66
-
67
-
68
-
69
-
70
-
71
-
72
-
73
-
74
-
75
-
76
-
77
-
78
-
79
-
80
-
81
-
82
-
83
-
84
-
85
-
86
-
87
-
88
-
89
-
90
-
91
-
92
-
93
-
94
-
95
-
96
-
97
-
98
-
99
-
100
-
101
-
102
-
103
-
104
-
105
-
106
-
107
-
108
-
109
-
110
-
111
-
112
-
113
-
114
-
115
-
116
-
117
-
118
-
119
-
120
-
121
-
122
-
123
-
124
-
125
-
126
-
127
-
128
-
129
-
130
-
131
-
132
-
133
-
134
-
135
-
136
-
137
-
138
-
139
-
140
-
141
-
142
-
143
-
144
-
145
-
146
-
147
-
148
-
149
-
150
-
151
-
152
-
153
-
154
-
155
-
156
-
157
-
158
-
159
-
160
-
161
-
162
-
163
-
164
-
165
-
166
-
167
-
168
-
169
-
170
-
171
-
172
-
173
-
174
-
175
-
176
-
177
-
178
-
179
-
180
-
181
-
182
-
183
-
184
-
185
-
186
-
187
-
188
-
189
-
190
-
191
-
192
-
193
-
194
-
195
-
196
-
197
-
198
-
199
-
200
-
201
-
202
-
203
-
204
-
205
-
206
-
207
-
208
-
209
-
210
-
211
 |
 |