Pfaff creative icon User Guide - Page 15
Function Buttons, Presser Foot Up and Extra Lift, Presser Foot Down and Pivot
|
View all Pfaff creative icon manuals
Add to My Manuals
Save this manual to your list of manuals |
Page 15 highlights
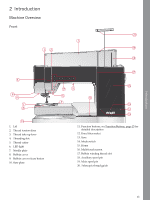
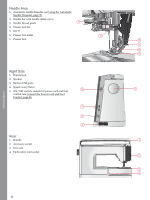
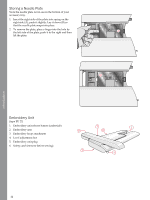
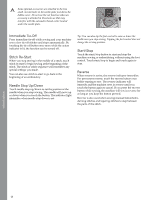
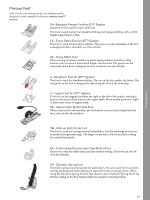
Function Buttons 1 2 3 4 5 6 7 Introduction 8 9 10 1. Presser foot up and extra lift 2. Presser foot down and pivot 3. Automatic needle threader 4. Cut function 5. Immediate tie-off 6. Stitch restart 7. Needle stop up/down 8. Start/stop 9. Reverse 10. Indication Light Presser Foot Up and Extra Lift Touch the presser foot up button once to raise the presser foot. Touch again and the presser foot will raise to extra lift position, and the feed teeth will be automatically lowered to make it easier to get heavy fabric under the presser foot. In embroidery mode, the extra lift makes it easier to insert or remove the hoop. Presser Foot Down and Pivot The presser foot is lowered automatically when you start sewing. To lower the presser foot before starting to sew, touch the presser foot down and pivot button. The presser foot will be completely lowered and the machine firmly holds the fabric. Touch presser foot down again to go to pivot position. In embroidery mode touch presser foot down to lower the presser foot to embroidery position. Automatic Needle Threader See Using the Automatic Needle Threader, page 38 to learn how to place the thread for automatic needle threading. When the thread is in place, touch this button to thread the needle automatically. To prevent damage to the automatic needle threader, needle, presser foot or other attached accessories, read the instructions carefully on how to use the automatic needle threader before using it. Cut Function Touch the cut function button and your machine cuts the upper and bobbin threads and raises the presser foot and needle. To cut threads at the end of a stitch or stitch sequence, touch the cut function button while sewing. The indicator light will intensify, alerting you that a cut is requested. When the stitch or stitch sequence is completed, your machine cuts the upper and bobbin threads and raises the presser foot and needle. Note: If automatic presser foot lift has been deselected in temporary session settings the presser foot will not be raised when using the cut function. Touch the cut function button when embroidering and your machine cuts the upper and bobbin threads instantly. 15
-
 1
1 -
2
-
3
-
4
-
5
-
6
-
7
-
8
-
9
-
 10
10 -
 11
11 -
 12
12 -
 13
13 -
 14
14 -
 15
15 -
 16
16 -
 17
17 -
 18
18 -
 19
19 -
 20
20 -
21
-
22
-
23
-
24
-
25
-
26
-
27
-
28
-
29
-
30
-
31
-
32
-
33
-
34
-
35
-
36
-
37
-
38
-
39
-
40
-
41
-
42
-
43
-
44
-
45
-
46
-
47
-
48
-
49
-
50
-
51
-
52
-
53
-
54
-
55
-
56
-
57
-
58
-
59
-
60
-
61
-
62
-
63
-
64
-
65
-
66
-
67
-
68
-
69
-
70
-
71
-
72
-
73
-
74
-
75
-
76
-
77
-
78
-
79
-
80
-
81
-
82
-
83
-
84
-
85
-
86
-
87
-
88
-
89
-
90
-
91
-
92
-
93
-
94
-
95
-
96
-
97
-
98
-
99
-
100
-
101
-
102
-
103
-
104
-
105
-
106
-
107
-
108
-
109
-
110
-
111
-
112
-
113
-
114
-
115
-
116
-
117
-
118
-
119
-
120
-
121
-
122
-
123
-
124
-
125
-
126
-
127
-
128
-
129
-
130
-
131
-
132
-
133
-
134
-
135
-
136
-
137
-
138
-
139
-
140
-
141
-
142
-
143
-
144
-
145
-
146
-
147
-
148
-
149
-
150
-
151
-
152
-
153
-
154
-
155
-
156
-
157
-
158
-
159
-
160
-
161
-
162
-
163
-
164
-
165
-
166
-
167
-
168
-
169
-
170
-
171
-
172
-
173
-
174
-
175
-
176
-
177
-
178
-
179
-
180
-
181
-
182
-
183
-
184
-
185
-
186
-
187
-
188
-
189
-
190
-
191
-
192
-
193
-
194
-
195
-
196
-
197
-
198
-
199
-
200
-
201
-
202
-
203
-
204
-
205
-
206
-
207
-
208
-
209
-
210
-
211
 |
 |