Pfaff creative icon User Guide - Page 44
Inserting the Bobbin, creative, icon™
|
View all Pfaff creative icon manuals
Add to My Manuals
Save this manual to your list of manuals |
Page 44 highlights
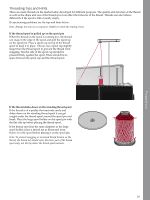
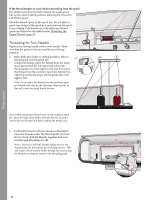
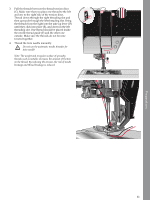
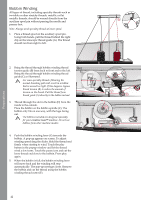
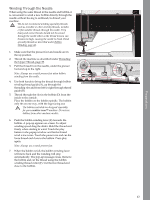
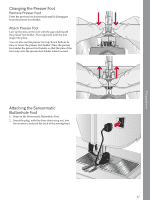
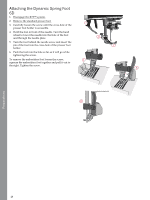
Inserting the Bobbin Use only the bobbins designed for your creative icon™ machine. 1 1. Open the bobbin cover by pushing the release button (A) to the right. Remove the cover. 2. Place the bobbin in the bobbin case. It drops in only one way with the logo facing up. The bobbin will then rotate counterclockwise when you pull the thread. 3 3. Place your finger on the bobbin to keep it from turning as you pull the thread firmly to the right and then to the left into the tension spring (B) until it "clicks" into place. Continue threading around (C) and to the right of the thread cutter (D). 4. Replace the bobbin cover. Pull the thread to the left to cut. 4 2 A C B D Preparations 44
-
 1
1 -
2
-
3
-
4
-
5
-
6
-
7
-
8
-
9
-
10
-
11
-
12
-
13
-
14
-
15
-
16
-
17
-
18
-
19
-
20
-
21
-
22
-
23
-
24
-
25
-
26
-
27
-
28
-
29
-
30
-
31
-
32
-
33
-
34
-
35
-
36
-
37
-
38
-
 39
39 -
 40
40 -
 41
41 -
 42
42 -
 43
43 -
 44
44 -
 45
45 -
 46
46 -
 47
47 -
 48
48 -
 49
49 -
50
-
51
-
52
-
53
-
54
-
55
-
56
-
57
-
58
-
59
-
60
-
61
-
62
-
63
-
64
-
65
-
66
-
67
-
68
-
69
-
70
-
71
-
72
-
73
-
74
-
75
-
76
-
77
-
78
-
79
-
80
-
81
-
82
-
83
-
84
-
85
-
86
-
87
-
88
-
89
-
90
-
91
-
92
-
93
-
94
-
95
-
96
-
97
-
98
-
99
-
100
-
101
-
102
-
103
-
104
-
105
-
106
-
107
-
108
-
109
-
110
-
111
-
112
-
113
-
114
-
115
-
116
-
117
-
118
-
119
-
120
-
121
-
122
-
123
-
124
-
125
-
126
-
127
-
128
-
129
-
130
-
131
-
132
-
133
-
134
-
135
-
136
-
137
-
138
-
139
-
140
-
141
-
142
-
143
-
144
-
145
-
146
-
147
-
148
-
149
-
150
-
151
-
152
-
153
-
154
-
155
-
156
-
157
-
158
-
159
-
160
-
161
-
162
-
163
-
164
-
165
-
166
-
167
-
168
-
169
-
170
-
171
-
172
-
173
-
174
-
175
-
176
-
177
-
178
-
179
-
180
-
181
-
182
-
183
-
184
-
185
-
186
-
187
-
188
-
189
-
190
-
191
-
192
-
193
-
194
-
195
-
196
-
197
-
198
-
199
-
200
-
201
-
202
-
203
-
204
-
205
-
206
-
207
-
208
-
209
-
210
-
211
 |
 |
Preparations
Inserting the Bobbin
Use only the bobbins designed for your
creative
icon™
machine.
1.
Open the bobbin cover by pushing the release button
(A) to the right. Remove the cover.
2.
Place the bobbin in the bobbin case. It drops in only
one way with the logo facing up. The bobbin will
then rotate counterclockwise when you pull the
thread.
3.
Place your finger on the bobbin to keep it from
turning as you pull the thread firmly to the right and
then to the left into the tension spring (B) until it
“clicks” into place. Continue threading around (C)
and to the right of the thread cutter (D).
4.
Replace the bobbin cover. Pull the thread to the left
to cut.
1
2
3
4
A
B
C
D
44