Pfaff creative icon User Guide - Page 48
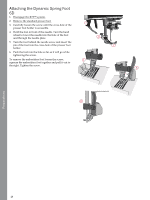
Attaching the Dynamic Spring Foot 6D, Push the foot into the hole as far as it will go while
|
View all Pfaff creative icon manuals
Add to My Manuals
Save this manual to your list of manuals |
Page 48 highlights
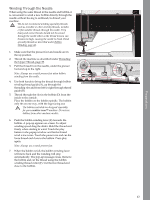
Attaching the Dynamic Spring Foot 6D 1. Disengage the IDT™ system. 2. Remove the standard presser foot. 1 3. Carefully loosen the screw until the cross-hole of the presser foot holder is accessible. 4. Hold the foot in front of the needle. Turn the hand wheel to lower the needle into the hole of the foot and through the needle plate. 3 5. Turn the foot behind the needle screw and insert the pin of the foot into the cross-hole of the presser foot 2 holder. 6. Push the foot into the hole as far as it will go while tightening the screw. To remove the embroidery foot loosen the screw, 4 squeeze the embroidery foot together and pull it out to the right. Tighten the screw. 5 6 Preparations 48
-
 1
1 -
2
-
3
-
4
-
5
-
6
-
7
-
8
-
9
-
10
-
11
-
12
-
13
-
14
-
15
-
16
-
17
-
18
-
19
-
20
-
21
-
22
-
23
-
24
-
25
-
26
-
27
-
28
-
29
-
30
-
31
-
32
-
33
-
34
-
35
-
36
-
37
-
38
-
39
-
40
-
41
-
42
-
 43
43 -
 44
44 -
 45
45 -
 46
46 -
 47
47 -
 48
48 -
 49
49 -
 50
50 -
 51
51 -
 52
52 -
 53
53 -
54
-
55
-
56
-
57
-
58
-
59
-
60
-
61
-
62
-
63
-
64
-
65
-
66
-
67
-
68
-
69
-
70
-
71
-
72
-
73
-
74
-
75
-
76
-
77
-
78
-
79
-
80
-
81
-
82
-
83
-
84
-
85
-
86
-
87
-
88
-
89
-
90
-
91
-
92
-
93
-
94
-
95
-
96
-
97
-
98
-
99
-
100
-
101
-
102
-
103
-
104
-
105
-
106
-
107
-
108
-
109
-
110
-
111
-
112
-
113
-
114
-
115
-
116
-
117
-
118
-
119
-
120
-
121
-
122
-
123
-
124
-
125
-
126
-
127
-
128
-
129
-
130
-
131
-
132
-
133
-
134
-
135
-
136
-
137
-
138
-
139
-
140
-
141
-
142
-
143
-
144
-
145
-
146
-
147
-
148
-
149
-
150
-
151
-
152
-
153
-
154
-
155
-
156
-
157
-
158
-
159
-
160
-
161
-
162
-
163
-
164
-
165
-
166
-
167
-
168
-
169
-
170
-
171
-
172
-
173
-
174
-
175
-
176
-
177
-
178
-
179
-
180
-
181
-
182
-
183
-
184
-
185
-
186
-
187
-
188
-
189
-
190
-
191
-
192
-
193
-
194
-
195
-
196
-
197
-
198
-
199
-
200
-
201
-
202
-
203
-
204
-
205
-
206
-
207
-
208
-
209
-
210
-
211
 |
 |
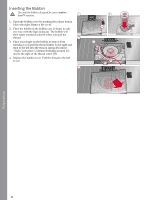
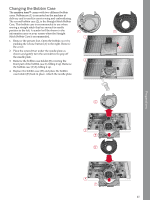
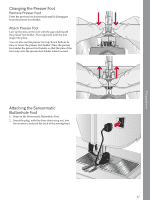
Preparations
Attaching the Dynamic Spring Foot
6D
1.
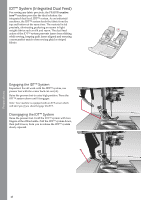
Disengage the IDT™ system.
2.
Remove the standard presser foot.
3.
Carefully loosen the screw until the cross-hole of the
presser foot holder is accessible.
4.
Hold the foot in front of the needle. Turn the hand
wheel to lower the needle into the hole of the foot
and through the needle plate.
5.
Turn the foot behind the needle screw and insert the
pin of the foot into the cross-hole of the presser foot
holder.
6.
Push the foot into the hole as far as it will go while
tightening the screw.
To remove the embroidery foot loosen the screw,
squeeze the embroidery foot together and pull it out to
the right. Tighten the screw.
1
2
3
4
5
6
48