Pioneer AVIC-Z140BH Owner's Manual - Page 176
Selecting the video for rear, display, Adjusting the picture, Customizing preferences
 |
View all Pioneer AVIC-Z140BH manuals
Add to My Manuals
Save this manual to your list of manuals |
Page 176 highlights
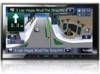
Chapter 31 Customizing preferences Selecting the video for rear display You can choose either to show the same image as the front screen or to show the selected source on the rear display. 1 Display the AV operation screen. = For details of the operations, refer to Displaying the AV operation screen on page 74. 2 Tap on the left edge of the screen. p The appearance of this key changes according to the current setting. p While the tuner is receiving an emergency announcement, traffic announcement, or news program, the current setting cannot be changed. Each touch of changes the settings as follows: ! Mirror AV: The video on the front screen of the navigation unit is output to the rear display ! DISC: The video and sound of the DVDs are output to the rear display ! iPod: The video and sound of the iPod are output to the rear display ! AV1: The video and sound of AV1 are output to the rear display ! AV2: The video and sound of AV2 are output to the rear display p When "Mirror AV" is selected, the following restrictions are applied to rear display. - When selecting "Rear View" in the map display, nothing is displayed. - All sounds cannot be output for rear display. - When playing back video files on the external storage device (USB, SD), the video image is not output. p When "DISC" is selected, the following restriction is applied to rear display. - When a CD or MP3/WMA/AAC disc is set in the built-in DVD drive, only the sound is output. p When "iPod" is selected, the following restriction is applied to rear display. - The video image and sound are output only when the corresponding setting on "AV1 Input" is "iPod". p When "AV1" or "AV2" is selected, the following restrictions are applied to rear display. - The video image and sound are output only when "AV1" or "AV2" has both video and sound. - The video image and sound are output only when the corresponding setting on "AV1 Input" or "AV2 Input" are "Video". Adjusting the picture CAUTION For safety reasons, you cannot use some of these navigation functions while your vehicle is in motion. To enable these functions, you must stop in a safe place and apply the parking brake. Refer to Important Information for the User (a separate manual). You can adjust the picture for each source and rear view camera. 1 Press and hold the MODE button. The "Picture Adjustment" screen appears. 2 Touch [+] or [-] to adjust the desired item. ! Brightness: Adjusts the black intensity. ! Contrast: Adjusts the contrast. ! Color: Adjusts the color saturation. ! Color Temp.: Adjusts the tone of color (which color is emphasized, red or blue). ! Dimmer: Adjusts the brightness of display. p Touching [Camera] switches to the picture adjustment screen for the rear view camera. 176 En
-
 1
1 -
2
-
3
-
4
-
5
-
6
-
7
-
8
-
9
-
10
-
11
-
12
-
13
-
14
-
15
-
16
-
17
-
18
-
19
-
20
-
21
-
22
-
23
-
24
-
25
-
26
-
27
-
28
-
29
-
30
-
31
-
32
-
33
-
34
-
35
-
36
-
37
-
38
-
39
-
40
-
41
-
42
-
43
-
44
-
45
-
46
-
47
-
48
-
49
-
50
-
51
-
52
-
53
-
54
-
55
-
56
-
57
-
58
-
59
-
60
-
61
-
62
-
63
-
64
-
65
-
66
-
67
-
68
-
69
-
70
-
71
-
72
-
73
-
74
-
75
-
76
-
77
-
78
-
79
-
80
-
81
-
82
-
83
-
84
-
85
-
86
-
87
-
88
-
89
-
90
-
91
-
92
-
93
-
94
-
95
-
96
-
97
-
98
-
99
-
100
-
101
-
102
-
103
-
104
-
105
-
106
-
107
-
108
-
109
-
110
-
111
-
112
-
113
-
114
-
115
-
116
-
117
-
118
-
119
-
120
-
121
-
122
-
123
-
124
-
125
-
126
-
127
-
128
-
129
-
130
-
131
-
132
-
133
-
134
-
135
-
136
-
137
-
138
-
139
-
140
-
141
-
142
-
143
-
144
-
145
-
146
-
147
-
148
-
149
-
150
-
151
-
152
-
153
-
154
-
155
-
156
-
157
-
158
-
159
-
160
-
161
-
162
-
163
-
164
-
165
-
166
-
167
-
168
-
169
-
170
-
 171
171 -
 172
172 -
 173
173 -
 174
174 -
 175
175 -
 176
176 -
 177
177 -
 178
178 -
 179
179 -
 180
180 -
 181
181 -
182
-
183
-
184
-
185
-
186
-
187
-
188
-
189
-
190
-
191
-
192
-
193
-
194
-
195
-
196
-
197
-
198
-
199
-
200
-
201
-
202
-
203
-
204
-
205
-
206
-
207
-
208
-
209
-
210
-
211
-
212
-
213
-
214
-
215
-
216
-
217
-
218
-
219
-
220
-
221
-
222
-
223
-
224
-
225
-
226
-
227
-
228
-
229
-
230
-
231
-
232
-
233
-
234
-
235
-
236
-
237
-
238
-
239
-
240
 |
 |