Pioneer AVIC-Z140BH Owner's Manual - Page 177
Displaying the screen for, AV system settings, Customizing preferences - sirius radio
 |
View all Pioneer AVIC-Z140BH manuals
Add to My Manuals
Save this manual to your list of manuals |
Page 177 highlights
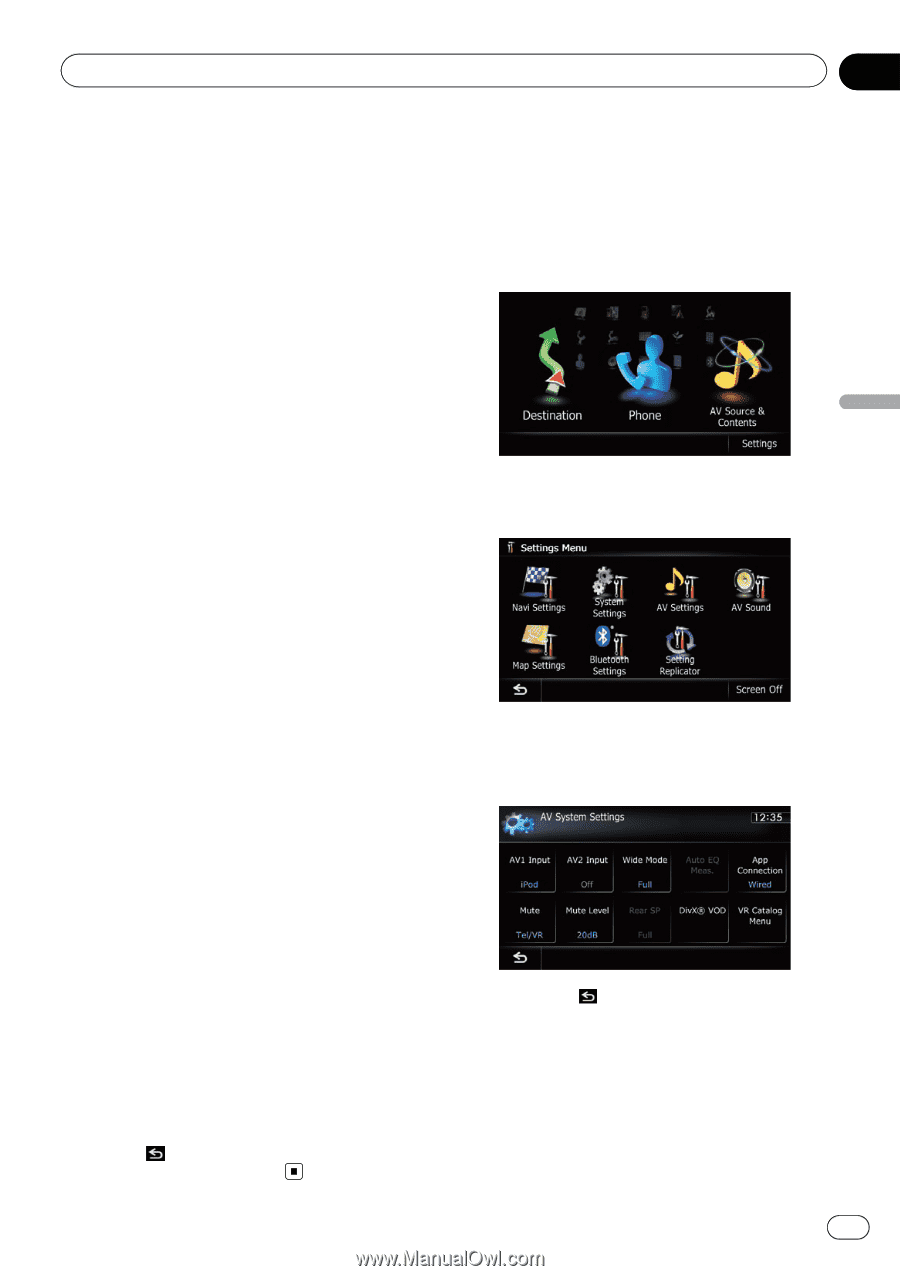
Customizing preferences Chapter 31 Customizing preferences p Touching [Source] while adjusting the rear view camera image returns you to the previous screen. p The adjustments of "Brightness" and "Contrast" are stored separately when your vehicle's headlights are off (daytime) and when your vehicle's headlights are on (nighttime). These are switched automatically depending on whether the vehicle's headlights are on or off. p The adjustments of "Dimmer" is stored separately when your vehicle's headlights are off (daytime) and when your vehicle's headlights are on (nighttime). "Dimmer" is switched automatically only when the value of nighttime is lower than the value of daytime. p You cannot adjust "Color" for the source without a video and navigation map display. p The setting contents can be memorized separately for the following screen and the video image. ! Audio source - AM/FM/Tuner or HD Radio/CD/ ROM/iPod (Music)/SD (audio)/USB (audio)/Bluetooth audio/XM/ SIRIUS/Pandora/aha/EXT1 (audio), EXT2 (audio)/source off screen/ menu screens/others ! Video source - AV1 and iPod (Video) - DVD-V and DivX - SD (Video) and USB (Video) - AV2 (Video) and EXT1 (Video), EXT2 (Video) - Rear view camera image ! Map screen p The picture adjustment may not be available with some rear view cameras. p Because of the LCD screen characteristics, you may not be able to adjust the screen at low temperatures. 3 Touch [+] or [-] to adjust the desired item. Each touch of [+] or [-] increases or decreases the level of the desired item. 4 Touch . The previous screen returns. Displaying the screen for AV system settings 1 Press the HOME button to display the "Top Menu" screen. 2 Touch [Settings]. The "Settings Menu" screen appears. 3 Touch [AV Settings]. The "AV System Settings" menu appears. 4 Touch the item that you want to change the setting. # If you touch , the previous screen returns. Setting video input 1 (AV1) You can switch this setting according to the connected component. p This setting applies to mini-jack input. En 177
-
 1
1 -
2
-
3
-
4
-
5
-
6
-
7
-
8
-
9
-
10
-
11
-
12
-
13
-
14
-
15
-
16
-
17
-
18
-
19
-
20
-
21
-
22
-
23
-
24
-
25
-
26
-
27
-
28
-
29
-
30
-
31
-
32
-
33
-
34
-
35
-
36
-
37
-
38
-
39
-
40
-
41
-
42
-
43
-
44
-
45
-
46
-
47
-
48
-
49
-
50
-
51
-
52
-
53
-
54
-
55
-
56
-
57
-
58
-
59
-
60
-
61
-
62
-
63
-
64
-
65
-
66
-
67
-
68
-
69
-
70
-
71
-
72
-
73
-
74
-
75
-
76
-
77
-
78
-
79
-
80
-
81
-
82
-
83
-
84
-
85
-
86
-
87
-
88
-
89
-
90
-
91
-
92
-
93
-
94
-
95
-
96
-
97
-
98
-
99
-
100
-
101
-
102
-
103
-
104
-
105
-
106
-
107
-
108
-
109
-
110
-
111
-
112
-
113
-
114
-
115
-
116
-
117
-
118
-
119
-
120
-
121
-
122
-
123
-
124
-
125
-
126
-
127
-
128
-
129
-
130
-
131
-
132
-
133
-
134
-
135
-
136
-
137
-
138
-
139
-
140
-
141
-
142
-
143
-
144
-
145
-
146
-
147
-
148
-
149
-
150
-
151
-
152
-
153
-
154
-
155
-
156
-
157
-
158
-
159
-
160
-
161
-
162
-
163
-
164
-
165
-
166
-
167
-
168
-
169
-
170
-
171
-
 172
172 -
 173
173 -
 174
174 -
 175
175 -
 176
176 -
 177
177 -
 178
178 -
 179
179 -
 180
180 -
 181
181 -
 182
182 -
183
-
184
-
185
-
186
-
187
-
188
-
189
-
190
-
191
-
192
-
193
-
194
-
195
-
196
-
197
-
198
-
199
-
200
-
201
-
202
-
203
-
204
-
205
-
206
-
207
-
208
-
209
-
210
-
211
-
212
-
213
-
214
-
215
-
216
-
217
-
218
-
219
-
220
-
221
-
222
-
223
-
224
-
225
-
226
-
227
-
228
-
229
-
230
-
231
-
232
-
233
-
234
-
235
-
236
-
237
-
238
-
239
-
240
 |
 |