Pioneer DEH-80PRS Owner's Manual - Page 27
Using the auto-equalizer, Recalling equalizer curves - equalizer settings
 |
View all Pioneer DEH-80PRS manuals
Add to My Manuals
Save this manual to your list of manuals |
Page 27 highlights
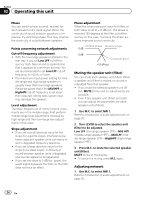
Operating this unit Section 02 Operating this unit 5 Turn M.C. to select cut-off frequency. 50-63-80-100-125-160-200 (Hz) Only frequencies higher than those in the selected range are output from the front speakers. 6 Turn LEVER to adjust the output level of the front speakers. 0 to -24 is displayed as the level is increased or decreased. Setting the high pass filter for rear speakers 1 Use M.C. to select R.HPF 1. Refer to Introduction of audio adjustments on page 20. 2 Turn LEVER to select slope. -12- -6-Pass (dB/oct.) # If you set the slope Pass (0 dB/oct.), the audio signal bypasses the filter, so the filter does not have an effect. 3 Press /DISP to display the upper tier. 4 Use M.C. to select R.HPF 2. Refer to Introduction of audio adjustments on page 20. 5 Turn M.C. to select cut-off frequency. 50-63-80-100-125-160-200 (Hz) Only frequencies higher than those in the selected range are output from the rear speakers. 6 Turn LEVER to adjust the output level of the rear speakers. +6 to -24 is displayed as the level is increased or decreased. Using the auto-equalizer The auto-equalizer is the equalizer curve created by auto TA and EQ (refer to Auto TA and EQ (auto-time alignment and auto-equalizing) on page 29). You can turn the auto-equalizer on or off. 1 Use M.C. to select A.EQ in the audio function menu. Refer to Introduction of audio adjustments on page 20. # If auto TA and EQ has not been carried out, Please set Auto EQ appears. This indicates that you cannot turn this function on. 2 Press M.C. to turn the auto-equalizer on. Auto EQ ON appears in the display. # To turn auto-equalizer off, press M.C. again. Recalling equalizer curves You can adjust the equalization to match the car's interior acoustic characteristics as desired. There are seven stored equalizer curves which you can easily recall at any time. Here is a list of the equalizer curves. Display Equalizer curve Super bass Super bass Powerful Powerful Natural Natural Vocal Vocal Flat Flat Custom1 Custom 1 Custom2 Custom 2 ! Custom1 and Custom2 are adjusted equalizer curves that you create. Adjustments can be made with a 16-band graphic equalizer. ! When Flat, no changes are made to the sound. You can check the effects of the equalizer curves by switching alternatively between Flat and another equalizer curve. % Press EQ/DISP OFF to select the equalizer. Press EQ/DISP OFF repeatedly to switch between the following equalizers: Powerful-Natural-Vocal-Flat-Custom1 -Custom2-Super bass En 27
-
 1
1 -
2
-
3
-
4
-
5
-
6
-
7
-
8
-
9
-
10
-
11
-
12
-
13
-
14
-
15
-
16
-
17
-
18
-
19
-
20
-
21
-
 22
22 -
 23
23 -
 24
24 -
 25
25 -
 26
26 -
 27
27 -
 28
28 -
 29
29 -
 30
30 -
 31
31 -
 32
32 -
33
-
34
-
35
-
36
-
37
-
38
-
39
-
40
-
41
-
42
-
43
-
44
-
45
-
46
-
47
-
48
-
49
-
50
-
51
-
52
 |
 |
