Pioneer DEH-80PRS Owner's Manual - Page 8
Set up menu, Basic operations, Operating this unit - installation
 |
View all Pioneer DEH-80PRS manuals
Add to My Manuals
Save this manual to your list of manuals |
Page 8 highlights
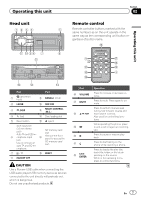
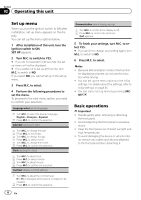
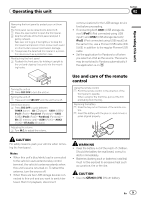
Section 02 Operating this unit Set up menu When you turn the ignition switch to ON after installation, set up menu appears on the display. You can set up the menu options below. 1 After installation of this unit, turn the ignition switch to ON. SET UP appears. 2 Turn M.C. to switch to YES. # If you do not operate for 30 seconds, the set up menu will not be displayed. # If you prefer not to set up at this time, turn M.C. to switch to NO. If you select NO, you cannot set up in the set up menu. 3 Press M.C. to select. 4 Perform the following procedures to set the menu. To proceed to the next menu option, you need to confirm your selection. Language select (multi-language) 1 Turn M.C. to select the desired language. English-Français-Español 2 Press M.C. to confirm the selection. Calendar (setting the date) 1 Turn M.C. to change the year. 2 Press M.C. to select day. 3 Turn M.C. to change the day. 4 Press M.C. to select month. 5 Turn M.C. to change the month. 6 Press M.C. to confirm the selection. Clock (setting the clock) 1 Turn M.C. to adjust hour. 2 Press M.C. to select minute. 3 Turn M.C. to adjust minute. 4 Press M.C. to confirm the selection. Contrast (display contrast setting) 1 Turn M.C. to adjust the contrast level. 0 to 15 is displayed as the level is increased or decreased. 2 Press M.C. to confirm the selection. 8 En Demonstration (demo display setting) 1 Turn M.C. to set the demo display to off. 2 Press M.C. to confirm the selection. Quit appears. 5 To finish your settings, turn M.C. to select YES. # If you prefer to change your setting again, turn M.C. to switch to NO. 6 Press M.C. to select. Notes ! Because demonstration mode is the function for displaying at stores, do not use this function while driving. ! You can set up the menu options in the initial settings. For details about the settings, refer to Initial settings on page 35. ! You can cancel set up menu by pressing SRC/ OFF. Basic operations Important ! Handle gently when removing or attaching the front panel. ! Avoid subjecting the front panel to excessive shock. ! Keep the front panel out of direct sunlight and high temperatures. ! To avoid damaging the device or vehicle inter- ior, remove any cables and devices attached to the front panel before detaching it.
-
 1
1 -
2
-
 3
3 -
 4
4 -
 5
5 -
 6
6 -
 7
7 -
 8
8 -
 9
9 -
 10
10 -
 11
11 -
 12
12 -
 13
13 -
14
-
15
-
16
-
17
-
18
-
19
-
20
-
21
-
22
-
23
-
24
-
25
-
26
-
27
-
28
-
29
-
30
-
31
-
32
-
33
-
34
-
35
-
36
-
37
-
38
-
39
-
40
-
41
-
42
-
43
-
44
-
45
-
46
-
47
-
48
-
49
-
50
-
51
-
52
 |
 |