Pioneer DEH-80PRS Owner's Manual - Page 28
Adjusting equalizer curves, Adjusting the 16-band graphic, equalizer, Adjusting loudness, Adjusting
 |
View all Pioneer DEH-80PRS manuals
Add to My Manuals
Save this manual to your list of manuals |
Page 28 highlights
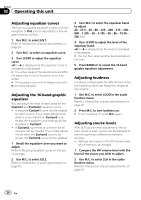
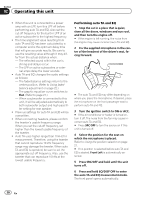
Section 02 Operating this unit Adjusting equalizer curves The factory supplied equalizer curves, with the exception of Flat, can be adjusted to a fine degree (nuance control). 1 Use M.C. to select EQ 1. Refer to Introduction of audio adjustments on page 20. 2 Turn M.C. to select an equalizer curve. 3 Turn LEVER to adjust the equalizer curve. +6 to -6 is displayed as the equalizer curve is increased or decreased. # The actual range of the adjustments are different depending on which equalizer curve is selected. # The equalizer curve with all frequencies set to 0 cannot be adjusted. Adjusting the 16-band graphic equalizer You can adjust the level of each band for the Custom1 and Custom2 equalizer curves. ! A separate Custom1 curve can be created for each source. If you make adjustments when a curve other than Custom2 is selected, the equalizer curve settings will be recorded in Custom1. ! A Custom2 curve that is common for all sources can be created. If you make adjustments when the Custom2 curve is selected, the Custom2 curve will be updated. 1 Recall the equalizer curve you want to adjust. Refer to Recalling equalizer curves on the previous page. 2 Use M.C. to select EQ 2. Refer to Introduction of audio adjustments on page 20. 3 Turn M.C. to select the equalizer band to adjust. 20-31.5-50-80-125-200-315-500- 800-1.25k-2k-3.15k-5k-8k-12.5k- 20k (Hz) 4 Turn LEVER to adjust the level of the equalizer band. +6 to -6 is displayed as the level is increased or decreased. # You can then select another band and adjust the level. 5 Press BAND/ to cancel the 16-band graphic equalizer adjustment. Adjusting loudness Loudness compensates for deficiencies in the low-frequency and high-frequency ranges at low volume. 1 Use M.C. to select LOUD in the audio function menu. Refer to Introduction of audio adjustments on page 20. 2 Press M.C. to turn loudness on. # To turn loudness off, press M.C. again. Adjusting source levels With SLA (source level adjustment), the volume levels of each source can be adjusted to prevent significant differences between sources. ! Settings are based on the FM volume level, which remains unchanged. 1 Compare the FM volume level with the level of the source you wish to adjust. 2 Use M.C. to select SLA in the audio function menu. Refer to Introduction of audio adjustments on page 20. 28 En
-
 1
1 -
2
-
3
-
4
-
5
-
6
-
7
-
8
-
9
-
10
-
11
-
12
-
13
-
14
-
15
-
16
-
17
-
18
-
19
-
20
-
21
-
22
-
 23
23 -
 24
24 -
 25
25 -
 26
26 -
 27
27 -
 28
28 -
 29
29 -
 30
30 -
 31
31 -
 32
32 -
 33
33 -
34
-
35
-
36
-
37
-
38
-
39
-
40
-
41
-
42
-
43
-
44
-
45
-
46
-
47
-
48
-
49
-
50
-
51
-
52
 |
 |
