Pioneer MEP-7000 Owner's Manual - Page 24
Handling Discs And Other Media - second hand
 |
UPC - 012562879185
View all Pioneer MEP-7000 manuals
Add to My Manuals
Save this manual to your list of manuals |
Page 24 highlights
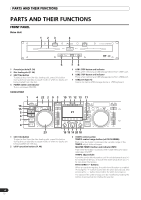
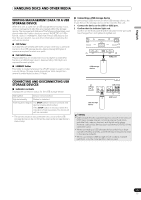
HANDLING DISCS AND OTHER MEDIA HANDLING DISCS AND OTHER MEDIA LOADING AND REMOVING DISCS Label surface up Insert straight POWER switch 1 Set the drive unit's front panel POWER switch to ON. NOTE • Do not attempt to forcibly insert a disc when the power is off, since damage may occur to the disc or loading mechanism. 2 Insert a disc. • Insert the disc flat with the label surface upright. • Only one disc can be loaded at a time. Do not attempt to insert two discs together, or to insert a second disc when one is already playing. • When inserting a disc, do not apply excessive force, or so much pressure that the disc bends. Also, when the mechanism is pulling in a disc or ejecting a disc, do not apply opposing pressure so as to defeat the mechanism's purpose. Any of these actions may damage the disc or mechanism. 3 To remove a currently playing disc, first press the play/pause () button to stop the playback, then press the EJECT () button. Alternately, when a cue point has been set, during play press the CUE button (to cause "back cue") and then press the EJECT () button. Disc rotation will stop and the disc will be ejected from the slot. REGARDING FORCIBLE DISC EJECT If the EJECT () button fails to operate and a disc cannot be removed, insert the furnished forcible eject pin into the forcible eject hole on the front panel of the drive unit to allow the disc to be removed. When performing forcible eject, always abide by the following precautions: 1 Turn off the power to the drive unit and wait at least one minute. Inserting the forcible eject pin before one minute has elapsed may occasion the following dangers: • The disc may be ejected while it is still rotating at high speed, causing injury to fingers or hands. • The drive's disc clamp may rotate in an unstable condition, causing damage to the disc. 2 Use only the furnished eject pin (do not use other objects) When the forcible eject pin is inserted fully into the forcible eject hole, the disc will come out of the slot by about 5 mm to 10 mm, where it can be grasped by the fingers and removed. Forcible eject hole NOTE • Do not attempt to reinsert a disc while the eject procedure is still operating and the [EJECT] indicator is lighted. If a disc is pressed back in while it is still being ejected (the [EJECT] indicator is lighted), the mechanism may stop. In this case, press the EJECT () button once again, and wait until the [EJECT] indicator has gone out before reinserting the disc. 24 En
-
 1
1 -
2
-
3
-
4
-
5
-
6
-
7
-
8
-
9
-
10
-
11
-
12
-
13
-
14
-
15
-
16
-
17
-
18
-
 19
19 -
 20
20 -
 21
21 -
 22
22 -
 23
23 -
 24
24 -
 25
25 -
 26
26 -
 27
27 -
 28
28 -
 29
29 -
30
-
31
-
32
-
33
-
34
-
35
-
36
-
37
-
38
-
39
-
40
-
41
-
42
-
43
-
44
-
45
-
46
-
47
-
48
-
49
-
50
-
51
-
52
-
53
-
54
-
55
-
56
-
57
-
58
-
59
-
60
-
61
-
62
-
63
-
64
-
65
-
66
-
67
-
68
-
69
-
70
-
71
-
72
 |
 |
