Pioneer MEP-7000 Owner's Manual - Page 40
Advanced Operations
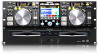 |
UPC - 012562879185
View all Pioneer MEP-7000 manuals
Add to My Manuals
Save this manual to your list of manuals |
Page 40 highlights
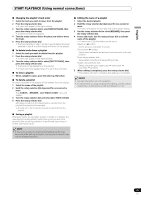
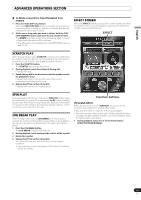
ADVANCED OPERATIONS SECTION ADVANCED OPERATIONS SECTION LOOP PLAY Create a loop. 1 Press the play/pause () button to start playback. 2 During playback, press the IN/CUE/HOT LOOP button at the point you wish to designate as the "loop-in" point. This step is unnecessary in the event you have a previously recorded cue point you wish to designate as a loop-in point. 3 During playback, press the OUT/ADJUST button at the point you wish to designate as the "loop-out" point. Loop play will begin and continue between the loop-in and loop-out points. To cancel loop play During loop play, press the RELOOP/EXIT button. Even after playback reaches the loop-out point, play will continue without returning to the loop-in point. To change the loop-out point 1 During loop play, press the OUT/ADJUST button. The time of the out point will show on the display; the OUT/ ADJUST button indicator will flash rapidly, and the IN/CUE/ HOT LOOP button indicator will turn off. 2 Press one of the SEARCH (, ) buttons or rotate the jog dial. • The loop-out point will move in one-frame increments. • Either press the OUT/ADJUST button, or wait for 30 seconds without doing anything and the adjust mode will be canceled and loop play will return. During loop play, to return to the loop-in point and begin loop play again (hot loop) During loop play, press the IN/CUE/HOT LOOP button. Playback will return to the loop-in point and loop play will begin again. To return again to a loop During playback after canceling loop play, press the RELOOP/EXIT button. Playback will return to the previously set loop-in point and loop play will begin again from that point (reloop play). To store loop play information During loop play, press the CUE/LOOP MEMORY button, and the current loop information will be stored in memory. CUE POINT/LOOP POINT MEMORY This unit can store cue points and loop points for future use. When the tracks are on discs, the cue/loop points are stored in the unit's internal memory; when the tracks are on external USB storage devices, the cue/loop points are stored in the external storage device itself. One cue point or loop point can be stored for each track. MEMO • This unit's internal memory is capable of storing a maximum of 2 000 discs' worth of cue/loop points (when each disc has no more than 10 cue/loop points each). When the internal memory becomes full, previously stored disc information is overwritten, beginning from disc information with the lowest usage frequency. • If the external USB storage device has insufficient storage capacity, the cue/loop point information for the tracks on that device cannot be saved. • Tracks in DJS and other DJ software cannot be stored in memory. Storing a cue point 1 Use the auto cue function or CUE button to input a cue point. 2 Press the CUE/LOOP MEMORY button. The [MEMO] indicator will light, indicating that the cue point has been stored. Storing a loop 1 Input a loop-in and loop-out point, and begin loop play. 2 During loop play, press the CUE/LOOP MEMORY button. The [MEMO] indicator will light, indicating that the loop-in and loop-out points have been stored. In the case of tracks for which cue or loop points are recorded, the [ ] icon will change to [ ] on the BROWSE screen. NOTE • If a cue point differs from the loaded track, it cannot be stored. • If the external USB storage device has insufficient storage capacity, the cue/loop point information for the tracks on that device cannot be saved. To call up a stored cue point or loop When a cue point or loop has been stored, the [MEMO] indicator will light. 1 Press the CUE/LOOP CALL button. When the CUE/LOOP CALL button is pressed, the cue point or loop is called from memory, and the unit enters the standby mode at the cue or loop-in point. 2 Press the play/pause () button. Play or loop play begins. 40 En
-
 1
1 -
2
-
3
-
4
-
5
-
6
-
7
-
8
-
9
-
10
-
11
-
12
-
13
-
14
-
15
-
16
-
17
-
18
-
19
-
20
-
21
-
22
-
23
-
24
-
25
-
26
-
27
-
28
-
29
-
30
-
31
-
32
-
33
-
34
-
 35
35 -
 36
36 -
 37
37 -
 38
38 -
 39
39 -
 40
40 -
 41
41 -
 42
42 -
 43
43 -
 44
44 -
 45
45 -
46
-
47
-
48
-
49
-
50
-
51
-
52
-
53
-
54
-
55
-
56
-
57
-
58
-
59
-
60
-
61
-
62
-
63
-
64
-
65
-
66
-
67
-
68
-
69
-
70
-
71
-
72
 |
 |
