Pioneer MEP-7000 Owner's Manual - Page 38
Changing The Play Speed, Applying A Master Tempo, Setting Cue Points - manual
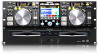 |
UPC - 012562879185
View all Pioneer MEP-7000 manuals
Add to My Manuals
Save this manual to your list of manuals |
Page 38 highlights
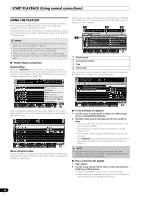
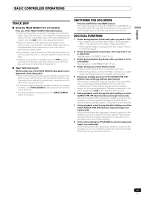
BASIC CONTROLLER OPERATIONS CHANGING THE PLAY SPEED Tempo adjustment Slide the TEMPO adjust slider forward or back. When moved toward the front (+), the tempo becomes faster, and when moved away from you toward the rear (-), the tempo becomes slower. • The amount (%) of tempo change is shown in the display. • The tempo of the piece can be changed even while maintaining the same musical pitch; see "APPLYING A MASTER TEMPO". Pitch bend Press the PITCH BEND (+) button to increase the playback speed, and press the (-) button to slow the playback speed. Selecting a tempo adjust range Press the TEMPO control range button. Each time the button is pressed, the variable range of the TEMPO adjust slider changes (±6 %/±10 %/±16 %/WIDE). When set to a variable range of ±6 %, the tempo changes in increments of 0.02 %. When set to ±10 % and ±16 %, the tempo changes in increments of 0.05 %. When set to WIDE, the tempo can be changed in increments of 0.5 %. MEMO • When playing MP3/AAC/WAV/AIFF files, the variable range is ±6 %/±10 %/±16 % only. • The tempo range setting is preserved in memory even when power is turned OFF. • The variable range setting value is show in the display. • In the case of a track on DJ software, the temp range will depend on the software's specifications. APPLYING A MASTER TEMPO During playback, press the MASTER TEMPO button. • The button indicator (MT) will light; when the TEMPO adjust slider is used to adjust the speed (tempo), the pitch of the music will remain unchanged. • The sound quality will change due to the digital processing of the audio. SETTING CUE POINTS By setting a cue point in memory, you can set the track to cue standby instantly merely by pressing the CUE button. Manual cue 1 During playback, press the play/pause () button and pause playback around the point you wish to set as cue point. 2 Find the accurate cue point. Set the cue point using the frame number. The cue point can be set in one-frame units (75 frames = one second). Use the jog dial or SEARCH (, ) buttons to adjust the frame position. Rotating the jog dial one rotation moves playback 75 frames, while pressing SEARCH button once moves the playback one-frame in the designated direction. Set the cue point while listening to the playback audio. Rotate the jog dial slowly and return the play to the point just before the place you wish to begin playback (if the jog mode is something other than SCRATCH, the cue point will be the point immediately after the sound heard in audible pause). 3 Once the frame number or audible sound is at the desired cue point, press the CUE button. • The sound will be muted, and the CUE button indicator will light, indicating successful setting of the cue point. • When a new cue point is set in memory, any previously set cue point will be cleared from memory. Real time cue During playback, press the IN/CUE button at the point you wish to mark as a cue point. This point will be recorded as a new cue point. To confirm the cue point (cue point sampler) After setting the cue point, press and hold the CUE button. The sound at the cue point will be audible so long as the CUE button is held depressed. To return to the cue point (back cue) 1 During playback, press the CUE button. The unit will return to the set cue point and enter cue standby mode. 2 Press the play/pause () button. Playback will begin instantly from the cue point. To modify a cue point (cue point modification) 1 During playback, press the CUE button. The unit will return to the set cue point and enter cue standby mode. 2 Press one of the SEARCH (, ) buttons. • The cue point will be moved in one-frame increments (the cue point sound will move). • The cue point can also be moved by pressing one of the SEARCH (, ) buttons and then rotating the jog dial (the cue point sound will move). 3 Press the CUE button. The point at which the CUE button is pressed forms the newly set cue point. 38 En
-
 1
1 -
2
-
3
-
4
-
5
-
6
-
7
-
8
-
9
-
10
-
11
-
12
-
13
-
14
-
15
-
16
-
17
-
18
-
19
-
20
-
21
-
22
-
23
-
24
-
25
-
26
-
27
-
28
-
29
-
30
-
31
-
32
-
 33
33 -
 34
34 -
 35
35 -
 36
36 -
 37
37 -
 38
38 -
 39
39 -
 40
40 -
 41
41 -
 42
42 -
 43
43 -
44
-
45
-
46
-
47
-
48
-
49
-
50
-
51
-
52
-
53
-
54
-
55
-
56
-
57
-
58
-
59
-
60
-
61
-
62
-
63
-
64
-
65
-
66
-
67
-
68
-
69
-
70
-
71
-
72
 |
 |
