Pioneer PDP6100HD Owner's Manual - Page 19
Controls
 |
UPC - 012562773780
View all Pioneer PDP6100HD manuals
Add to My Manuals
Save this manual to your list of manuals |
Page 19 highlights
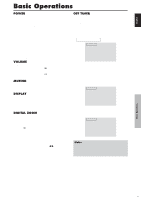
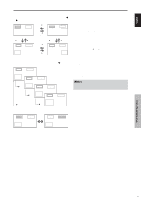
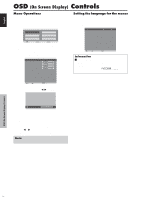
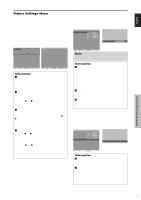
English OSD (On Screen Display) Controls Menu Operations The following describes how to use the menus and the selected items. 1. Press the MENU/SET button on the remote control to display the MAIN MENU. MAIN MENU PICTURE SET UP SOUND FUNCTION SCREEN SIGNAL INFO. SEL. MENU OK EXIT EXIT 2. Press the cursor buttons v w on the remote control to highlight the menu you wish to enter. 3. Press the MENU/SET button on the remote control to select a sub menu or item. PICTURE PICTURE MEMORY : OFF CONTRAST BRIGHTNESS SHARPNESS COLOR TINT R G DNR : LOW COLOR TEMP. : MIDDLE GAMMA : 2.1 LOW TONE : AUTO SET UP LEVEL : 0 COLOR MGT PURECINEMA : ON AV SELECTION : DYNAMIC SEL. ADJ. EXIT RETURN 4. Adjust the level or change the setting of the selected item by using the cursor buttons ᮤ ᮣ on the remote control. Setting the language for the menus The menu display can be set to one of seven languages. Example: Setting the menu display to "DEUTSCH" On "LANGUAGE" of "SET UP" menu, select "DEUTSCH". SET UP LANGUAGE : DEUTSCH BNC INPUT : COMPONENT D-SUB INPUT : RGB HD SELECT : 1080I RGB SELECT : AUTO HDMI SET UP : COLOR1 COLOR SYSTEM : AUTO BACK GROUND : GRAY SIDE MASK : 3 S1/S2 : OFF DISPLAY OSD : ON OSD ADJUST : TOP LEFT ALL RESET : OFF SEL. ADJ. EXIT RETURN Information Ⅵ Language settings ENGLISH ........ English DEUTSCH ....... German FRANÇAIS ...... French ESPAÑOL ....... Spanish ITALIANO ........ Italian SVENSKA ....... Swedish У Russian CONTRAST 10 5. The adjustments or the settings that are stored in memory. The change is stored until you change it again. 6. Repeat steps 2 - 5 to adjust an additional item, or press the EXIT button on the remote control to return to the main menu. * When adjusting using the bar at the bottom of the screen, press the ᮤ or ᮣ button within 5 seconds. If not, the current setting is set and the previous screen appears. Note: The main menu disappears by pressing the EXIT button. OSD (On Screen Display) Controls 12 En
-
 1
1 -
2
-
3
-
4
-
5
-
6
-
7
-
8
-
9
-
10
-
11
-
12
-
13
-
 14
14 -
 15
15 -
 16
16 -
 17
17 -
 18
18 -
 19
19 -
 20
20 -
 21
21 -
 22
22 -
 23
23 -
 24
24 -
25
-
26
-
27
-
28
-
29
-
30
-
31
-
32
-
33
-
34
-
35
-
36
-
37
-
38
-
39
-
40
-
41
-
42
-
43
-
44
-
45
-
46
-
47
-
48
-
49
-
50
-
51
-
52
-
53
-
54
-
55
-
56
-
57
-
58
-
59
-
60
-
61
-
62
-
63
-
64
-
65
-
66
-
67
-
68
-
69
-
70
-
71
-
72
-
73
-
74
-
75
-
76
-
77
-
78
-
79
-
80
-
81
-
82
-
83
-
84
-
85
-
86
-
87
-
88
-
89
-
90
-
91
-
92
-
93
-
94
-
95
-
96
-
97
-
98
-
99
-
100
-
101
-
102
-
103
-
104
-
105
-
106
-
107
-
108
-
109
-
110
 |
 |
