Pioneer PDP6100HD Owner's Manual - Page 26
SET UP Settings Menu
 |
UPC - 012562773780
View all Pioneer PDP6100HD manuals
Add to My Manuals
Save this manual to your list of manuals |
Page 26 highlights
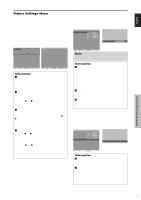
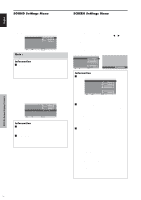
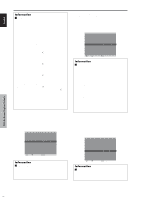
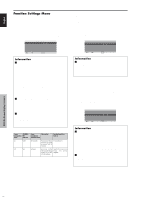
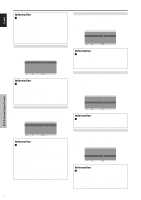
English SET UP Settings Menu Setting the BNC connectors Select whether to set the input of the 5 BNC connectors to RGB and component. Example: Set the BNC INPUT mode to "RGB" On "BNC INPUT" of "SET UP" menu, select "RGB". SET UP LANGUAGE : ENGLISH BNC INPUT : RGB D-SUB INPUT : RGB HD SELECT : 1080I RGB SELECT : AUTO HDMI SET UP : COLOR1 COLOR SYSTEM : AUTO BACK GROUND : GRAY SIDE MASK : 3 S1/S2 : OFF DISPLAY OSD : ON OSD ADJUST : TOP LEFT ALL RESET : OFF SEL. ADJ. EXIT RETURN Information Ⅵ BNC INPUT Settings RGB: Use the 5BNC terminals for PC2/ COMPONENT2 input. COMPONENT: Use the 3BNC terminals for PC2/ COMPONENT2 input. Checking the signal being transmitted to PC1 terminal Use this to confirm the signal being transmitted to the PC1 terminal. It is set to RGB and can not be adjusted. SET UP LANGUAGE : ENGLISH BNC INPUT : COMPONENT D-SUB INPUT : RGB HD SELECT : 1080I RGB SELECT : AUTO HDMI SET UP : COLOR1 COLOR SYSTEM : AUTO BACK GROUND : GRAY SIDE MASK : 3 S1/S2 : OFF DISPLAY OSD : ON OSD ADJUST : TOP LEFT ALL RESET : OFF CAN NOT ADJUST Setting high definition images to the suitable screen size Use this procedure to set whether the number of vertical lines of the input high definition image is 1080I or 1035I or 540P. Example: Setting the "HD SELECT" mode to "1035I" On "HD SELECT" of "SET UP" menu, select "1035I". SET UP LANGUAGE : ENGLISH BNC INPUT : COMPONENT D-SUB INPUT : RGB HD SELECT : 1035I RGB SELECT : AUTO HDMI SET UP : COLOR1 COLOR SYSTEM : AUTO BACK GROUND : GRAY SIDE MASK : 3 S1/S2 : OFF DISPLAY OSD : ON OSD ADJUST : TOP LEFT ALL RESET : OFF SEL. ADJ. EXIT RETURN Information Ⅵ HD SELECT modes These 3 modes are not displayed in correct image automatically. 1080I: Standard digital broadcasts 1035I: Japanese "High Vision" signal format 540P: Special Digital broadcasts (for example : DTC100) Setting a computer image to the correct RGB select screen With the computer image, select the RGB Select mode for a moving image such as (video) mode, wide mode or digital broadcast. Example: Setting the "RGB SELECT" mode to "MOTION " On "RGB SELECT" of "SET UP" menu, select "MOTION". SET UP LANGUAGE : ENGLISH BNC INPUT : COMPONENT D-SUB INPUT : RGB HD SELECT : 1080I RGB SELECT : MOTION HDMI SET UP 1024768 COLOR SYSTEM : AUTO BACK GROUND : GRAY SIDE MASK : 3 S1/S2 : OFF DISPLAY OSD : ON OSD ADJUST : TOP LEFT ALL RESET : OFF SEL. ADJ. EXIT RETURN OSD (On Screen Display) Controls 19 En
-
 1
1 -
2
-
3
-
4
-
5
-
6
-
7
-
8
-
9
-
10
-
11
-
12
-
13
-
14
-
15
-
16
-
17
-
18
-
19
-
20
-
 21
21 -
 22
22 -
 23
23 -
 24
24 -
 25
25 -
 26
26 -
 27
27 -
 28
28 -
 29
29 -
 30
30 -
 31
31 -
32
-
33
-
34
-
35
-
36
-
37
-
38
-
39
-
40
-
41
-
42
-
43
-
44
-
45
-
46
-
47
-
48
-
49
-
50
-
51
-
52
-
53
-
54
-
55
-
56
-
57
-
58
-
59
-
60
-
61
-
62
-
63
-
64
-
65
-
66
-
67
-
68
-
69
-
70
-
71
-
72
-
73
-
74
-
75
-
76
-
77
-
78
-
79
-
80
-
81
-
82
-
83
-
84
-
85
-
86
-
87
-
88
-
89
-
90
-
91
-
92
-
93
-
94
-
95
-
96
-
97
-
98
-
99
-
100
-
101
-
102
-
103
-
104
-
105
-
106
-
107
-
108
-
109
-
110
 |
 |
