Pioneer PDP6100HD Owner's Manual - Page 28
Example: Setting S1/S2 to AUTO, Example: Setting SIDE MASK to 5, Example: Turning the DISPLAY
 |
UPC - 012562773780
View all Pioneer PDP6100HD manuals
Add to My Manuals
Save this manual to your list of manuals |
Page 28 highlights
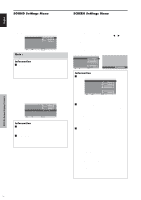
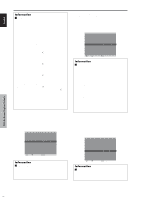
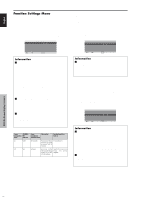
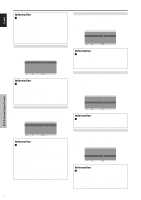
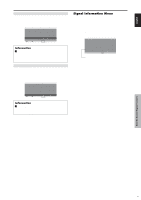
Setting the gray level for the SIDE MASK Use this procedure to set the gray level for the parts on the screen on which nothing is displayed when the screen is set to the 4:3 size. Example: Setting "SIDE MASK" to "5" On "SIDE MASK" of "SET UP" menu, select "5". SET UP LANGUAGE : ENGLISH BNC INPUT : COMPONENT D-SUB INPUT : RGB HD SELECT : 1080I RGB SELECT : AUTO HDMI SET UP : COLOR1 COLOR SYSTEM : AUTO BACK GROUND : GRAY SIDE MASK : 5 S1/S2 : OFF DISPLAY OSD : ON OSD ADJUST : TOP LEFT ALL RESET : OFF SEL. ADJ. EXIT RETURN Information Ⅵ SIDE MASK settings This adjusts the brightness of the black (the gray level) for the sides of the screen. The standard is 0 (black). The level can be adjusted from 0 to 15. The factory setting is 3 (dark gray). Setting the screen size for S1/S2 video input If the S-video signal contains screen size information, the image will be automatically adjusted to fit the screen when this S1/S2 is set to AUTO. This feature is available only when an S-video signal is input via the VIDEO3 terminal. Example: Setting "S1/S2" to "AUTO" On "S1/S2" of "SET UP" menu, select "AUTO". SET UP LANGUAGE : ENGLISH BNC INPUT : COMPONENT D-SUB INPUT : RGB HD SELECT : 1080I RGB SELECT : AUTO HDMI SET UP : COLOR1 COLOR SYSTEM : AUTO BACK GROUND : GRAY SIDE MASK : 3 S1/S2 : AUTO DISPLAY OSD : ON OSD ADJUST : TOP LEFT ALL RESET : OFF SEL. ADJ. EXIT RETURN Information Ⅵ S1/S2 settings AUTO: Adjusts the screen size automatically according to the S1/S2 video signal. OFF: Turns the S1/S2 function off. Turning on/off the information display When this is set to OFF, the information will not be displayed even if you press the DISPLAY button. Example: Turning the DISPLAY OSD off On "DISPLAY OSD" of "SET UP" menu, select "OFF". SET UP LANGUAGE : ENGLISH BNC INPUT : COMPONENT D-SUB INPUT : RGB HD SELECT : 1080I RGB SELECT : AUTO HDMI SET UP : COLOR1 COLOR SYSTEM : AUTO BACK GROUND : GRAY SIDE MASK : 3 S1/S2 : OFF DISPLAY OSD : OFF OSD ADJUST : TOP LEFT ALL RESET : OFF SEL. ADJ. EXIT RETURN Information Ⅵ DISPLAY OSD settings ON: The informations on screen size, volume control, etc. will be shown. OFF: The informations on screen size, volume control, etc. will not be shown. The DISPLAY button on the remote control will not function either. Setting the position of the menu Adjusts the position of the menu when it appears on the screen. Example: Set the position to "TOP CENTER" On "OSD ADJUST" of "SET UP" menu, select "TOP CENTER". SET UP LANGUAGE : ENGLISH BNC INPUT : COMPONENT D-SUB INPUT : RGB HD SELECT : 1080I RGB SELECT : AUTO HDMI SET UP : COLOR1 COLOR SYSTEM : AUTO BACK GROUND : GRAY SIDE MASK : 3 S1/S2 : OFF DISPLAY OSD : ON OSD ADJUST : TOP CENTER ALL RESET : OFF SEL. ADJ. EXIT RETURN Information Ⅵ OSD ADJUST settings TOP LEFT TOP TOP CENTER RIGHT BTM LEFT BTM BTM CENTER RIGHT Resetting to the default values Use these operations to restore all the settings (PICTURE, SOUND, SCREEN, SET UP, etc) to the factory default values. Refer to page 13 for items to be reset. On "ALL RESET" of "SET UP" menu, select "ON", then press the MENU/SET button. SET UP LANGUAGE : ENGLISH BNC INPUT : COMPONENT D-SUB INPUT : RGB HD SELECT : 1080I RGB SELECT : AUTO HDMI SET UP : COLOR1 COLOR SYSTEM : AUTO BACK GROUND : GRAY SIDE MASK : 3 S1/S2 : OFF DISPLAY OSD : ON OSD ADJUST : TOP LEFT ALL RESET : ON SEL. ADJ. EXIT RETURN ALL RESET SETTING NOW When the "SETTING NOW" screen disappears, then all the settings are restored to the default values. OSD (On Screen Display) Controls English 21 En
-
 1
1 -
2
-
3
-
4
-
5
-
6
-
7
-
8
-
9
-
10
-
11
-
12
-
13
-
14
-
15
-
16
-
17
-
18
-
19
-
20
-
21
-
22
-
 23
23 -
 24
24 -
 25
25 -
 26
26 -
 27
27 -
 28
28 -
 29
29 -
 30
30 -
 31
31 -
 32
32 -
 33
33 -
34
-
35
-
36
-
37
-
38
-
39
-
40
-
41
-
42
-
43
-
44
-
45
-
46
-
47
-
48
-
49
-
50
-
51
-
52
-
53
-
54
-
55
-
56
-
57
-
58
-
59
-
60
-
61
-
62
-
63
-
64
-
65
-
66
-
67
-
68
-
69
-
70
-
71
-
72
-
73
-
74
-
75
-
76
-
77
-
78
-
79
-
80
-
81
-
82
-
83
-
84
-
85
-
86
-
87
-
88
-
89
-
90
-
91
-
92
-
93
-
94
-
95
-
96
-
97
-
98
-
99
-
100
-
101
-
102
-
103
-
104
-
105
-
106
-
107
-
108
-
109
-
110
 |
 |
