Pioneer VSX 818V Owner's Manual - Page 15
Connecting up, Connecting an HDD/DVD recorder, VCR and other video sources - tv input
 |
UPC - 012562884769
View all Pioneer VSX 818V manuals
Add to My Manuals
Save this manual to your list of manuals |
Page 15 highlights
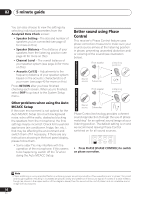
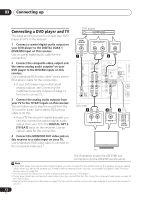
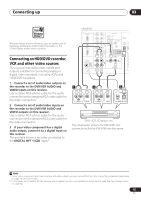
English Deutsch Français Italiano Nederlands Español Connecting up 03 Windows Media and the Windows logo are trademarks or registered trademarks of Microsoft Corporation in the United States and/or other countries. Connecting an HDD/DVD recorder, VCR and other video sources This receiver has audio/video inputs and outputs suitable for connecting analog or digital video recorders, including VCRs and HDD/DVD recorders. 1 Connect a set of audio/video outputs on the recorder to the DVR/VCR AUDIO and VIDEO inputs on this receiver. Use a stereo RCA phono cable for the audio connection and a standard RCA video cable for the video connection.1 2 Connect a set of audio/video inputs on the recorder to the DVR/VCR AUDIO and VIDEO outputs on this receiver. Use a stereo RCA phono cable for the audio connection and a standard RCA video cable for the video connection. 3 If your video component has a digital audio output, connect it to a digital input on this receiver. The example shows a recorder connected to the DIGITAL OPT 1 (CD) input.2 VSX-918V HDMI IN R IN (DVD / BD) IN 1 IN (ASSIGNABLE) OUT (TV / SAT) IN 2 IN OUT IN XM IN IN DIGITAL IN COAX 1 OUT (DVD / BD) (ASSIGNABLE) AUDIO AUX L CD ANTENNA FM UNBAL DIGITAL IN CD-R / TAPE / MD AM LOOP DVD / BD FRONT DVD / BD IN DVD5.1 CH INPUT TV TV / SAT / SAT IN DVR / VCR IN DVR / VCR CONTROL OUT IN SUB WOOFER PREOUT MONITOR OUT DVR / VCR OUT VIDEO OPT 2 (TV / SA OPT 1 (CD) (ASSIGNABLE) S P E A K E R S 1 2 3 R OUT PLAY L AUDIO OUT VIDEO OUT R IN L REC AUDIO IN VIDEO IN COAXIAL OPTICAL DIGITAL OUT DVR, VCR, LD player, etc. The illustration shows the VSX-918V, but connections for the VSX-818V are the same. Note 1 If your video component also has a component video output, you can connect this too. See Using the component video jacks on page 16 for more on this. 2 In this case, you'll need to tell the receiver which digital input you connected the component to (see The Input Assign menu on page 64). 15 En
-
 1
1 -
2
-
3
-
4
-
5
-
6
-
7
-
8
-
9
-
 10
10 -
 11
11 -
 12
12 -
 13
13 -
 14
14 -
 15
15 -
 16
16 -
 17
17 -
 18
18 -
 19
19 -
 20
20 -
21
-
22
-
23
-
24
-
25
-
26
-
27
-
28
-
29
-
30
-
31
-
32
-
33
-
34
-
35
-
36
-
37
-
38
-
39
-
40
-
41
-
42
-
43
-
44
-
45
-
46
-
47
-
48
-
49
-
50
-
51
-
52
-
53
-
54
-
55
-
56
-
57
-
58
-
59
-
60
-
61
-
62
-
63
-
64
-
65
-
66
-
67
-
68
-
69
-
70
-
71
-
72
-
73
-
74
-
75
-
76
 |
 |