Pioneer VSX 818V Owner's Manual - Page 68
Symptom, Remedy, Problem - no sound hdmi
 |
UPC - 012562884769
View all Pioneer VSX 818V manuals
Add to My Manuals
Save this manual to your list of manuals |
Page 68 highlights
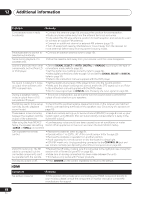
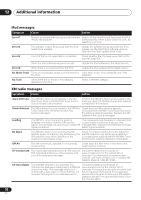
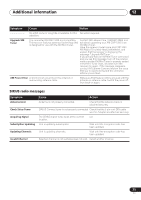
12 Additional information Problem Remedy Considerable noise in radio broadcasts. • Connect the antenna (page 19) and adjust the position for best reception. • Route any loose cables away from the antenna terminals and wires. • Fully extend the FM wire antenna, position for best reception, and secure to a wall (or connect an outdoor FM antenna). • Connect an additional internal or external AM antenna (page 19). • Turn off equipment causing interference or move it away from the receiver (or move antennas farther away from equipment causing noise). Broadcast stations cannot be • Connect an outdoor antenna (refer to page 19). selected automatically. Noise during playback of a cassette deck. • Move the cassette deck away from your receiver, until the noise disappears. Sound is produced from other components, but not from LD or DVD player. • Set the SIGNAL SELECT to AUTO, DIGITAL or ANALOG according to the type of connections made (refer to page 36). • Set the digital input settings correctly (refer to page 64). • Make digital connections (refer to page 12) and set the SIGNAL SELECT to DIGITAL (refer to page 36). • Refer to the instruction manual supplied with the DVD player. No sound is output or a noise is output when software with DTS is played back. • Set the digital volume level of the player to full, or to the neutral position. • Make sure the player's settings are correct and/or the DTS signal out is on. Refer to the instruction manual supplied with the DVD player. • Set the input signal type to DIGITAL (see Choosing the input signal on page 36). During a playback search, noise is output from a DTS compatible CD player. • This is not a malfunction, but be sure to turn the volume down to prevent the output of loud noise from your speakers. Everything seems to be set up • Check that the positive/negative speaker terminals on the receiver are matched correctly, but the playback with the corresponding terminals on the speakers (see Connecting the speakers on sound is odd. page 20). There seems to be a time lag • See Automatically setting up for surround sound (MCACC) on page 8 to set up your between the speakers and the system again using MCACC (this will automatically compensate for a delay in the output of the subwoofer. subwoofer output). After using the Auto MCACC • Low-frequency noise could have been caused by an air conditioner or motor. Setup, the speaker size setting Switch off all appliances in the room and rerun the Auto MCACC Setup. (LARGE or SMALL) is incorrect. Can't operate the remote control. • Replace the batteries (refer to page 6). • Operate within 7 m (23 ft.), 30° of the remote sensor (refer to page 29). • Remove the obstacle or operate from another position. • Avoid exposing the remote sensor on the front panel to direct light. • VSX-918V model only: Unplug anything connected to the CONTROL IN jack and use remote normally (see Operating other Pioneer components on page 49). VSX-918V model only: The SR cable is connected, but the connected components can't be operated with the remote. • Reinsert the SR cable, making sure it's connected to the right jack (see Using this receiver with a Pioneer flat panel TV on page 62). • Make sure an analog connection has been made between the units. • This feature only works with Pioneer products. The display is dark or off. • Press DIMMER on the control repeatedly to return to the default. HDMI Symptom No picture or sound. Remedy • If the problem still persists when connecting your HDMI component directly to your monitor, please consult the component or monitor manual or contact the manufacturer for support. 68 En
-
 1
1 -
2
-
3
-
4
-
5
-
6
-
7
-
8
-
9
-
10
-
11
-
12
-
13
-
14
-
15
-
16
-
17
-
18
-
19
-
20
-
21
-
22
-
23
-
24
-
25
-
26
-
27
-
28
-
29
-
30
-
31
-
32
-
33
-
34
-
35
-
36
-
37
-
38
-
39
-
40
-
41
-
42
-
43
-
44
-
45
-
46
-
47
-
48
-
49
-
50
-
51
-
52
-
53
-
54
-
55
-
56
-
57
-
58
-
59
-
60
-
61
-
62
-
 63
63 -
 64
64 -
 65
65 -
 66
66 -
 67
67 -
 68
68 -
 69
69 -
 70
70 -
 71
71 -
 72
72 -
 73
73 -
74
-
75
-
76
 |
 |