Ricoh Aficio SP W2470 Hardware Guide - Page 13
Exterior: Rear View
 |
View all Ricoh Aficio SP W2470 manuals
Add to My Manuals
Save this manual to your list of manuals |
Page 13 highlights
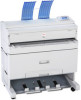
Exterior: Rear View Exterior: Rear View This section explains names and functions of the parts on the rear side of the printer. 1 1. Upper output guide Takes prints to the upper output stacker. 2. Vents Prevent overheating. 3. Anti-humidity heater switch Turn this switch to On when operating this machine in humid conditions. The anti-humidity heater prevents roll and tray paper absorbing moisture. 4. Upper output exit When the upper output is selected, output paper is delivered here with the print side facing the user. BAL008S 5. Lower output exit When the lower output is selected, output prints are delivered here with the print side up. 6. Controller board Attach the interface cable, network cable, or USB cable here. 7. Lower output guides Prevent delivered paper being stacked at an angle when the lower output is selected. 8. Lower output tray Delivers prints from the lower output exit, and then sends them to the lower output stacker. 3
-
 1
1 -
2
-
3
-
4
-
5
-
6
-
7
-
 8
8 -
 9
9 -
 10
10 -
 11
11 -
 12
12 -
 13
13 -
 14
14 -
 15
15 -
 16
16 -
 17
17 -
 18
18 -
19
-
20
-
21
-
22
-
23
-
24
-
25
-
26
-
27
-
28
-
29
-
30
-
31
-
32
-
33
-
34
-
35
-
36
-
37
-
38
-
39
-
40
-
41
-
42
-
43
-
44
-
45
-
46
-
47
-
48
-
49
-
50
-
51
-
52
-
53
-
54
-
55
-
56
-
57
-
58
-
59
-
60
-
61
-
62
-
63
-
64
-
65
-
66
-
67
-
68
-
69
-
70
-
71
-
72
-
73
-
74
-
75
-
76
-
77
-
78
-
79
-
80
-
81
-
82
-
83
-
84
-
85
-
86
-
87
-
88
-
89
-
90
-
91
-
92
-
93
-
94
-
95
-
96
-
97
-
98
-
99
-
100
-
101
-
102
-
103
-
104
-
105
-
106
-
107
-
108
-
109
-
110
-
111
-
112
-
113
-
114
-
115
-
116
-
117
-
118
-
119
-
120
-
121
-
122
-
123
-
124
-
125
-
126
-
127
-
128
-
129
-
130
-
131
-
132
-
133
-
134
-
135
-
136
-
137
-
138
-
139
-
140
-
141
-
142
-
143
-
144
-
145
-
146
-
147
-
148
-
149
-
150
-
151
-
152
-
153
-
154
 |
 |
