Ricoh C811DN Operating Instructions - Page 108
Specifying a paper type, Letterhead, Preprinted Paper, Bond Paper, Cardstock, Thick Paper 1
 |
UPC - 026649028182
View all Ricoh C811DN manuals
Add to My Manuals
Save this manual to your list of manuals |
Page 108 highlights
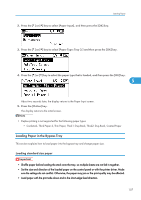
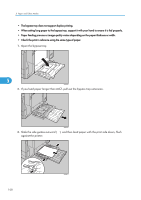
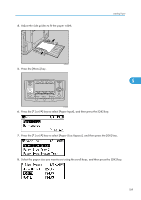
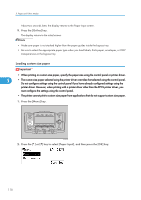
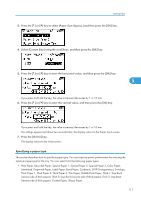
5. Paper and Other Media 2. Align and load the new paper into the right and left sides with the print side up. You can load up to 1000 sheets in each side. ASZ250S 3. Push the paper tray carefully into the printer until it stops. 5 • For details about types of paper supported by this printer, see p.81 "Supported Paper for Each Tray". Specifying a paper type This section describes how to specify a paper type. You can improve printer performance by selecting the optimum paper type for the tray. You can select from the following paper types: • Plain Paper, Recycled Paper, Special Paper 1, Special Paper 2, Special Paper 3, Color Paper, Letterhead, Preprinted Paper, Bond Paper, Cardstock, Thick Paper 1, Thick Paper 2, Thin Paper, Middle Thick Paper, Thick 1: Dup.Back (reverse side of thick paper), Thick 2: Dup.Back (reverse side of thick paper), Coated Paper, Glossy Paper 1. Press the [Menu] key. 106 ATU050S
-
 1
1 -
2
-
3
-
4
-
5
-
6
-
7
-
8
-
9
-
10
-
11
-
12
-
13
-
14
-
15
-
16
-
17
-
18
-
19
-
20
-
21
-
22
-
23
-
24
-
25
-
26
-
27
-
28
-
29
-
30
-
31
-
32
-
33
-
34
-
35
-
36
-
37
-
38
-
39
-
40
-
41
-
42
-
43
-
44
-
45
-
46
-
47
-
48
-
49
-
50
-
51
-
52
-
53
-
54
-
55
-
56
-
57
-
58
-
59
-
60
-
61
-
62
-
63
-
64
-
65
-
66
-
67
-
68
-
69
-
70
-
71
-
72
-
73
-
74
-
75
-
76
-
77
-
78
-
79
-
80
-
81
-
82
-
83
-
84
-
85
-
86
-
87
-
88
-
89
-
90
-
91
-
92
-
93
-
94
-
95
-
96
-
97
-
98
-
99
-
100
-
101
-
102
-
 103
103 -
 104
104 -
 105
105 -
 106
106 -
 107
107 -
 108
108 -
 109
109 -
 110
110 -
 111
111 -
 112
112 -
 113
113 -
114
-
115
-
116
-
117
-
118
-
119
-
120
-
121
-
122
-
123
-
124
-
125
-
126
-
127
-
128
-
129
-
130
-
131
-
132
-
133
-
134
-
135
-
136
-
137
-
138
-
139
-
140
-
141
-
142
-
143
-
144
-
145
-
146
-
147
-
148
-
149
-
150
-
151
-
152
-
153
-
154
-
155
-
156
-
157
-
158
-
159
-
160
-
161
-
162
-
163
-
164
-
165
-
166
-
167
-
168
-
169
-
170
-
171
-
172
-
173
-
174
-
175
-
176
-
177
-
178
-
179
-
180
-
181
-
182
-
183
-
184
-
185
-
186
-
187
-
188
-
189
-
190
-
191
-
192
-
193
-
194
-
195
-
196
-
197
-
198
-
199
-
200
-
201
-
202
-
203
-
204
-
205
-
206
-
207
-
208
-
209
-
210
-
211
-
212
-
213
-
214
-
215
-
216
-
217
-
218
-
219
-
220
-
221
-
222
-
223
-
224
-
225
-
226
-
227
-
228
-
229
-
230
-
231
-
232
-
233
-
234
-
235
-
236
-
237
-
238
-
239
-
240
-
241
-
242
-
243
-
244
-
245
-
246
-
247
-
248
-
249
-
250
-
251
-
252
 |
 |
