Ricoh C811DN Operating Instructions - Page 198
Pull out the punch waste box carefully, and then remove punch waste., Re-install the punch waste box.
 |
UPC - 026649028182
View all Ricoh C811DN manuals
Add to My Manuals
Save this manual to your list of manuals |
Page 198 highlights
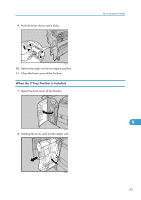
9. Troubleshooting 2. Pull out the punch waste box carefully, and then remove punch waste. ASZ282S 3. Re-install the punch waste box. ASZ291S 4. Close the front cover of the finisher. 9 • If you do not re-install the punch waste box in step 3, the message remains displayed. • If the message remains displayed, re-install the punch waste box. • The message might appear even when the punch waste box is not full. In this case, there may be some punch waste on the surface shown by the arrow. Remove the punch waste. 196 ASZ302S
-
 1
1 -
2
-
3
-
4
-
5
-
6
-
7
-
8
-
9
-
10
-
11
-
12
-
13
-
14
-
15
-
16
-
17
-
18
-
19
-
20
-
21
-
22
-
23
-
24
-
25
-
26
-
27
-
28
-
29
-
30
-
31
-
32
-
33
-
34
-
35
-
36
-
37
-
38
-
39
-
40
-
41
-
42
-
43
-
44
-
45
-
46
-
47
-
48
-
49
-
50
-
51
-
52
-
53
-
54
-
55
-
56
-
57
-
58
-
59
-
60
-
61
-
62
-
63
-
64
-
65
-
66
-
67
-
68
-
69
-
70
-
71
-
72
-
73
-
74
-
75
-
76
-
77
-
78
-
79
-
80
-
81
-
82
-
83
-
84
-
85
-
86
-
87
-
88
-
89
-
90
-
91
-
92
-
93
-
94
-
95
-
96
-
97
-
98
-
99
-
100
-
101
-
102
-
103
-
104
-
105
-
106
-
107
-
108
-
109
-
110
-
111
-
112
-
113
-
114
-
115
-
116
-
117
-
118
-
119
-
120
-
121
-
122
-
123
-
124
-
125
-
126
-
127
-
128
-
129
-
130
-
131
-
132
-
133
-
134
-
135
-
136
-
137
-
138
-
139
-
140
-
141
-
142
-
143
-
144
-
145
-
146
-
147
-
148
-
149
-
150
-
151
-
152
-
153
-
154
-
155
-
156
-
157
-
158
-
159
-
160
-
161
-
162
-
163
-
164
-
165
-
166
-
167
-
168
-
169
-
170
-
171
-
172
-
173
-
174
-
175
-
176
-
177
-
178
-
179
-
180
-
181
-
182
-
183
-
184
-
185
-
186
-
187
-
188
-
189
-
190
-
191
-
192
-
 193
193 -
 194
194 -
 195
195 -
 196
196 -
 197
197 -
 198
198 -
 199
199 -
 200
200 -
 201
201 -
 202
202 -
 203
203 -
204
-
205
-
206
-
207
-
208
-
209
-
210
-
211
-
212
-
213
-
214
-
215
-
216
-
217
-
218
-
219
-
220
-
221
-
222
-
223
-
224
-
225
-
226
-
227
-
228
-
229
-
230
-
231
-
232
-
233
-
234
-
235
-
236
-
237
-
238
-
239
-
240
-
241
-
242
-
243
-
244
-
245
-
246
-
247
-
248
-
249
-
250
-
251
-
252
 |
 |

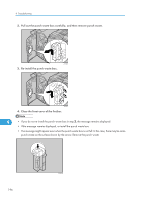
2.
Pull out the punch waste box carefully, and then remove punch waste.
ASZ282S
3.
Re-install the punch waste box.
ASZ291S
4.
Close the front cover of the finisher.
•
If you do not re-install the punch waste box in step
3
, the message remains displayed.
•
If the message remains displayed, re-install the punch waste box.
•
The message might appear even when the punch waste box is not full. In this case, there may be some
punch waste on the surface shown by the arrow. Remove the punch waste.
ASZ302S
9. Troubleshooting
196
9