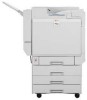
Ricoh CL7200DT2 Setup Guide - Page 14
Upper right cover, Controller board, Ethernet port, USB port, Expansion Card Slots, Optional
 |
UPC - 026649024139
View all Ricoh CL7200DT2 manuals
Add to My Manuals
Save this manual to your list of manuals |
Page 14 highlights
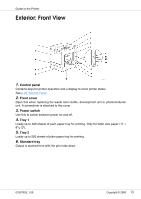
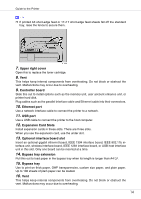
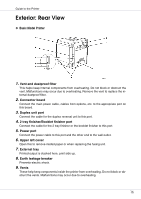
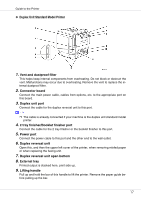
Guide to the Printer ❒ If printed A3 short-edge feed or 11×17 short-edge feed sheets fall off the standard tray, raise the fence to secure them. 7. Upper right cover Open this to replace the toner cartridge. 8. Vent This helps keep internal components from overheating. Do not block or obstruct the vent. Malfunctions may occur due to overheating. 9. Controller board Slide this out to install options such as the memory unit, user account enhance unit, or printer hard disk. Plug cables such as the parallel interface cable and Ethernet cable into their connectors. 10. Ethernet port Use a network interface cable to connect the printer to a network. 11. USB port Use a USB cable to connect the printer to the host computer. 12. Expansion Card Slots Install expansion cards in these slots. There are three slots. When you use the expansion card, use the under slot. 13. Optional interface board slot Insert an optional gigabit ethernet board, IEEE 1394 interface board, IEEE 802.11b interface unit, wireless interface board, IEEE 1284 interface board, or USB host interface unit in this slot. Only one board can be inserted at a time. 14. Bypass tray extension Pull this out to load paper in the bypass tray when its length is longer than A4 L. 15. Bypass tray Use to print on thick paper, OHP transparencies, custom size paper, and plain paper. Up to 100 sheets of plain paper can be loaded. 16. Vent This helps keep internal components from overheating. Do not block or obstruct the vent. Malfunctions may occur due to overheating. 14
-
 1
1 -
2
-
3
-
4
-
5
-
6
-
7
-
8
-
 9
9 -
 10
10 -
 11
11 -
 12
12 -
 13
13 -
 14
14 -
 15
15 -
 16
16 -
 17
17 -
 18
18 -
 19
19 -
20
-
21
-
22
-
23
-
24
-
25
-
26
-
27
-
28
-
29
-
30
-
31
-
32
-
33
-
34
-
35
-
36
-
37
-
38
-
39
-
40
-
41
-
42
-
43
-
44
-
45
-
46
-
47
-
48
-
49
-
50
-
51
-
52
-
53
-
54
-
55
-
56
-
57
-
58
-
59
-
60
-
61
-
62
-
63
-
64
-
65
-
66
-
67
-
68
-
69
-
70
-
71
-
72
-
73
-
74
-
75
-
76
-
77
-
78
-
79
-
80
-
81
-
82
-
83
-
84
-
85
-
86
-
87
-
88
-
89
-
90
-
91
-
92
-
93
-
94
-
95
-
96
-
97
-
98
-
99
-
100
-
101
-
102
-
103
-
104
-
105
-
106
-
107
-
108
-
109
-
110
-
111
-
112
-
113
-
114
-
115
-
116
-
117
-
118
-
119
-
120
-
121
-
122
-
123
-
124
-
125
-
126
-
127
-
128
-
129
-
130
-
131
-
132
-
133
-
134
-
135
-
136
-
137
-
138
-
139
-
140
 |
 |
