Ricoh CL7200DT2 Setup Guide - Page 17
Duplex Unit Standard Model Printer
 |
UPC - 026649024139
View all Ricoh CL7200DT2 manuals
Add to My Manuals
Save this manual to your list of manuals |
Page 17 highlights
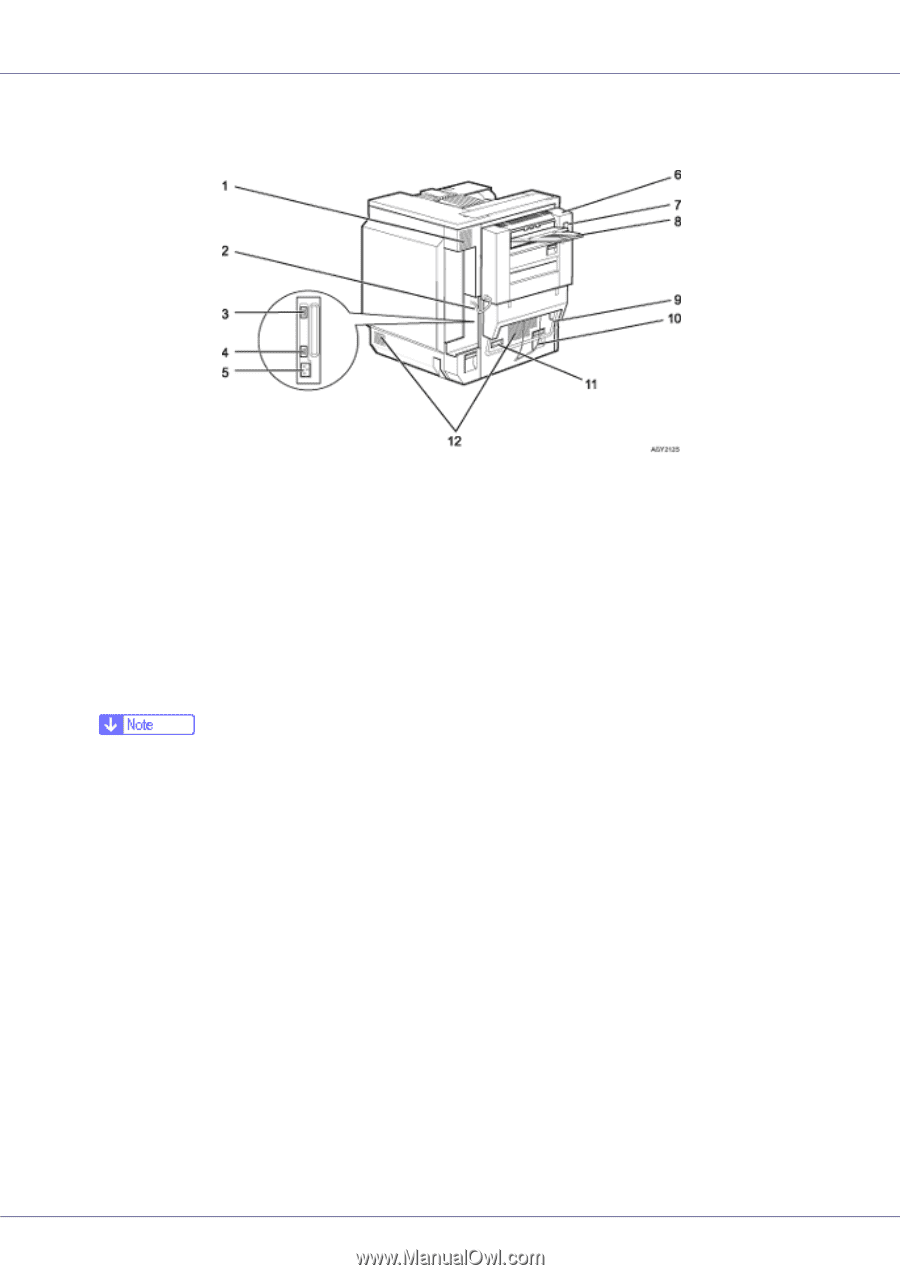
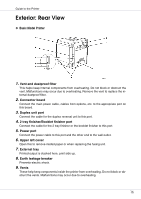
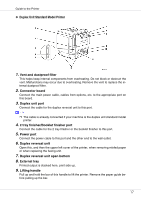
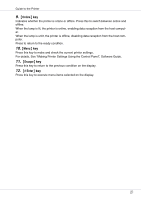
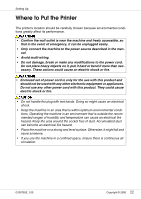
Guide to the Printer ❖ Duplex Unit Standard Model Printer 1. Vent and dustproof filter This helps keep internal components from overheating. Do not block or obstruct the vent. Malfunctions may occur due to overheating. Remove the vent to replace the internal dustproof filter. 2. Connector board Connect the main power cable, cables from options, etc. to the appropriate port on this board. 3. Duplex unit port Connect the cable for the duplex reversal unit to this port. ❒ The cable is already connected if your machine is the duplex unit standard model printer. 4. 2 tray finisher/Booklet finisher port Connect the cable for the 2 tray finisher or the booklet finisher to this port. 5. Power port Connect the power cable to this port and the other end to the wall outlet. 6. Duplex reversal unit Open this, and then the upper left cover of the printer, when removing misfed paper or when replacing the fusing unit. 7. Duplex reversal unit open bottom 8. External tray Printed output is stacked here, print side up. 9. Lifting handle Pull up and hold the bar of this handle to lift the printer. Remove the paper guide before pulling up the bar. 17
-
 1
1 -
2
-
3
-
4
-
5
-
6
-
7
-
8
-
9
-
10
-
11
-
 12
12 -
 13
13 -
 14
14 -
 15
15 -
 16
16 -
 17
17 -
 18
18 -
 19
19 -
 20
20 -
 21
21 -
 22
22 -
23
-
24
-
25
-
26
-
27
-
28
-
29
-
30
-
31
-
32
-
33
-
34
-
35
-
36
-
37
-
38
-
39
-
40
-
41
-
42
-
43
-
44
-
45
-
46
-
47
-
48
-
49
-
50
-
51
-
52
-
53
-
54
-
55
-
56
-
57
-
58
-
59
-
60
-
61
-
62
-
63
-
64
-
65
-
66
-
67
-
68
-
69
-
70
-
71
-
72
-
73
-
74
-
75
-
76
-
77
-
78
-
79
-
80
-
81
-
82
-
83
-
84
-
85
-
86
-
87
-
88
-
89
-
90
-
91
-
92
-
93
-
94
-
95
-
96
-
97
-
98
-
99
-
100
-
101
-
102
-
103
-
104
-
105
-
106
-
107
-
108
-
109
-
110
-
111
-
112
-
113
-
114
-
115
-
116
-
117
-
118
-
119
-
120
-
121
-
122
-
123
-
124
-
125
-
126
-
127
-
128
-
129
-
130
-
131
-
132
-
133
-
134
-
135
-
136
-
137
-
138
-
139
-
140
 |
 |