Ridgid R4030 Operation Manual - Page 14
Installing The Tile Cutting Wheel, Warning
 |
View all Ridgid R4030 manuals
Add to My Manuals
Save this manual to your list of manuals |
Page 14 highlights
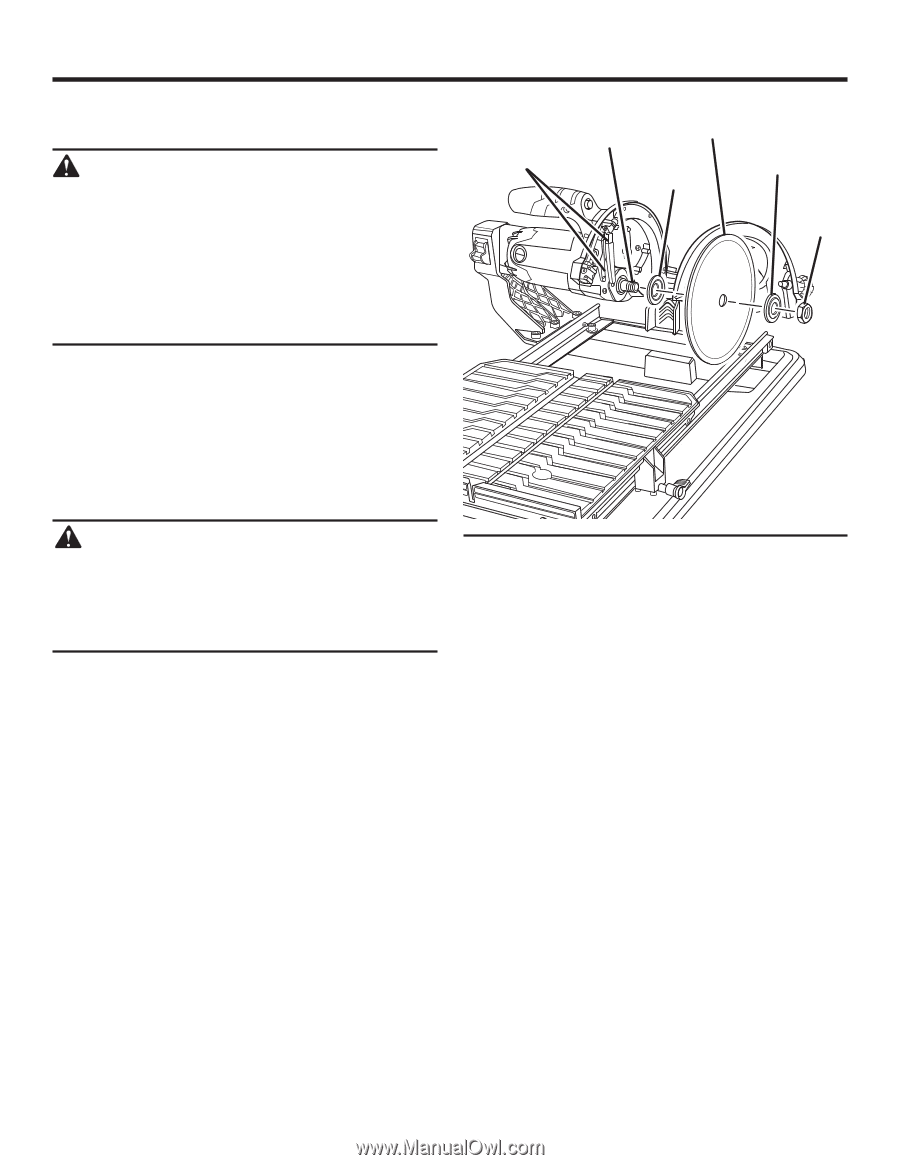
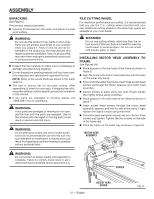
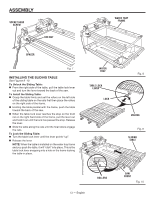
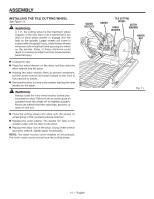
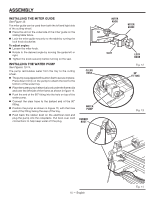
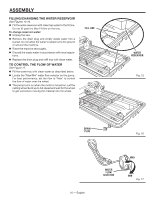
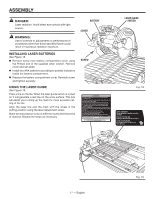
ASSEMBLY INSTALLING THE TILE CUTTING WHEEL See Figure 11. WARNING: A 7 in. tile cutting wheel is the maximum wheel capacity of the saw. Never use a wheel that is too thick to allow wheel washer to engage with the flats on the spindle. Larger wheels will come in contact with the splash hood, while thicker wheels will prevent the wheel bolt from securing the wheel on the spindle. Either of these situations could result in a serious accident and can cause serious personal injury. Unplug the saw. Place the wheel wrench on the arbor nut then slide the arbor wrench into the arbor. Holding the arbor wrench firmly to prevent movement, pull the wheel wrench (left side) forward to the front of the machine to loosen. Remove the arbor nut and outer washer leaving the inner washer on the arbor. WARNING: Always install the inner wheel washer before placing wheel on arbor. Failure to do so could cause an accident since the wheel will not tighten properly. Never use wheels that have openings, grooves, or teeth on this tool. Place the cutting wheel onto arbor with the arrows on wheel going in the counterclockwise direction. Replace the outer washer. The double "D" flats on the washers align with the flats on the arbor. Replace the arbor nut on the arbor. Using wheel wrench and arbor wrench, tighten arbor nut securely. NOTE: Two water nozzles come installed on this product. The hole in each nozzle should face the cutting wheel. WATER NOZZLES ARBOR TILE CUTTING WHEEL INNER WASHER OUTER WASHER ARBOR NUT Fig. 11 14 - English
-
 1
1 -
2
-
3
-
4
-
5
-
6
-
7
-
8
-
 9
9 -
 10
10 -
 11
11 -
 12
12 -
 13
13 -
 14
14 -
 15
15 -
 16
16 -
 17
17 -
 18
18 -
 19
19 -
20
-
21
-
22
-
23
-
24
-
25
-
26
-
27
-
28
-
29
-
30
-
31
-
32
-
33
-
34
-
35
-
36
-
37
-
38
-
39
-
40
-
41
-
42
-
43
-
44
-
45
-
46
-
47
-
48
-
49
-
50
-
51
-
52
-
53
-
54
-
55
-
56
-
57
-
58
-
59
-
60
-
61
-
62
-
63
-
64
-
65
-
66
-
67
-
68
-
69
-
70
-
71
-
72
-
73
-
74
-
75
-
76
-
77
-
78
-
79
-
80
 |
 |