Ridgid R4030 Operation Manual - Page 19
Making Cuts - 7 wet tile saw
 |
View all Ridgid R4030 manuals
Add to My Manuals
Save this manual to your list of manuals |
Page 19 highlights
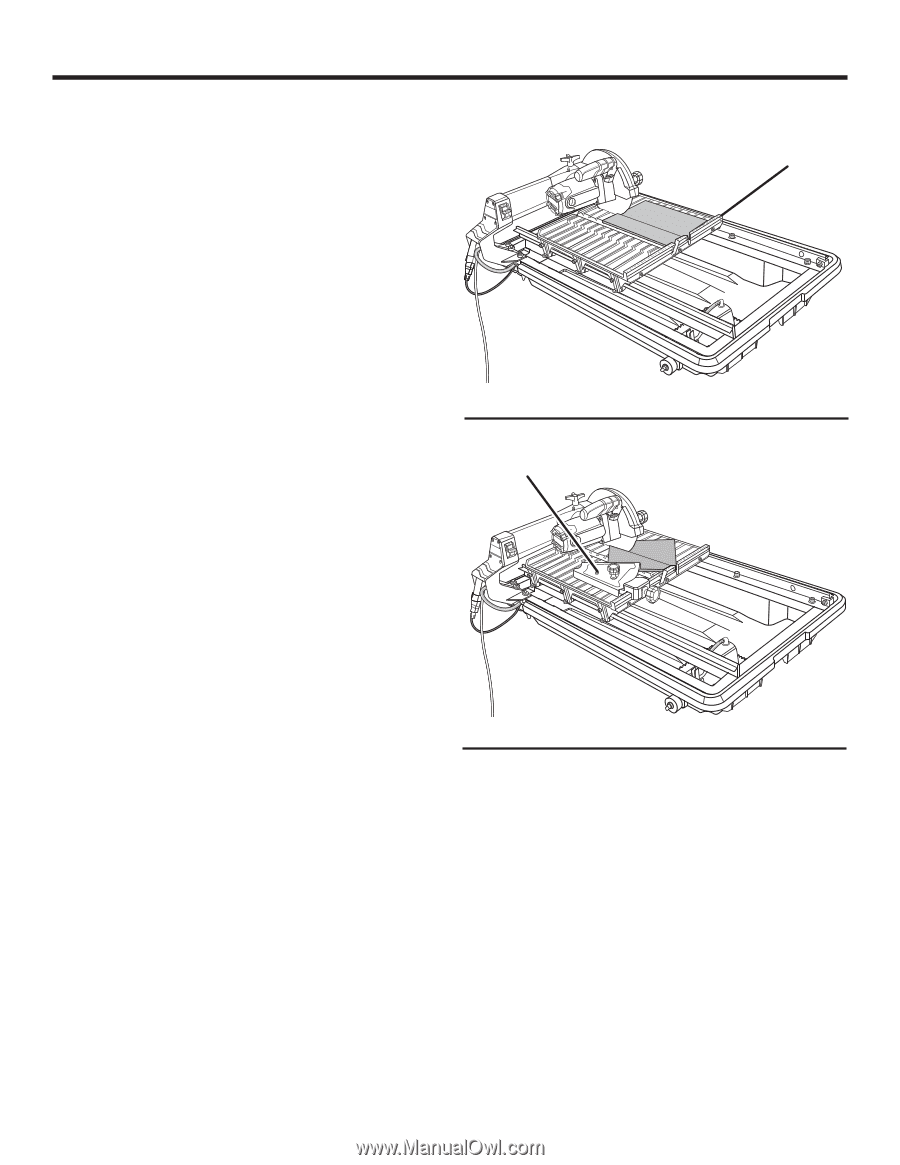
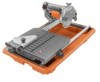
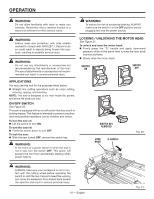
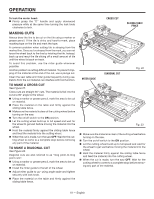
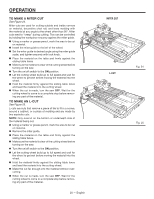
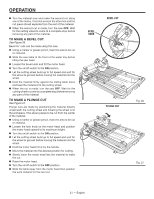
OPERATION To lock the motor head: Firmly grasp the "D" handle and apply downward pressure while at the same time turning the lock knob clockwise to lock. MAKING CUTS Always draw the line to be cut on the tile using a marker or grease pencil. If the tile is shiny and hard-to-mark, place masking tape on the tile and mark the tape. A common problem when cutting tile is straying from the marked line. Once you've strayed from the mark, you can not force the wheel back to the line by twisting the tile. Instead, back up and recut the tile slicing off a small amount of tile until the wheel is back on track. To avoid this problem, use the miter guide whenever possible. Another problem is cutting difficult material. To prevent chipping of the material at the end of the cut, use a plunge cut. Clean the saw table and miter guide frequently during use. Debris from the cut material can interfere with tool function. TO MAKE A CROSS CUT See Figure 22. Cross cuts are straight 90° cuts. The material is fed into the cut at a 90° angle to the wheel. Using a marker or grease pencil, mark the area to be cut on material. Place the material on the table and firmly against the sliding table fence. Make sure the material is clear of the cutting wheel before turning on the saw. Turn the on/off switch to the ON position. Let the cutting wheel build up to full speed and wait for the wheel to get wet before moving the material into the wheel. Hold the material firmly against the sliding table fence and feed the material into the cutting wheel. When the cut is made, turn the saw OFF. Wait for the cutting wheel to come to a complete stop before removing any part of the material. TO MAKE A DIAGONAL CUT See Figure 23. Diagonal cuts are also referred to as "long point-to-long point cuts". Using a marker or grease pencil, mark the area to be cut on material. Install the miter guide to the left of the wheel. Adjust miter guide to 45° using angle scale and tighten securely with lock knob. Place the material on the table and firmly against the sliding table fence. CROSS CUT SLIDING TABLE FENCE MITER GUIDE DIAGONAL CUT Fig. 22 Fig. 23 Make sure the material is clear of the cutting wheel before turning on the saw. Turn the on/off switch to the ON position. Let the cutting wheel build up to full speed and wait for the wheel to get wet before moving the material into the wheel. Hold the material firmly against the sliding table fence and feed the material into the cutting wheel. When the cut is made, turn the saw OFF. Wait for the cutting wheel to come to a complete stop before removing any part of the material. 19 - English
-
 1
1 -
2
-
3
-
4
-
5
-
6
-
7
-
8
-
9
-
10
-
11
-
12
-
13
-
 14
14 -
 15
15 -
 16
16 -
 17
17 -
 18
18 -
 19
19 -
 20
20 -
 21
21 -
 22
22 -
 23
23 -
 24
24 -
25
-
26
-
27
-
28
-
29
-
30
-
31
-
32
-
33
-
34
-
35
-
36
-
37
-
38
-
39
-
40
-
41
-
42
-
43
-
44
-
45
-
46
-
47
-
48
-
49
-
50
-
51
-
52
-
53
-
54
-
55
-
56
-
57
-
58
-
59
-
60
-
61
-
62
-
63
-
64
-
65
-
66
-
67
-
68
-
69
-
70
-
71
-
72
-
73
-
74
-
75
-
76
-
77
-
78
-
79
-
80
 |
 |