Ridgid R4030 Operation Manual - Page 15
Installing The Miter Guide, Installing The Water Pump
 |
View all Ridgid R4030 manuals
Add to My Manuals
Save this manual to your list of manuals |
Page 15 highlights
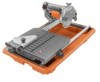
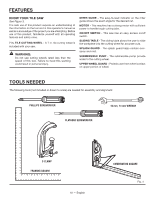
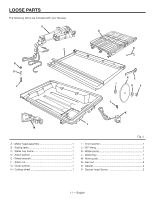
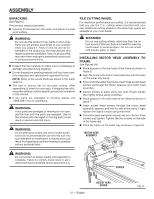
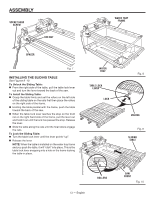
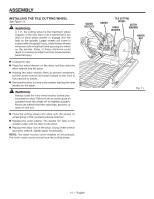
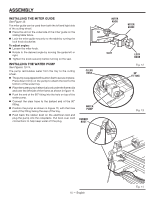
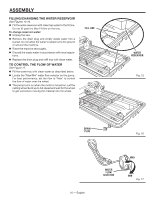
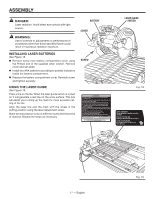
ASSEMBLY INSTALLING THE MITER GUIDE See Figure 12. The miter guide can be used from both the left and right side of the cutting wheel. Place the slot on the underside of the miter guide on the sliding table fence. Lock the miter guide securely to the table by turning the lock knob clockwise. 45 To adjust angles: Loosen the miter knob. Rotate to the desired angle by moving the guide left or right. Tighten the knob securely before turning on the saw. INSTALLING THE WATER PUMP See Figures 13-14. The pump recirculates water from the tray to the cutting wheel. The pump is equipped with suction feet to secure in place. Press down firmly on the pump to attach the feet to the bottom of the water tray. Place the water pump's electrical cord under the frame rails and over the left side of the frame as shown in figure 14. Push the end of the 90° fitting into the hole on top of the water pump. Connect the clear hose to the barbed end of the 90° fitting. Position the pump as shown in Figure 13, with the hose end of the fitting facing the rear of the tray. Push back the rubber boot on the electrical cord and plug the pump into the receptacle. Pull boot over cord connections to help keep water off the plug. CLEAR HOSE WATER PUMP RUBBER BOOT MITER KNOB SLOT MITER GUIDE LOCK KNOB Fig. 12 90° FITTING Fig. 13 15 - English Fig. 14
-
 1
1 -
2
-
3
-
4
-
5
-
6
-
7
-
8
-
9
-
 10
10 -
 11
11 -
 12
12 -
 13
13 -
 14
14 -
 15
15 -
 16
16 -
 17
17 -
 18
18 -
 19
19 -
 20
20 -
21
-
22
-
23
-
24
-
25
-
26
-
27
-
28
-
29
-
30
-
31
-
32
-
33
-
34
-
35
-
36
-
37
-
38
-
39
-
40
-
41
-
42
-
43
-
44
-
45
-
46
-
47
-
48
-
49
-
50
-
51
-
52
-
53
-
54
-
55
-
56
-
57
-
58
-
59
-
60
-
61
-
62
-
63
-
64
-
65
-
66
-
67
-
68
-
69
-
70
-
71
-
72
-
73
-
74
-
75
-
76
-
77
-
78
-
79
-
80
 |
 |
