Samsung DVD-HR720 User Manual (user Manual) (ver.1.0) (English) - Page 28
Connecting a Cable box to the G-Link jack, Correct,
 |
View all Samsung DVD-HR720 manuals
Add to My Manuals
Save this manual to your list of manuals |
Page 28 highlights
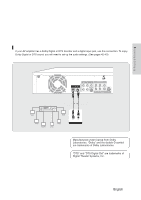
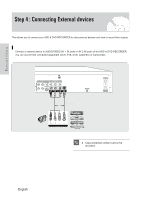
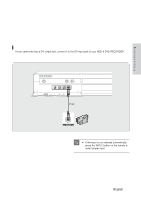
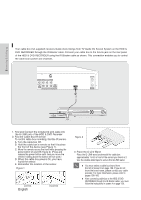
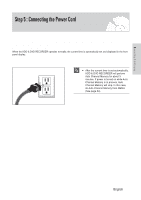
Connecting & Setting up Connecting a Cable box to the G-Link jack Your cable box (not supplied) receives Guide show listings from TV Guide On Screen System on the HDD & DVD RECORDER through the IR Blaster cable. Connect your cable box to the G-Link jack on the rear panel of the HDD & DVD RECORDER using the IR Blaster cable as shown. This connection enables you to control the cable box's power and channels. IR Blaster cable w w 1 inch G-Link wand Front Panel of CABLE BOX Getting Connected 1. Find and Connect the included G-Link cable into the G-LINK jack of the HDD & DVD Recorder. 2. Find the Cable Box IR Sensor To control cable box recording, find the IR sensor. A. Turn the cable box Off. B. Hold the cable box's remote so that it touches the front of the device (see Figure 1). C. Move the remote across the front while pressing the power button On and Off (Figure 2). (Press and release the power button each time you move the remote; holding down the button will not work.) D. When the cable box powers On, you have found the sensor. E. Remember the location of the sensor. Figure 1 Correct 28 - English Incorrect Figure 2 3. Place the G-Link Wand Place the G-LINK wand underneath the cable box approximately 1 inch in front of the sensor you found in 2 . Use the double-sided tape to secure the G-LINK wand. I You must select a cable box brand from the list in Screen 8 on page 159. If you do not NOTE know the brand name, please contact your cable provider. For more information, please refer to pages 158~160. I After connecting cable box to the HDD & DVD RECORDER through the IR Blaster cable, you must follow the instructions in screen 4 on page 158.
-
 1
1 -
2
-
3
-
4
-
5
-
6
-
7
-
8
-
9
-
10
-
11
-
12
-
13
-
14
-
15
-
16
-
17
-
18
-
19
-
20
-
21
-
22
-
 23
23 -
 24
24 -
 25
25 -
 26
26 -
 27
27 -
 28
28 -
 29
29 -
 30
30 -
 31
31 -
 32
32 -
 33
33 -
34
-
35
-
36
-
37
-
38
-
39
-
40
-
41
-
42
-
43
-
44
-
45
-
46
-
47
-
48
-
49
-
50
-
51
-
52
-
53
-
54
-
55
-
56
-
57
-
58
-
59
-
60
-
61
-
62
-
63
-
64
-
65
-
66
-
67
-
68
-
69
-
70
-
71
-
72
-
73
-
74
-
75
-
76
-
77
-
78
-
79
-
80
-
81
-
82
-
83
-
84
-
85
-
86
-
87
-
88
-
89
-
90
-
91
-
92
-
93
-
94
-
95
-
96
-
97
-
98
-
99
-
100
-
101
-
102
-
103
-
104
-
105
-
106
-
107
-
108
-
109
-
110
-
111
-
112
-
113
-
114
-
115
-
116
-
117
-
118
-
119
-
120
-
121
-
122
-
123
-
124
-
125
-
126
-
127
-
128
-
129
-
130
-
131
-
132
-
133
-
134
-
135
-
136
-
137
-
138
-
139
-
140
-
141
-
142
-
143
-
144
-
145
-
146
-
147
-
148
-
149
-
150
-
151
-
152
-
153
-
154
-
155
-
156
-
157
-
158
-
159
-
160
-
161
-
162
-
163
-
164
-
165
-
166
-
167
-
168
 |
 |
