Samsung DVD-HR720 User Manual (user Manual) (ver.1.0) (English) - Page 84
Making a One Touch Recording (OTR
 |
View all Samsung DVD-HR720 manuals
Add to My Manuals
Save this manual to your list of manuals |
Page 84 highlights
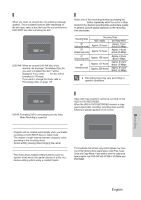
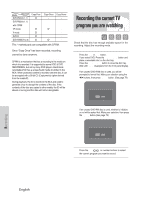
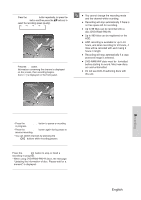
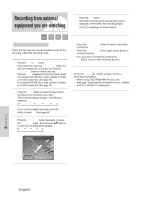
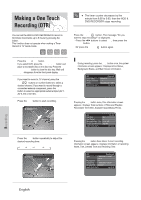
Making a One Touch Recording (OTR) You can set the HDD & DVD RECORDER to record in 30-minute increments up to 8 hours by pressing the REC button. This function does not operate when making a Timer Record in TV Guide mode. I The timer counter decreases by the NOTE minute from 8:00 to 0:00, then the HDD & DVD RECORDER stops recording. - To stop recording - Press the STOP ( ) button. The message "Do you want to stop recording?" is displayed. • Press the œ √ buttons to select Yes, then press the ENTER button. • Or press the STOP ( ) button again. 1 Press the HDD or DVD button. If you select DVD, press the OPEN/CLOSE button and place a recordable disc on the disc tray. Press the OPEN/CLOSE button to close the disc tray. Wait until LOAD disappears from the front panel display. 2 If you want to record a TV channel, press the CH ( ) buttons or number buttons to select a desired channel. If you want to record through a connected external component, press the INPUT button to select an appropriate external input (AV 1, AV 2, DV or CH 01). 3 Press the REC button to start recording. G Recording : CH 11 [SAP] About INFO button During recording, press the INFO button once, the system information screen appears.: Displays Active Status, Background Status, and Main Screen information. HDD Active status Background Status Screen JAN/01/2005 (SAT) System Info Record XP - - Recording:CH11 [SAP] AM 12:00 Pressing the INFO button twice, Disc information screen appears.: Displays Total numbers of Titles and Playlists, Recordable Time(Title), Available Space(Music/Photo). HDD Disc Info Total Title 15 Total Playlist 2 Recordable Time : Title 17:12 XP Available Space:Music/Photo 10033 MB JAN/01/2005 (SAT) AM 12:00 4 Press the REC button repeatedly to adjust the desired recording time. © 0:30 © 1:00 © ... 8:00 © Off OTR Mode 0:30 Pressing the INFO button three times: Current recording information screen appears.: Displays information of recording Name, Title, Created Time and Recording Time. HDD Recording Info Name JAN/01/2005 12:00 AM CH 11 Recording Title 4 Created Time JAN/01/2005 12:00 AM Recording Time 00:13:27 JAN/01/2005 (SAT) AM 12:00 Recording 84 - English
-
 1
1 -
2
-
3
-
4
-
5
-
6
-
7
-
8
-
9
-
10
-
11
-
12
-
13
-
14
-
15
-
16
-
17
-
18
-
19
-
20
-
21
-
22
-
23
-
24
-
25
-
26
-
27
-
28
-
29
-
30
-
31
-
32
-
33
-
34
-
35
-
36
-
37
-
38
-
39
-
40
-
41
-
42
-
43
-
44
-
45
-
46
-
47
-
48
-
49
-
50
-
51
-
52
-
53
-
54
-
55
-
56
-
57
-
58
-
59
-
60
-
61
-
62
-
63
-
64
-
65
-
66
-
67
-
68
-
69
-
70
-
71
-
72
-
73
-
74
-
75
-
76
-
77
-
78
-
 79
79 -
 80
80 -
 81
81 -
 82
82 -
 83
83 -
 84
84 -
 85
85 -
 86
86 -
 87
87 -
 88
88 -
 89
89 -
90
-
91
-
92
-
93
-
94
-
95
-
96
-
97
-
98
-
99
-
100
-
101
-
102
-
103
-
104
-
105
-
106
-
107
-
108
-
109
-
110
-
111
-
112
-
113
-
114
-
115
-
116
-
117
-
118
-
119
-
120
-
121
-
122
-
123
-
124
-
125
-
126
-
127
-
128
-
129
-
130
-
131
-
132
-
133
-
134
-
135
-
136
-
137
-
138
-
139
-
140
-
141
-
142
-
143
-
144
-
145
-
146
-
147
-
148
-
149
-
150
-
151
-
152
-
153
-
154
-
155
-
156
-
157
-
158
-
159
-
160
-
161
-
162
-
163
-
164
-
165
-
166
-
167
-
168
 |
 |
