Samsung ML-1250 User Manual (user Manual) (ver.1.00) (English) - Page 132
Reconnect the printer cable and the, Then, replace the supports.
 |
View all Samsung ML-1250 manuals
Add to My Manuals
Save this manual to your list of manuals |
Page 132 highlights
Installing Optional Memory Card 7 Push the SIMM down until it snaps into place. Make sure that the SIMM is secured in place by the metal clips and pins on both sides of the connectors. Pin Metal clip Note: When you disassemble the memory card, push out on the metal clips at each end of the connector, and pull it as shown. 8 Reassemble the shield cover, turn the printer back over, and replace the toner cartridge. 9 Reconnect the printer cable and the power cord and turn the printer on. Then, replace the supports. APPENDIX A.33
-
 1
1 -
2
-
3
-
4
-
5
-
6
-
7
-
8
-
9
-
10
-
11
-
12
-
13
-
14
-
15
-
16
-
17
-
18
-
19
-
20
-
21
-
22
-
23
-
24
-
25
-
26
-
27
-
28
-
29
-
30
-
31
-
32
-
33
-
34
-
35
-
36
-
37
-
38
-
39
-
40
-
41
-
42
-
43
-
44
-
45
-
46
-
47
-
48
-
49
-
50
-
51
-
52
-
53
-
54
-
55
-
56
-
57
-
58
-
59
-
60
-
61
-
62
-
63
-
64
-
65
-
66
-
67
-
68
-
69
-
70
-
71
-
72
-
73
-
74
-
75
-
76
-
77
-
78
-
79
-
80
-
81
-
82
-
83
-
84
-
85
-
86
-
87
-
88
-
89
-
90
-
91
-
92
-
93
-
94
-
95
-
96
-
97
-
98
-
99
-
100
-
101
-
102
-
103
-
104
-
105
-
106
-
107
-
108
-
109
-
110
-
111
-
112
-
113
-
114
-
115
-
116
-
117
-
118
-
119
-
120
-
121
-
122
-
123
-
124
-
125
-
126
-
 127
127 -
 128
128 -
 129
129 -
 130
130 -
 131
131 -
 132
132 -
 133
133 -
 134
134 -
 135
135 -
 136
136
 |
 |

A
PPENDIX
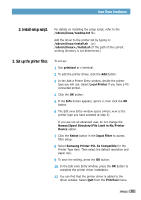
Installing Optional Memory Card
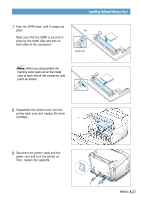
7
Push the SIMM down until it snaps into
place.
Make sure that the SIMM is secured in
place by the metal clips and pins on
both sides of the connectors.
9
Reconnect the printer cable and the
power cord and turn the printer on.
Then, replace the supports.
8
Reassemble the shield cover, turn the
printer back over, and replace the toner
cartridge.
Pin
Metal clip
Note:
When you disassemble the
memory card, push out on the metal
clips at each end of the connector, and
pull it as shown.
A.
33