Samsung SCH-I600 User Manual (user Manual) (ver.1.0) (English) - Page 56
Upload media files
 |
View all Samsung SCH-I600 manuals
Add to My Manuals
Save this manual to your list of manuals |
Page 56 highlights
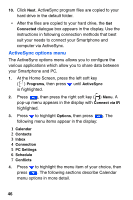
8. Click on the File menu and select New Folder from the dropdown list. 9. Name the new folder Home. You are now ready to upload media files to your Smartphone from your PC. Upload media files Once you've created the appropriate folders on your Smartphone using the ActiveSync interface as outlined in the previous section, you can move the files from the PC to your Smartphone using Windows Explorer. 1. Right click on your computer's Start button and select Explore. The contents of your computer's hard drive appear in the display. 2. Locate and highlight the media files on your computer that you wish to transfer to your Smartphone, then press CTRL-C to copy the files to your computer's clipboard. 3. Locate the Smartphone icon ( ) and explore the Smartphone's contents by clicking on the + to the left of the icon. • If the file that you copied is a .jpg file, open the Home folder on your Smartphone and press CTRL-V to paste the .jpg file (or files) into the Home folder. • If the file that you copied is a .wav file, open the Sounds folder on your Smartphone to, then press CTRL-V to past the .wav file (or files) into the Sounds folder. • The target folder for each media type (.jpg or .wav) in your Smartphone's folder hierarchy is as follows: JPEG files - Mobile Device/Smartphone/IPSM/Application Data/Home WAV files Mobile Device/Smartphone/IPSM/Application Data/Sounds 48
-
 1
1 -
2
-
3
-
4
-
5
-
6
-
7
-
8
-
9
-
10
-
11
-
12
-
13
-
14
-
15
-
16
-
17
-
18
-
19
-
20
-
21
-
22
-
23
-
24
-
25
-
26
-
27
-
28
-
29
-
30
-
31
-
32
-
33
-
34
-
35
-
36
-
37
-
38
-
39
-
40
-
41
-
42
-
43
-
44
-
45
-
46
-
47
-
48
-
49
-
50
-
 51
51 -
 52
52 -
 53
53 -
 54
54 -
 55
55 -
 56
56 -
 57
57 -
 58
58 -
 59
59 -
 60
60 -
 61
61 -
62
-
63
-
64
-
65
-
66
-
67
-
68
-
69
-
70
-
71
-
72
-
73
-
74
-
75
-
76
-
77
-
78
-
79
-
80
-
81
-
82
-
83
-
84
-
85
-
86
-
87
-
88
-
89
-
90
-
91
-
92
-
93
-
94
-
95
-
96
-
97
-
98
-
99
-
100
-
101
-
102
-
103
-
104
-
105
-
106
-
107
-
108
-
109
-
110
-
111
-
112
-
113
-
114
-
115
-
116
-
117
-
118
-
119
-
120
-
121
-
122
-
123
-
124
-
125
-
126
-
127
-
128
-
129
-
130
-
131
-
132
 |
 |