Samsung SPH-M830 User Manual Ver.lh1_f4 (English(north America)) - Page 28
Navigation and Customization
 |
View all Samsung SPH-M830 manuals
Add to My Manuals
Save this manual to your list of manuals |
Page 28 highlights
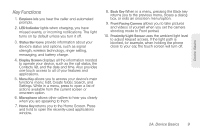
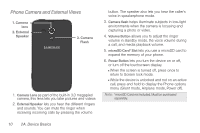
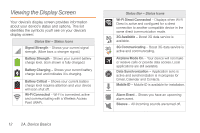
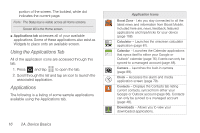
Note: Watch your device's battery level indicator and charge the battery before it runs out of power. Long backlight settings, searching for service, vibrate mode, browser use and other variables may reduce the battery's talk and standby times. Installing the Battery ᮣ See "Setting Up Your Device" on page 2. Removing the Battery 1. Make sure the power is off so that you don't lose any stored numbers or messages. 2. Grasp the device firmly, locate the cover release latch, and then place your fingernail in the opening and firmly "pop" the cover off the device. 3. Carefully remove the battery from the device. WARNING: Do not handle a damaged or leaking Li-Ion battery as you can be burned. Charging the Battery Keeping track of your battery's charge is important. If your battery level becomes too low, your device automatically turns off and you will lose any information you were just working on. Always use a Samsung-approved desktop charger, travel charger, or vehicle power adapter to charge your battery. ᮣ Plug the first end of the charger into the phone's charger jack and the other end into an electrical outlet. With the Samsung-approved Li-Ion battery, you can recharge the battery before it completely runs down. Navigation and Customization The Samsung Galaxy RushTM is a touch-sensitive device which allows you to select onscreen options with a single tap, and also scroll through long menu lists. Simply slide up and down through the display with your fingertip. Tip: Some menu options are also accessed by pressing and holding an onscreen item, such as a Contact entry from the Contacts tab. 14 2A. Device Basics
-
 1
1 -
2
-
3
-
4
-
5
-
6
-
7
-
8
-
9
-
10
-
11
-
12
-
13
-
14
-
15
-
16
-
17
-
18
-
19
-
20
-
21
-
22
-
 23
23 -
 24
24 -
 25
25 -
 26
26 -
 27
27 -
 28
28 -
 29
29 -
 30
30 -
 31
31 -
 32
32 -
 33
33 -
34
-
35
-
36
-
37
-
38
-
39
-
40
-
41
-
42
-
43
-
44
-
45
-
46
-
47
-
48
-
49
-
50
-
51
-
52
-
53
-
54
-
55
-
56
-
57
-
58
-
59
-
60
-
61
-
62
-
63
-
64
-
65
-
66
-
67
-
68
-
69
-
70
-
71
-
72
-
73
-
74
-
75
-
76
-
77
-
78
-
79
-
80
-
81
-
82
-
83
-
84
-
85
-
86
-
87
-
88
-
89
-
90
-
91
-
92
-
93
-
94
-
95
-
96
-
97
-
98
-
99
-
100
-
101
-
102
-
103
-
104
-
105
-
106
-
107
-
108
-
109
-
110
-
111
-
112
-
113
-
114
-
115
-
116
-
117
-
118
-
119
-
120
-
121
-
122
-
123
-
124
-
125
-
126
-
127
-
128
-
129
-
130
-
131
-
132
-
133
-
134
-
135
-
136
-
137
-
138
-
139
-
140
-
141
-
142
-
143
-
144
-
145
-
146
-
147
-
148
-
149
-
150
-
151
-
152
-
153
-
154
-
155
-
156
-
157
-
158
-
159
-
160
-
161
-
162
-
163
-
164
-
165
-
166
-
167
-
168
-
169
-
170
-
171
-
172
-
173
-
174
-
175
-
176
-
177
-
178
-
179
-
180
-
181
-
182
 |
 |