Sharp AR-P450 AR-P350 AR-P450 Operation Manual - Page 41
Setting The Printer Driver - windows 7 driver
 |
View all Sharp AR-P450 manuals
Add to My Manuals
Save this manual to your list of manuals |
Page 41 highlights
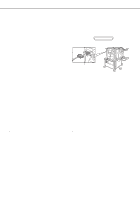
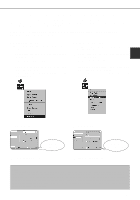
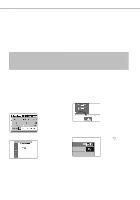
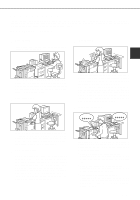
SETTING THE PRINTER DRIVER This section describes the method of changing the printer driver settings from your computer. If no printer driver has been installed, use the supplied CD-ROM to install it referring to "INSTALLING PRINTER DRIVERS AND PRINTER UTILITIES" on page 2-3. Printer driver settings under Windows (selecting and setting print conditions) Change the settings using the printer properties. s Windows 95 / 98 / Me Screens for Windows 98 are used in the description below. 1 On the [Start] menu, select [Settings] and then [Printers]. The Printer window will appear. 2 Right-click the installed printer driver and select [Properties]. This example is the screen displayed by selecting AR-P350PCL5e. s Windows NT 4.0 / 2000 Screens for Windows NT 4.0 are used in the description below. 1 2 On the [Start] menu, select [Settings] and then [Printers]. The Printer window will appear. 2 Right-click the installed printer driver and select [Document Defaults]. This example is the screen displayed by selecting AR-P350PCL5e. 3 Set each item. 3 Set each item. For setting items, see the printer driver help. For setting items, see the printer driver help. 4 Click the [OK] button. 4 Click the [OK] button. NOTE For the setting concerning optional peripheral devices such as the duplex module, finisher, and stand/3 x 500 sheet paper drawer, right-click the installed printer, select [Properties], and then open the [Configuration] tab. If you use this product as a network printer and you have installed the Printer Status Monitor, the configuration of peripheral devices will be automatically set by clicking "Auto Configuration". If you click the [Update Tray Status] button in the [Tray Status] dialog box of the [Paper] tab, the current tray information (paper size, paper type, and quantity of paper remaining) will be displayed. 2-5
-
 1
1 -
2
-
3
-
4
-
5
-
6
-
7
-
8
-
9
-
10
-
11
-
12
-
13
-
14
-
15
-
16
-
17
-
18
-
19
-
20
-
21
-
22
-
23
-
24
-
25
-
26
-
27
-
28
-
29
-
30
-
31
-
32
-
33
-
34
-
35
-
 36
36 -
 37
37 -
 38
38 -
 39
39 -
 40
40 -
 41
41 -
 42
42 -
 43
43 -
 44
44 -
 45
45 -
 46
46 -
47
-
48
-
49
-
50
-
51
-
52
-
53
-
54
-
55
-
56
-
57
-
58
-
59
-
60
-
61
-
62
-
63
-
64
-
65
-
66
-
67
-
68
-
69
-
70
-
71
-
72
-
73
-
74
-
75
-
76
-
77
-
78
-
79
-
80
-
81
-
82
-
83
-
84
-
85
-
86
-
87
-
88
-
89
-
90
-
91
-
92
-
93
-
94
-
95
-
96
-
97
-
98
-
99
-
100
-
101
-
102
-
103
-
104
-
105
-
106
-
107
-
108
-
109
-
110
-
111
-
112
 |
 |
