Sharp AR-P450 AR-P350 AR-P450 Operation Manual - Page 62
To finish the setting operation, touch
 |
View all Sharp AR-P450 manuals
Add to My Manuals
Save this manual to your list of manuals |
Page 62 highlights
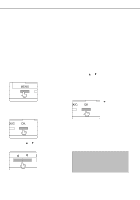
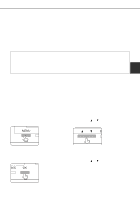
CUSTOM SETTINGS 6 Press the [OK] key. " " will be displayed to the right of selected item, and the setting will be registered. Depending on the setting item, additional item selection and registration operation may be needed. In this case, use the or key to select an item and press the [OK] key to register it. To set another item, press the [BACK/C] key and repeat steps 5 and 6. 7 When setting is complete, press the [MENU] key to return to the basic screen. NOTE If the [BACK/C] key is pressed after each setting is complete, the display that has called the setting will appear again. If selection of a number is mistaken during setting operation, press the [BACK/ C] key to correct the selected number. When the machine is being operated from the touch panel on a scanner module: 1 Press the [CUSTOM SETTINGS] key when the printer screen is displayed to display the custom settings menu screen. Any print jobs held in the printer and any job currently transmitted to the printer will be printed in the former custom setting conditions. 3 Touch the desired setting on the setting screen of the desired item and touch the [OK] key. CUSTOM SETTINGS TRAY SETTINGS TYPE / SIZE TRAY 1 PLAIN / 81/2X11 TRAY 2 PLAIN / AUTO-INCH PRINT COPY OK FAX 1/2 TRAY 3 RECYCLED / AUTO-INCH 2 Touch the key of the desired item to display its setting screen. To set another item, repeat steps 2 and 3. CUSTOM SETTINGS TOTAL COUNT TRAY SETTINGS DISPLAY CONTRAST ADDRESS CONTROL LIST PRINT RECEIVE MODE KEY OPERATOR PROGRAMS CLOCK FAX DATA FORWARD Detailed descriptions for custom settings start on the next page. 4 To finish the setting operation, touch the [EXIT] key. CUSTOM SETTINGS TOTAL COUNT TRAY SETTINGS DISPLAY CONTRAST ADDRESS CONTROL LIST PRINT RECEIVE MODE KEY OPERATOR PROGRAMS CLOCK FAX DATA FORWARD CUSTOM SETTINGS TRAY SETTINGS TYPE / SIZE TRAY 1 PLAIN / 81/2X11 TRAY 2 PLAIN / AUTO-INCH TRAY 3 RECYCLED / AUTO-INCH PRINT COPY OK FAX 1/2 Depending on the setting item, additional item setting keys may be displayed and page switching keys may be displayed. Check mark boxes are touch keys that show the status of selections. A box with a check mark means the function is "on" (enabled) and an unchecked box means the function is "off" (disabled). Alternate touches of a box will change the on/off status. 3-6
-
 1
1 -
2
-
3
-
4
-
5
-
6
-
7
-
8
-
9
-
10
-
11
-
12
-
13
-
14
-
15
-
16
-
17
-
18
-
19
-
20
-
21
-
22
-
23
-
24
-
25
-
26
-
27
-
28
-
29
-
30
-
31
-
32
-
33
-
34
-
35
-
36
-
37
-
38
-
39
-
40
-
41
-
42
-
43
-
44
-
45
-
46
-
47
-
48
-
49
-
50
-
51
-
52
-
53
-
54
-
55
-
56
-
 57
57 -
 58
58 -
 59
59 -
 60
60 -
 61
61 -
 62
62 -
 63
63 -
 64
64 -
 65
65 -
 66
66 -
 67
67 -
68
-
69
-
70
-
71
-
72
-
73
-
74
-
75
-
76
-
77
-
78
-
79
-
80
-
81
-
82
-
83
-
84
-
85
-
86
-
87
-
88
-
89
-
90
-
91
-
92
-
93
-
94
-
95
-
96
-
97
-
98
-
99
-
100
-
101
-
102
-
103
-
104
-
105
-
106
-
107
-
108
-
109
-
110
-
111
-
112
 |
 |
