Sharp AR-P450 AR-P350 AR-P450 Operation Manual - Page 70
Misfeed in the transport area, fusing area, and exit area, MISFEED REMOVAL
 |
View all Sharp AR-P450 manuals
Add to My Manuals
Save this manual to your list of manuals |
Page 70 highlights
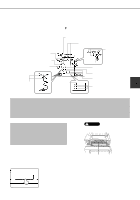
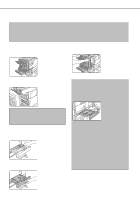
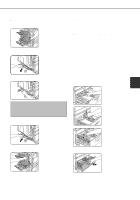
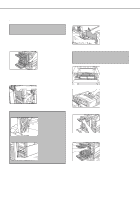
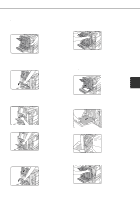
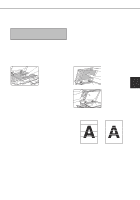
MISFEED REMOVAL Misfeed in the transport area, fusing area, and exit area CAUTION The fusing unit is hot. Take care in removing paper. (Do not touch the metal parts.) 1 Unlatch the duplex module and slide it to the left. Unlatch the module and gently move the module away from the machine. If the machine is not equipped with a duplex module, open the side cover similarly. 2 Remove the misfed paper as shown in the illustrations below. Roller rotating knob A If paper is misfed in the transport area, turn roller rotating knob A in the direction of the arrow to remove the misfed paper. Roller rotating knob B If paper is misfed in the fusing area, turn roller rotating knob B in the direction of the arrow to remove the misfed paper. CAUTION The fusing unit is hot. Take care in removing paper. (Do not touch any metal parts.) Fusing unit open tab If the misfed paper is inside the fusing area, turn down the fusing unit open tab to open the fusing unit and remove the misfed paper. If paper is misfed in the exit area, remove it as shown while taking care not to tear the paper. NOTE Do not touch or damage the transfer roller. Transfer roller Do not touch or damage the photoconductive drum. Photoconductive drum If the duplex module is equipped with an exit tray and paper is misfed in the exit area, remove the misfed paper as shown in the illustration. 3 Gently close the duplex module. If the machine is not equipped with a duplex module, close the side cover. After closing, confirm that the misfeed message has been cleared and the normal display appears. 4-6
-
 1
1 -
2
-
3
-
4
-
5
-
6
-
7
-
8
-
9
-
10
-
11
-
12
-
13
-
14
-
15
-
16
-
17
-
18
-
19
-
20
-
21
-
22
-
23
-
24
-
25
-
26
-
27
-
28
-
29
-
30
-
31
-
32
-
33
-
34
-
35
-
36
-
37
-
38
-
39
-
40
-
41
-
42
-
43
-
44
-
45
-
46
-
47
-
48
-
49
-
50
-
51
-
52
-
53
-
54
-
55
-
56
-
57
-
58
-
59
-
60
-
61
-
62
-
63
-
64
-
 65
65 -
 66
66 -
 67
67 -
 68
68 -
 69
69 -
 70
70 -
 71
71 -
 72
72 -
 73
73 -
 74
74 -
 75
75 -
76
-
77
-
78
-
79
-
80
-
81
-
82
-
83
-
84
-
85
-
86
-
87
-
88
-
89
-
90
-
91
-
92
-
93
-
94
-
95
-
96
-
97
-
98
-
99
-
100
-
101
-
102
-
103
-
104
-
105
-
106
-
107
-
108
-
109
-
110
-
111
-
112
 |
 |
