Sharp AR-P450 AR-P350 AR-P450 Operation Manual - Page 52
Insert the supplied SHARP PS3 Expansion - driver mac
 |
View all Sharp AR-P450 manuals
Add to My Manuals
Save this manual to your list of manuals |
Page 52 highlights
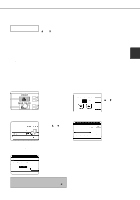
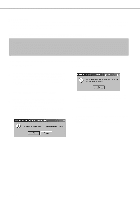
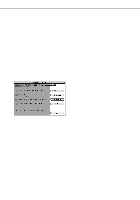
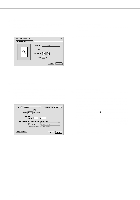
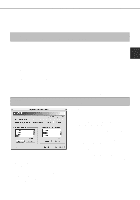
USING THE MACHINE AS A POSTSCRIPT PRINTER s Installing the utilities The screens in the Mac OS 9.0 environment are used below as examples. The display varies with the operating system and printer driver versions. 1 Turn on the computer and start the operating system. 2 Insert the supplied SHARP PS3 Expansion Kit AR-PK1 PRINTER UTILITIES CD-ROM into a CD-ROM drive. The AR-PK1 icon will appear on the desktop. 3 Close all other applications and doubleclick the AR-PK1 icon on the desktop. The files contained in the CD-ROM will be displayed. The Printer Manual is not for this product. 4 Double-click the Installer icon. The installer screen will appear. 6 Click the [Install] button of step 4. The SHARP Installer dialog box will appear. Ensure that "Easy Install" is selected, select the drive, and click the [Install] button. NOTES q "Easy Install" is recommended. q To cancel the installation, click the [Cancel] button. q When uninstalling the PPD files from your computer, select "Custom Remove" on the installation type selection window, select the features to be removed, and click the [Remove] button. 7 After installation is complete, click the [Quit] button and remove the CD-ROM. 5 Click [Reference] of steps 2 and 3 to read the text. Be sure to read the descriptions, which contain information on use of this product as a printer. 2-16
-
 1
1 -
2
-
3
-
4
-
5
-
6
-
7
-
8
-
9
-
10
-
11
-
12
-
13
-
14
-
15
-
16
-
17
-
18
-
19
-
20
-
21
-
22
-
23
-
24
-
25
-
26
-
27
-
28
-
29
-
30
-
31
-
32
-
33
-
34
-
35
-
36
-
37
-
38
-
39
-
40
-
41
-
42
-
43
-
44
-
45
-
46
-
 47
47 -
 48
48 -
 49
49 -
 50
50 -
 51
51 -
 52
52 -
 53
53 -
 54
54 -
 55
55 -
 56
56 -
 57
57 -
58
-
59
-
60
-
61
-
62
-
63
-
64
-
65
-
66
-
67
-
68
-
69
-
70
-
71
-
72
-
73
-
74
-
75
-
76
-
77
-
78
-
79
-
80
-
81
-
82
-
83
-
84
-
85
-
86
-
87
-
88
-
89
-
90
-
91
-
92
-
93
-
94
-
95
-
96
-
97
-
98
-
99
-
100
-
101
-
102
-
103
-
104
-
105
-
106
-
107
-
108
-
109
-
110
-
111
-
112
 |
 |
