Sharp PN-V701 PN-V701 Operation Manual - Page 21
DP DisplayPort, INPUT Input mode selection
 |
View all Sharp PN-V701 manuals
Add to My Manuals
Save this manual to your list of manuals |
Page 21 highlights
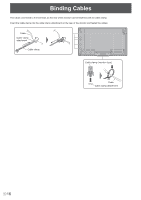
Basic Operation 6. INFORMATION Displays monitor information. INFORMATION1 INPUT MODE SIZE COLOR MODE BRIGHT VOLUME ID No. REMOTE No. MODEL VERSION S/N STATUS 01/01/2017 SUN 12:00:00 AM : D-SUB[RGB] : WIDE : STD : 31 : 15 :0 :0 : PN-V701 xxxxxxxx : 0000-000000-00-0000 LAN 1920x1080 NEXT:[ ] END:[RETURN] V: 60 Hz H: 67.5 kHz INFORMATION2 RS-232C/LAN SELECT DHCP CLIENT IP ADDRESS SUBNET MASK DEFAULT GATEWAY MONITOR NAME DATA PORT MAC ADDRESS 01/01/2017 SUN 12:00:00 AM : LAN : OFF : 192.168.150. 2 : 255.255.255. 0 : 0. 0. 0. 0 : PN-V701 : 10008 : XX-XX-XX-XX-XX-XX LAN 1920x1080 NEXT:[ ] END:[RETURN] V: 60 Hz H: 67.5 kHz The display changes from INFORMATION1 → INFORMATION2 → INFORMATION3 → clear display, and so on every time you press this button. When displaying INFORMATION, the display changes from INFORMATION1 → INFORMATION2 → INFORMATION3 → INFORMATION1, and so on every time you press the button. Pressing the RETURN button disappears the display. • INFORMATION3 shows the information when you have used the expansion slot to expand the functions. • The display disappears automatically after about 15 seconds. • LAN is displayed during LAN communication. • If LAN is displayed in red, there is a duplicate IP address. • If using the monitor buttons, select INFORMATION from the OTHERS menu. 7. FUNCTION Use this to display the FUNCTION menu. (See page 37.) 8. ENTER Confirms the setting. 9. FREEZE This is not used with this monitor. 10. Buttons for operating the HDMI-connected device When HDMI CEC LINK is set to AUTO, use these buttons to operate the device connected through the HDMI interface. 11. ID SET Set a number on the remote control. (See page 36.) 12. OPTION Switch the input mode to OPTION. 13. DP (DisplayPort) Switch the input mode to DisplayPort. 14. SIZE (Screen size selection) The menu is displayed. Press the or button to select the screen size. (See page 22.) If using the monitor buttons, select SIZE from the SCREEN menu. 15. PIP/PbyP Each time you press the button, PIP MODES switches in the following order: OFF → PIP → PbyP → PbyP2 → OFF. 16. BRIGHT +/- (Brightness adjustment) Pressing + or - displays the BRIGHT menu. BRIGHT 15 Press + or - to adjust the brightness. * If you do not press any buttons for about 4 seconds, the BRIGHT menu automatically disappears. 17. INPUT (Input mode selection) The menu is displayed. Press the or button to select the input mode, and press the ENTER button to enter. * You can select the input mode by pressing the INPUT button of the monitor. Input mode DVI-D DisplayPort HDMI1 Video DVI-D input terminal DisplayPort input terminal HDMI1 input terminal Audio Audio input terminal *3 HDMI2 HDMI2 input terminal D-SUB[RGB] D-sub input terminal*2 D-SUB[COMPONENT] OPTION*1 Expansion slot Audio input terminal *3 *1 This is displayed when you have used the expansion slot to expand the functions. *2 Select the input mode to be used for D-SUB of INPUT SELECT. (See page 28.) *3 Select the terminal for AUDIO SELECT which is used for audio input. (See page 28.) 18. MENU Displays and turns off the menu screen. (See page 24.) 19. Cursor These buttons are used to perform operations such as selecting items, changing adjustment values, and moving the cursor. 20. RETURN Returns to the previous screen. 21 E
-
 1
1 -
2
-
3
-
4
-
5
-
6
-
7
-
8
-
9
-
10
-
11
-
12
-
13
-
14
-
15
-
 16
16 -
 17
17 -
 18
18 -
 19
19 -
 20
20 -
 21
21 -
 22
22 -
 23
23 -
 24
24 -
 25
25 -
 26
26 -
27
-
28
-
29
-
30
-
31
-
32
-
33
-
34
-
35
-
36
-
37
-
38
-
39
-
40
-
41
-
42
-
43
-
44
-
45
-
46
-
47
-
48
-
49
-
50
-
51
-
52
-
53
-
54
-
55
-
56
-
57
-
58
-
59
-
60
-
61
-
62
-
63
-
64
-
65
-
66
-
67
-
68
-
69
-
70
 |
 |