Sharp PN-V701 PN-V701 Operation Manual - Page 27
Rgb Input Range Dvi-d/hdmi/d-sub[rgb]/displayport/option, Analog Gain D-sub[rgb]
 |
View all Sharp PN-V701 manuals
Add to My Manuals
Save this manual to your list of manuals |
Page 27 highlights
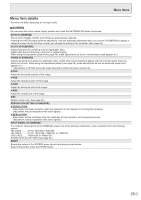
Menu Items ADVANCED AUTO (D-SUB[RGB]) The ANALOG GAIN and ANALOG OFFSET are automatically adjusted. Pressing the ENTER button performs adjustment. ANALOG GAIN (D-SUB[RGB]) Adjusts the bright portions of the video input signal. ANALOG OFFSET (D-SUB[RGB]) Adjusts the dark portions of the video input signal. NR Reduce the image noise. Setting a higher level reduces more noise. However, it may cause blurring on an image. RGB INPUT RANGE (DVI-D/HDMI/D-SUB[RGB]/DisplayPort/OPTION) Sets the RGB input signal range. When using HDMI, DisplayPort or OPTION set to AUTO, the RGB input signal is detected automatically. Use AUTO normally. If the RGB input signal range cannot be set appropriately even when using AUTO, set according to the image. When the setting is different, images will be displayed with washed out blacks and compressed gradients. DISPLAY COLOR PATTERN Displays a color pattern. Can be displayed while the menu screen is displayed, so you can refer to the pattern while adjusting the image. When WHITE, RED, GREEN, or BLUE is displayed, you can set the level in the range of 0 to 255. OFF No pattern display. WHITE............White single color pattern display. RED Red single color pattern display. GREEN..........Green single color pattern display. BLUE Blue single color pattern display. USER Red/green/blue mixed color pattern display. When USER is selected, set each color's level. UNIFORMITY Sets the LCD panel's discoloration correction level. OFF Discoloration will not be corrected. MODE1 to MODE3 The effect of the discoloration correction will increase from MODE1
-
 1
1 -
2
-
3
-
4
-
5
-
6
-
7
-
8
-
9
-
10
-
11
-
12
-
13
-
14
-
15
-
16
-
17
-
18
-
19
-
20
-
21
-
 22
22 -
 23
23 -
 24
24 -
 25
25 -
 26
26 -
 27
27 -
 28
28 -
 29
29 -
 30
30 -
 31
31 -
 32
32 -
33
-
34
-
35
-
36
-
37
-
38
-
39
-
40
-
41
-
42
-
43
-
44
-
45
-
46
-
47
-
48
-
49
-
50
-
51
-
52
-
53
-
54
-
55
-
56
-
57
-
58
-
59
-
60
-
61
-
62
-
63
-
64
-
65
-
66
-
67
-
68
-
69
-
70
 |
 |
