Sharp XG-C435X XG-C435X XG-C465X Operation Manual - Page 16
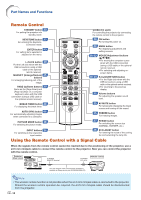
Remote Control, Using the Remote Control with a Signal Cable, WIRED R/C JACK - l lamp
 |
View all Sharp XG-C435X manuals
Add to My Manuals
Save this manual to your list of manuals |
Page 16 highlights
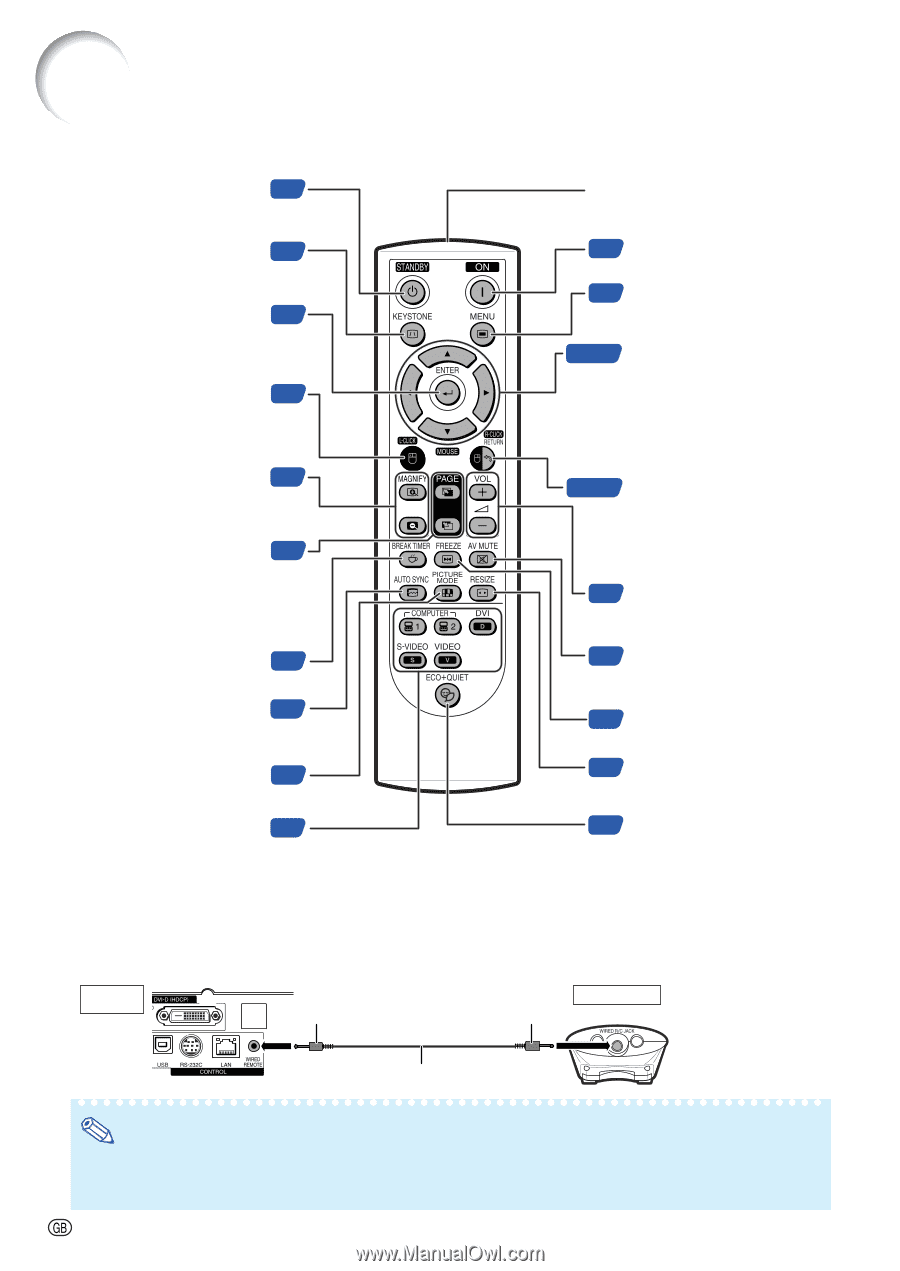
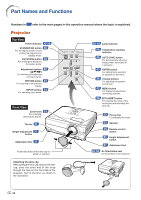
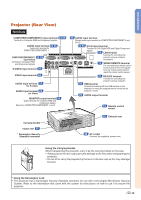
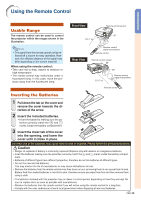
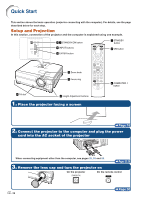
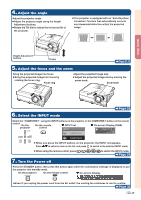
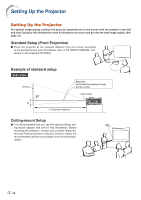
Part Names and Functions Remote Control STANDBY button 30 For putting the projector into standby mode. KEYSTONE button 32 For entering the Keystone Correction mode. ENTER button 43 For setting items selected or adjusted on the menu. L-CLICK button 39 For the Left click when with the USB connection (using a USB cable or the optional remote receiver). MAGNIFY (Enlarge/Reduce) 35 buttons For enlarging/reducing part of the image. PAGE Up/Down buttons 39 Same as the [Page Down] and [Page Up] keys on a computer keyboard, when with the USB connection (using a USB cable or the optional remote receiver). BREAK TIMER button 36 For displaying the break timer. AUTO SYNC button 46 For automatically adjusting images when connected to a computer. PICTURE MODE button 36 For switching the picture mode. INPUT buttons 34 For switching to the respective input modes. WIRED R/C JACK For controlling the projector by connecting the remote control to the projector. 30 ON button For turning the power on. 42 MENU button For displaying adjustment and setting screens. 39·42 MOUSE/Adjustment buttons For moving the computer cursor when with the USB connection (using a USB cable or the optional remote receiver). • For selecting and adjusting onscreen items. 39·43 R-CLICK/RETURN button • For the Right click when with the USB connection (using a USB cable or the optional remote receiver). • For returning to the previous display. 35 Volume buttons For adjusting the speaker sound level. 35 AV MUTE button For temporarily displaying the black screen and turning off the sound. 35 FREEZE button For freezing images. 37 RESIZE button For switching the screen size (NORMAL, BORDER, etc.). 36 ECO+QUIET button For lowering the noise of the cooling fan and extending the lamp life. Using the Remote Control with a Signal Cable When the signals from the remote control cannot be reached due to the positioning of the projector, use a ø3.5 mm minijack cable to connect the remote control to the projector. Now you can control the projector with the remote control. Projector (Rear view) To WIRED REMOTE terminal To WIRED R/C JACK Remote control ø3.5 mm minijack cable (commercially available or available as Sharp service part QCNWGA038WJPZ) Note • The wireless remote function is not possible when the ø3.5 mm minijack cable is connected to the projector. Should the wireless remote operation be required, the ø3.5 mm minijack cable should be disconnected from the projector. -14
-
 1
1 -
2
-
3
-
4
-
5
-
6
-
7
-
8
-
9
-
10
-
 11
11 -
 12
12 -
 13
13 -
 14
14 -
 15
15 -
 16
16 -
 17
17 -
 18
18 -
 19
19 -
 20
20 -
 21
21 -
22
-
23
-
24
-
25
-
26
-
27
-
28
-
29
-
30
-
31
-
32
-
33
-
34
-
35
-
36
-
37
-
38
-
39
-
40
-
41
-
42
-
43
-
44
-
45
-
46
-
47
-
48
-
49
-
50
-
51
-
52
-
53
-
54
-
55
-
56
-
57
-
58
-
59
-
60
-
61
-
62
-
63
-
64
-
65
-
66
-
67
-
68
-
69
-
70
-
71
 |
 |