Sharp XG-C435X XG-C435X XG-C465X Operation Manual - Page 33
Image Projection, Using the Adjustment Feet
 |
View all Sharp XG-C435X manuals
Add to My Manuals
Save this manual to your list of manuals |
Page 33 highlights
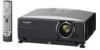
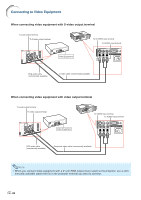
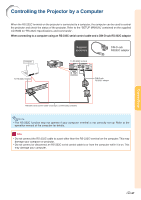
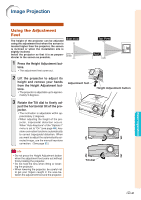
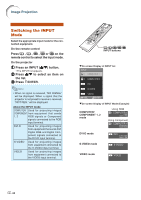
Image Projection Using the Adjustment Feet The height of the projector can be adjusted using the adjustment feet when the screen is located higher than the projector, the screen is inclined or when the installation site is slightly inclined. Install the projector so that it is as perpendicular to the screen as possible. Side View Lens center 1 Press the Height Adjustment but- tons. • The adjustment feet come out. 2 Lift the projector to adjust its height and remove your hands from the Height Adjustment but- tons. • The projector is adjustable up to approximately 9 degrees. Adjustment foot 3 Rotate the Tilt dial to finely ad- just the horizontal tilt of the projector. • The inclination is adjustable within approximately 2 degrees. • When adjusting the height of the projector, trapezoidal distortion occurs. When "Auto Keystone" of the "Options1" menu is set to "On" (see page 48), keystone correction functions automatically to correct trapezoidal distortion. When you want to adjust the automatically corrected image, use the manual keystone correction. (See page 32.) Top View Height Adjustment button Info • Do not press the Height Adjustment button when the adjustment feet come out without firmly holding the projector. • Do not hold the lens when lifting or lowering the projector. • When lowering the projector, be careful not to get your fingers caught in the area between the adjustment foot and the projector. Tilt dial Basic Operation -31
-
 1
1 -
2
-
3
-
4
-
5
-
6
-
7
-
8
-
9
-
10
-
11
-
12
-
13
-
14
-
15
-
16
-
17
-
18
-
19
-
20
-
21
-
22
-
23
-
24
-
25
-
26
-
27
-
 28
28 -
 29
29 -
 30
30 -
 31
31 -
 32
32 -
 33
33 -
 34
34 -
 35
35 -
 36
36 -
 37
37 -
 38
38 -
39
-
40
-
41
-
42
-
43
-
44
-
45
-
46
-
47
-
48
-
49
-
50
-
51
-
52
-
53
-
54
-
55
-
56
-
57
-
58
-
59
-
60
-
61
-
62
-
63
-
64
-
65
-
66
-
67
-
68
-
69
-
70
-
71
 |
 |