Sharp XG-C435X XG-C435X XG-C465X Operation Manual - Page 5
How to Read this Operation Manual, s 64 and 65 - video projector
 |
View all Sharp XG-C435X manuals
Add to My Manuals
Save this manual to your list of manuals |
Page 5 highlights
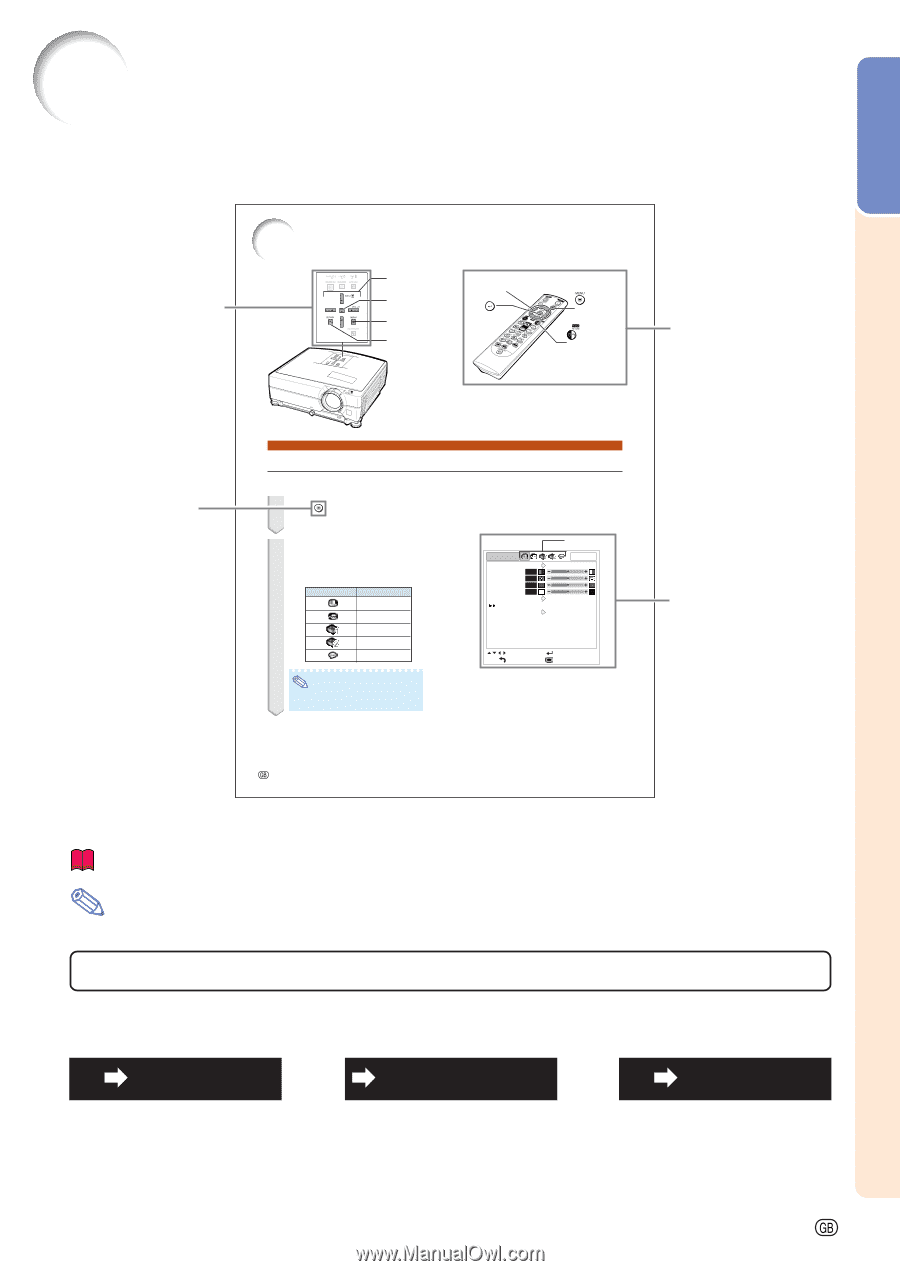
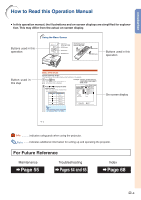
Introduction How to Read this Operation Manual • In this operation manual, the illustrations and on-screen displays are simplified for explanation. This may differ from the actual on-screen display. Buttons used in this operation Using the Menu Screen Adjustment buttons ('/"/\/|) ENTER button MENU button RETURN button MOUSE/Adjustment buttons ('/"/\/|) ENTER button MENU button RETURN button Buttons used in this operation Button used in this step Menu Selections Example: Adjusting "Bright" • This operation can also be performed by using the buttons on the projector. 1 Press MENU. • The "Picture" menu screen for the selected input mode is displayed. Example: "Picture" screen menu for COMPUTER/COMPONENT 1 (RGB) mode 2 Press | or \ to display the other menu screens. • The menu icon for the selected menu screen is highlighted. Menu icon Menu screen Picture Fine Sync Menu icons Picture Picture Mode Contrast 0 Bright 0 Red 0 Blue 0 CLR Temp Reset Signal Type COMP.1 Standard 7500K Auto Options1 Options2 Language SEL./ADJ. RETURN ENTER END Note • The "Fine Sync" menu is not available for selecting VIDEO or S-VIDEO. On-screen display -42 Info ...........Indicates safeguards when using the projector. Note ........Indicates additional information for setting up and operating the projector. For Future Reference Maintenance Page 55 Troubleshooting Pages 64 and 65 Index Page 68 -3
-
 1
1 -
 2
2 -
 3
3 -
 4
4 -
 5
5 -
 6
6 -
 7
7 -
 8
8 -
 9
9 -
 10
10 -
 11
11 -
12
-
13
-
14
-
15
-
16
-
17
-
18
-
19
-
20
-
21
-
22
-
23
-
24
-
25
-
26
-
27
-
28
-
29
-
30
-
31
-
32
-
33
-
34
-
35
-
36
-
37
-
38
-
39
-
40
-
41
-
42
-
43
-
44
-
45
-
46
-
47
-
48
-
49
-
50
-
51
-
52
-
53
-
54
-
55
-
56
-
57
-
58
-
59
-
60
-
61
-
62
-
63
-
64
-
65
-
66
-
67
-
68
-
69
-
70
-
71
 |
 |