Sharp XG-C435X XG-C435X XG-C465X Operation Manual - Page 36
Switching the INPUT Mode
 |
View all Sharp XG-C435X manuals
Add to My Manuals
Save this manual to your list of manuals |
Page 36 highlights
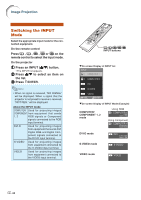
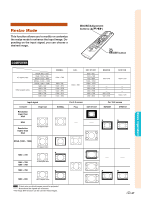
Image Projection Switching the INPUT Mode Select the appropriate input mode for the connected equipment. On the remote control Press , , , or on the remote control to select the input mode. On the projector 1 Press an INPUT ('/") button. • The INPUT list appears. 2 Press '/" to select an item on the list. 3 Press ENTER. Note • When no signal is received, "NO SIGNAL" will be displayed. When a signal that the projector is not preset to receive is received, "NOT REG." will be displayed. About the INPUT mode COMPUTER/ Used for projecting images COMPONENT from equipment that sends 1, 2 RGB signals or Component signals connected to the RGB input terminal. DVI-D Used for projecting images from equipment that sends DVI Digital RGB and Digital Component signals connected to the DVI-D input terminal. S-VIDEO Used for projecting images from equipment connected to the S-VIDEO input terminal. VIDEO Used for projecting images from equipment connected to the VIDEO input terminal. //// INPUT buttons "On-screen Display of INPUT list INPUT 1 COMPUTER 1 2 COMPUTER 2 D DVI S S-VIDEO V VIDEO SEL. ENTER "On-screen Display of INPUT Mode (Example) COMPUTER/ COMPONENT 1, 2 mode Using RGB 1 COMPUTER 1 RGB 1024 × 768 Using Component 1 COMPUTER 1 Component 720P/750P DVI-D mode D DVI D. PC RGB 1024 × 768 S-VIDEO mode S S-VIDEO VIDEO mode V VIDEO -34
-
 1
1 -
2
-
3
-
4
-
5
-
6
-
7
-
8
-
9
-
10
-
11
-
12
-
13
-
14
-
15
-
16
-
17
-
18
-
19
-
20
-
21
-
22
-
23
-
24
-
25
-
26
-
27
-
28
-
29
-
30
-
 31
31 -
 32
32 -
 33
33 -
 34
34 -
 35
35 -
 36
36 -
 37
37 -
 38
38 -
 39
39 -
 40
40 -
 41
41 -
42
-
43
-
44
-
45
-
46
-
47
-
48
-
49
-
50
-
51
-
52
-
53
-
54
-
55
-
56
-
57
-
58
-
59
-
60
-
61
-
62
-
63
-
64
-
65
-
66
-
67
-
68
-
69
-
70
-
71
 |
 |
