Sharp XG-C435X XG-C435X XG-C465X Operation Manual - Page 32
Basic Operation, Turning the Projector On/Off, Connecting the Power Cord
 |
View all Sharp XG-C435X manuals
Add to My Manuals
Save this manual to your list of manuals |
Page 32 highlights
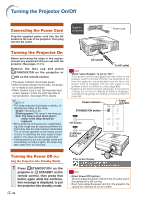
Turning the Projector On/Off Connecting the Power Cord Plug the supplied power cord into the AC socket on the rear of the projector. Then plug into the AC outlet. Supplied accessory Power cord Turning the Projector On Before performing the steps in this section, connect any equipment that you use with the projector. (See pages 23-29.) Remove the lens cap and press STANDBY/ON on the projector or ON on the remote control. • The power indicator illuminates green. • After the lamp indicator illuminates, the projec- tor is ready to start operation. • When System Lock is set, the keycode input screen appears. Enter the right keycode to start projection. See page 49 for details. Note • The lamp indicator illuminates or blinks, in- dicating the status of the lamp. Green: The lamp is on. Blinking green: The lamp is warming up. Red: The lamp is shut down abnormally or the lamp should be replaced. • When switching on the projector, a slight flickering of the image may be experienced within the first minute after the lamp has been illuminated. This is normal operation as the lamp's control circuitry is stabilizing the lamp output characteristics. This does not indicate malfunction. • If the projector is put into standby mode and immediately turned on again, the lamp may take some time to illuminate. AC socket To AC outlet Info • When "Auto Restart" is set to "On": If the power cord is unplugged from the outlet or the breaker switch is turned off when the projector is on, then the projector automatically turns on when the power cord is plugged into the AC outlet or the breaker switch is turned on. (See page 50.) • English is the factory preset language. If you want to change the on-screen display to another language, change the language according to the procedure on page 54. Power indicator Lamp indicator STANDBY/ON button ON button STANDBY button Turning the Power Off (Put- ting the Projector into Standby Mode) 1 Press STANDBY/ON on the projector or STANDBY on the remote control, then press that button again while the confirmation message is displayed, to put the projector into standby mode. -30 ▼On-screen Display Info • Direct Power Off function: You can unplug the power cord from the AC outlet even if the cooling fan is still running. • Even if you unplug the power cord from the projector, the cooling fan continues to run for a while.
-
 1
1 -
2
-
3
-
4
-
5
-
6
-
7
-
8
-
9
-
10
-
11
-
12
-
13
-
14
-
15
-
16
-
17
-
18
-
19
-
20
-
21
-
22
-
23
-
24
-
25
-
26
-
 27
27 -
 28
28 -
 29
29 -
 30
30 -
 31
31 -
 32
32 -
 33
33 -
 34
34 -
 35
35 -
 36
36 -
 37
37 -
38
-
39
-
40
-
41
-
42
-
43
-
44
-
45
-
46
-
47
-
48
-
49
-
50
-
51
-
52
-
53
-
54
-
55
-
56
-
57
-
58
-
59
-
60
-
61
-
62
-
63
-
64
-
65
-
66
-
67
-
68
-
69
-
70
-
71
 |
 |
