Sony BRC-X400 Operating Instructions - Page 11
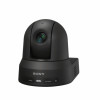
Infrared Remote Commander (supplied), CAMERA SELECT buttons, FOCUS buttons, DATA SCREEN button
 |
View all Sony BRC-X400 manuals
Add to My Manuals
Save this manual to your list of manuals |
Page 11 highlights
Infrared Remote Commander (supplied) CAMERA SELECT buttons Press the button corresponding to the camera you want to operate with the remote commander. The camera number can be set using the IR SELECT switch on the back of the camera. Note If two or more cameras are adjacent and have the same camera number, they are operated simultaneously with the supplied remote commander. When you install the cameras close to each other, set different camera numbers. For setting of camera number, see "Operating Multiple Cameras Using the Infrared Remote Commander" (page 26). FOCUS buttons Used for focus adjustment. Press the AUTO button to adjust the focus automatically. To adjust the focus manually, press the MANUAL button, and adjust it with the FAR and NEAR buttons. Note Press the MANUAL button and adjust the focus manually when shooting the following objects. • White walls and other objects without contrast • Objects behind glass • Objects with horizontal stripes • Objects on which bright lights are cast or reflected • Nightscapes and other dark objects with blinking lights • Lit objects shot with darkened exposure adjustment or exposure compensation settings DATA SCREEN button Press this button to display the main menu PAGE. Press it again to close the menu. If you press the button when a lower-level menu is selected, the display goes back to a higherlevel menu. Notes • You cannot perform pan/tilt/zoom operations while the menu is displayed. • The menu is not displayed on the SDI output image when the [Menu overlay (SDI)] check box on the Administrator menu is not selected. • The menu is not displayed on the HDMI output image when the [Menu overlay (HDMI)] check box on the Administrator menu is not selected. PAN-TILT button Press the arrow buttons to pan or tilt the camera. Press the HOME button to face the camera back to the front. When the menu is displayed, use or to select the menu items and or to change the set values. The selected setting menu is displayed by pressing the HOME button when the main menu is displayed. L/R DIRECTION SET button Hold down this button and press the REV button to change the direction of the camera movement to be opposite the direction of the arrows on the and buttons. To reset the direction of the camera movement, press the STD button while holding down this button. POWER button Press this button to turn on power or to put the camera in the standby mode. BACK LIGHT button Press this button to enable backlight compensation. Press it again to disable backlight compensation. 11
-
 1
1 -
2
-
3
-
4
-
5
-
 6
6 -
 7
7 -
 8
8 -
 9
9 -
 10
10 -
 11
11 -
 12
12 -
 13
13 -
 14
14 -
 15
15 -
 16
16 -
17
-
18
-
19
-
20
-
21
-
22
-
23
-
24
-
25
-
26
-
27
-
28
-
29
-
30
-
31
-
32
-
33
-
34
-
35
-
36
-
37
-
38
-
39
-
40
-
41
-
42
-
43
-
44
-
45
-
46
-
47
-
48
-
49
-
50
-
51
-
52
-
53
-
54
-
55
-
56
-
57
-
58
-
59
-
60
-
61
-
62
-
63
-
64
-
65
-
66
-
67
-
68
-
69
-
70
-
71
-
72
-
73
-
74
-
75
-
76
-
77
-
78
-
79
-
80
-
81
-
82
-
83
-
84
-
85
-
86
-
87
-
88
-
89
-
90
-
91
-
92
-
93
-
94
-
95
-
96
-
97
-
98
-
99
-
100
-
101
-
102
-
103
-
104
 |
 |
