Sony DCR-TRV80 Operating Instructions - Page 139
Changing image size – Resize
 |
View all Sony DCR-TRV80 manuals
Add to My Manuals
Save this manual to your list of manuals |
Page 139 highlights
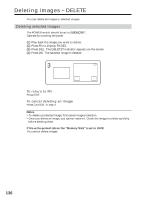
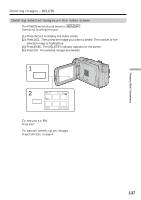
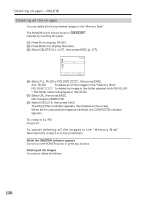
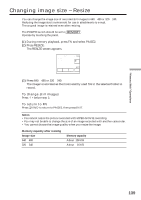
"Memory Stick" Operations Changing image size - Resize You can change the image size of recorded still images to 640 × 480 or 320 × 240. Reducing the image size is convenient for use in attachments to e-mail. The original image is retained even after resizing. The POWER switch should be set to . Operate by touching the panel. (1) During memory playback, press FN and select PAGE2. (2) Press RESIZE. The RESIZE screen appears. 640 RESIZE 101-0003 3/40 101 END 101 - + 640 × 320 × 480 240 (3) Press 640 × 480 or 320 × 240. The image is recorded as the most recently used file in the selected folder to record. To change still images Press -/+ before step 3. To return to FN Press END to return to PAGE2, then press EXIT. Notes •You cannot resize the picture recorded with MPEG MOVIE recording. •You may not be able to change the size of an image recorded with another camcorder. • You cannot choose the image quality when you resize the image. Memory capacity after resizing Image size 640 × 480 320 × 240 Memory capacity About 150 KB About 16 KB 139
-
 1
1 -
2
-
3
-
4
-
5
-
6
-
7
-
8
-
9
-
10
-
11
-
12
-
13
-
14
-
15
-
16
-
17
-
18
-
19
-
20
-
21
-
22
-
23
-
24
-
25
-
26
-
27
-
28
-
29
-
30
-
31
-
32
-
33
-
34
-
35
-
36
-
37
-
38
-
39
-
40
-
41
-
42
-
43
-
44
-
45
-
46
-
47
-
48
-
49
-
50
-
51
-
52
-
53
-
54
-
55
-
56
-
57
-
58
-
59
-
60
-
61
-
62
-
63
-
64
-
65
-
66
-
67
-
68
-
69
-
70
-
71
-
72
-
73
-
74
-
75
-
76
-
77
-
78
-
79
-
80
-
81
-
82
-
83
-
84
-
85
-
86
-
87
-
88
-
89
-
90
-
91
-
92
-
93
-
94
-
95
-
96
-
97
-
98
-
99
-
100
-
101
-
102
-
103
-
104
-
105
-
106
-
107
-
108
-
109
-
110
-
111
-
112
-
113
-
114
-
115
-
116
-
117
-
118
-
119
-
120
-
121
-
122
-
123
-
124
-
125
-
126
-
127
-
128
-
129
-
130
-
131
-
132
-
133
-
 134
134 -
 135
135 -
 136
136 -
 137
137 -
 138
138 -
 139
139 -
 140
140 -
 141
141 -
 142
142 -
 143
143 -
 144
144 -
145
-
146
-
147
-
148
-
149
-
150
-
151
-
152
-
153
-
154
-
155
-
156
-
157
-
158
-
159
-
160
-
161
-
162
-
163
-
164
-
165
-
166
-
167
-
168
-
169
-
170
-
171
-
172
-
173
-
174
-
175
-
176
-
177
-
178
-
179
-
180
-
181
-
182
-
183
-
184
-
185
-
186
-
187
-
188
-
189
-
190
-
191
-
192
-
193
-
194
-
195
-
196
-
197
-
198
-
199
-
200
-
201
-
202
-
203
-
204
-
205
-
206
-
207
-
208
-
209
-
210
-
211
-
212
-
213
-
214
-
215
-
216
-
217
-
218
-
219
-
220
 |
 |