Sony DCR-TRV80 Operating Instructions - Page 215
Identifying parts and controls, Remote Commander, ZERO SET MEMORY button
 |
View all Sony DCR-TRV80 manuals
Add to My Manuals
Save this manual to your list of manuals |
Page 215 highlights
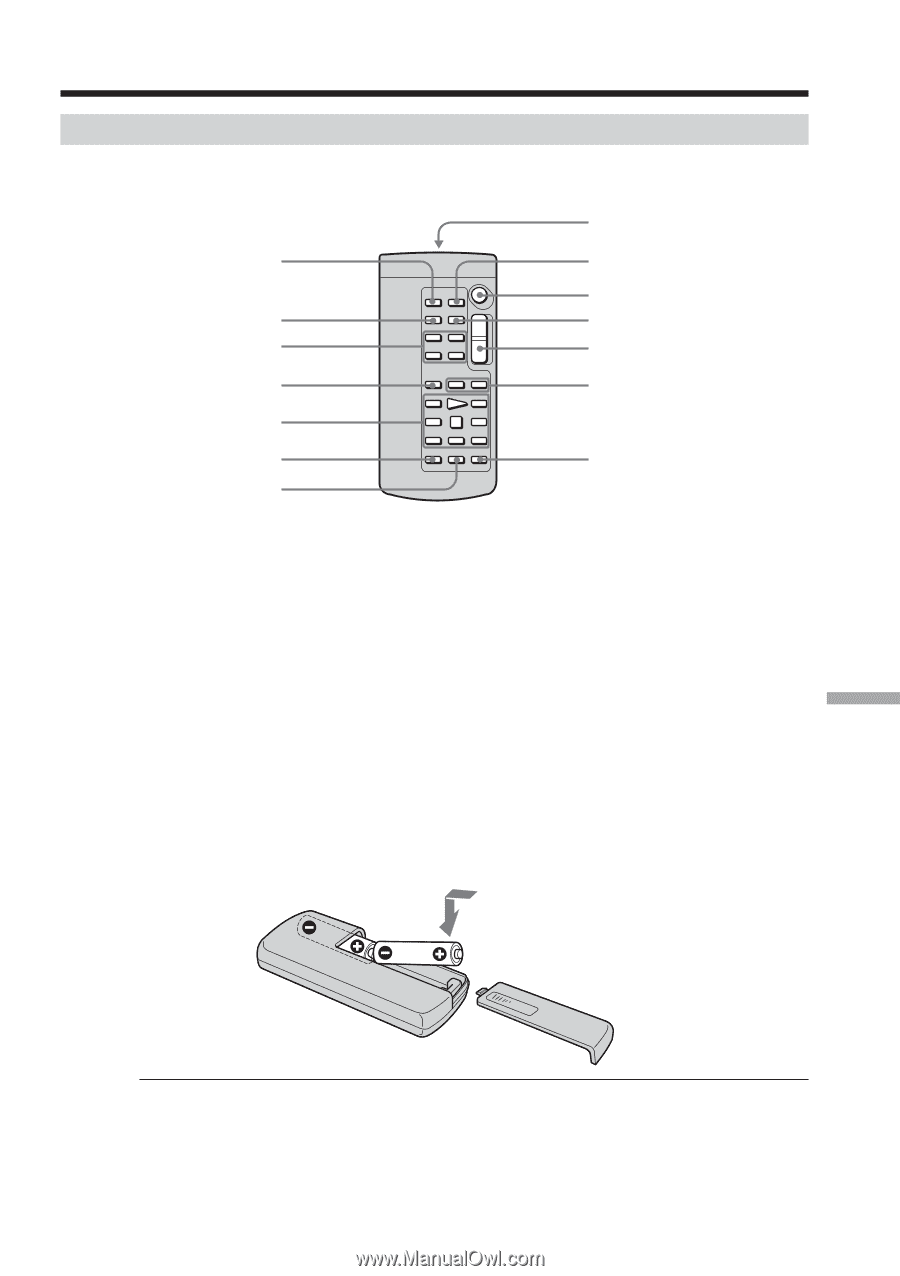
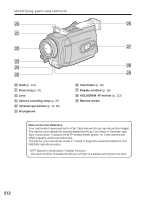
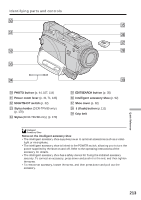
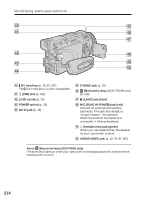
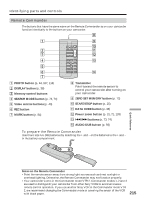
Identifying parts and controls Remote Commander The buttons that have the same name on the Remote Commander as on your camcorder function identically to the buttons on your camcorder. 8 1 9 0 2 qa 3 qs 4 qd 5 6 qf 7 1 PHOTO button (p. 44, 107, 114) 2 DISPLAY button (p. 38) 3 Memory control buttons 4 SEARCH MODE button (p. 73, 74) 5 Video control buttons (p. 40) 6 REC button 7 MARK button (p. 84) 8 Transmitter Point toward the remote sensor to control your camcorder after turning on your camcorder. 9 ZERO SET MEMORY button (p. 72) q; START/STOP button (p. 25) qa DATA CODE button (p. 38) qs Power zoom button (p. 31, 71, 133) qd ./> buttons (p. 73, 74) qf AUDIO DUB button (p. 93) To prepare the Remote Commander Insert two size AA (R6) batteries by matching the + and - on the batteries to the + and - in the battery compartment. Quick Reference Notes on the Remote Commander •Point the remote sensor away from strong light sources such as direct sunlight or overhead lighting. Otherwise, the Remote Commander may not function properly. •Your camcorder works in the Commander mode VTR 2. Commander modes 1, 2 and 3 are used to distinguish your camcorder from other Sony VCRs to avoid erroneous remote control operation. If you use another Sony VCR in the Commander mode VTR 2, we recommend changing the Commander mode or covering the sensor of the VCR with black paper. 215
-
 1
1 -
2
-
3
-
4
-
5
-
6
-
7
-
8
-
9
-
10
-
11
-
12
-
13
-
14
-
15
-
16
-
17
-
18
-
19
-
20
-
21
-
22
-
23
-
24
-
25
-
26
-
27
-
28
-
29
-
30
-
31
-
32
-
33
-
34
-
35
-
36
-
37
-
38
-
39
-
40
-
41
-
42
-
43
-
44
-
45
-
46
-
47
-
48
-
49
-
50
-
51
-
52
-
53
-
54
-
55
-
56
-
57
-
58
-
59
-
60
-
61
-
62
-
63
-
64
-
65
-
66
-
67
-
68
-
69
-
70
-
71
-
72
-
73
-
74
-
75
-
76
-
77
-
78
-
79
-
80
-
81
-
82
-
83
-
84
-
85
-
86
-
87
-
88
-
89
-
90
-
91
-
92
-
93
-
94
-
95
-
96
-
97
-
98
-
99
-
100
-
101
-
102
-
103
-
104
-
105
-
106
-
107
-
108
-
109
-
110
-
111
-
112
-
113
-
114
-
115
-
116
-
117
-
118
-
119
-
120
-
121
-
122
-
123
-
124
-
125
-
126
-
127
-
128
-
129
-
130
-
131
-
132
-
133
-
134
-
135
-
136
-
137
-
138
-
139
-
140
-
141
-
142
-
143
-
144
-
145
-
146
-
147
-
148
-
149
-
150
-
151
-
152
-
153
-
154
-
155
-
156
-
157
-
158
-
159
-
160
-
161
-
162
-
163
-
164
-
165
-
166
-
167
-
168
-
169
-
170
-
171
-
172
-
173
-
174
-
175
-
176
-
177
-
178
-
179
-
180
-
181
-
182
-
183
-
184
-
185
-
186
-
187
-
188
-
189
-
190
-
191
-
192
-
193
-
194
-
195
-
196
-
197
-
198
-
199
-
200
-
201
-
202
-
203
-
204
-
205
-
206
-
207
-
208
-
209
-
 210
210 -
 211
211 -
 212
212 -
 213
213 -
 214
214 -
 215
215 -
 216
216 -
 217
217 -
 218
218 -
 219
219 -
 220
220
 |
 |