Sony DCR-TRV80 Operating Instructions - Page 25
— Recording – Basics —, Recording a picture
 |
View all Sony DCR-TRV80 manuals
Add to My Manuals
Save this manual to your list of manuals |
Page 25 highlights
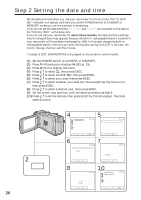
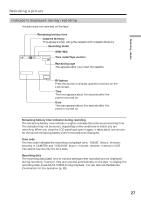
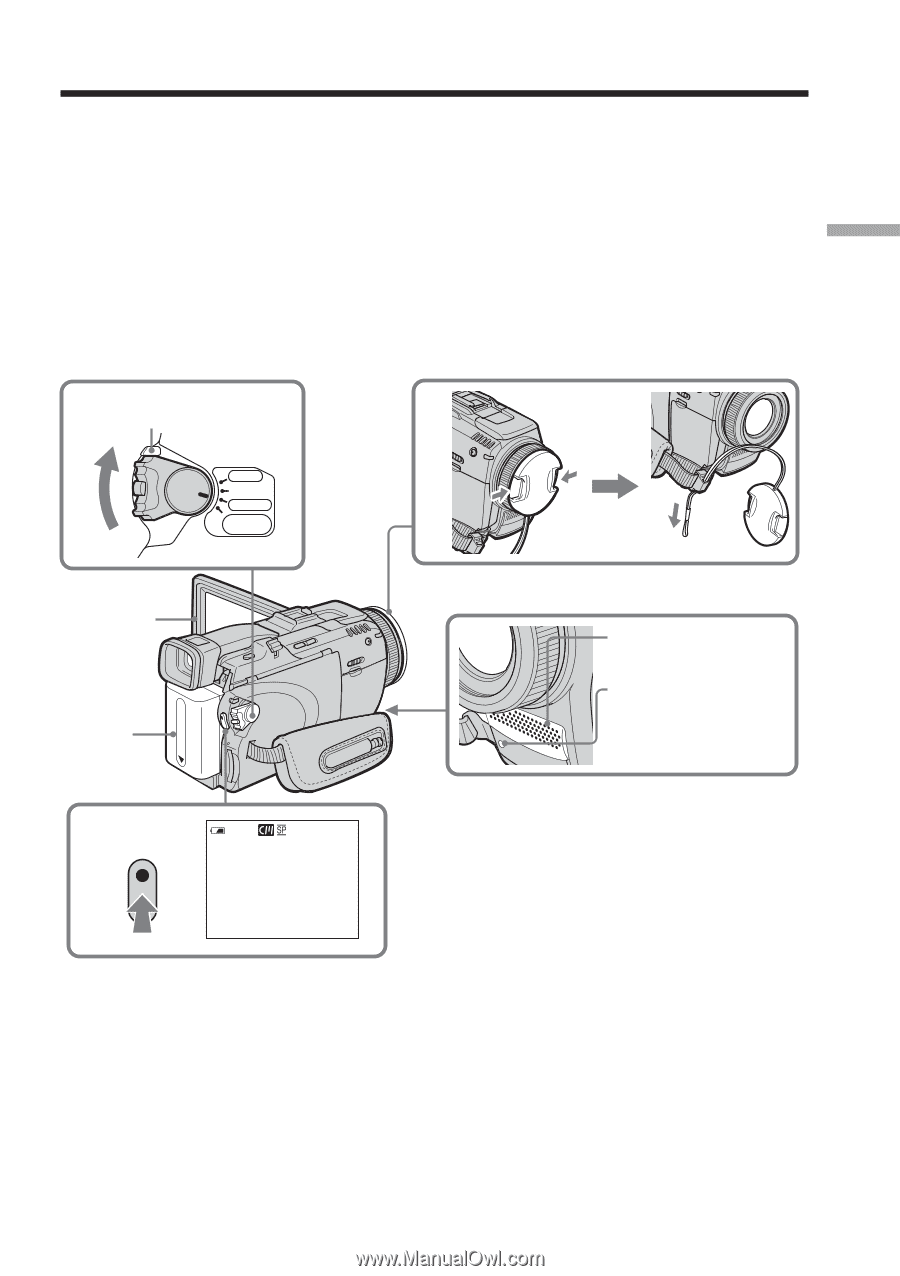
Recording - Basics - Recording - Basics - Recording a picture See relevant "Step 1" and "Step 2." (1) Remove the lens cap and pull the lens cap string to fix it. (2) Prepare the power source (p. 15 to 19) and insert the cassette (p. 8). (3) Set the POWER switch to CAMERA while pressing the small green button. This sets your camcorder to standby. (4) Press OPEN to open the LCD panel. The picture appears on the screen. (5) Press START/STOP. Your camcorder starts recording. The REC indicator appears. The camera recording lamp located on the front of your camcorder lights up. To stop recording, press START/STOP again. 3 LOCK switch 1 POWER VCR OFF(CHG) CAMERA MEMORY/ NETWORK 4 2 Microphone Camera recording lamp 5 50min REC 0:00:01 25
-
 1
1 -
2
-
3
-
4
-
5
-
6
-
7
-
8
-
9
-
10
-
11
-
12
-
13
-
14
-
15
-
16
-
17
-
18
-
19
-
 20
20 -
 21
21 -
 22
22 -
 23
23 -
 24
24 -
 25
25 -
 26
26 -
 27
27 -
 28
28 -
 29
29 -
 30
30 -
31
-
32
-
33
-
34
-
35
-
36
-
37
-
38
-
39
-
40
-
41
-
42
-
43
-
44
-
45
-
46
-
47
-
48
-
49
-
50
-
51
-
52
-
53
-
54
-
55
-
56
-
57
-
58
-
59
-
60
-
61
-
62
-
63
-
64
-
65
-
66
-
67
-
68
-
69
-
70
-
71
-
72
-
73
-
74
-
75
-
76
-
77
-
78
-
79
-
80
-
81
-
82
-
83
-
84
-
85
-
86
-
87
-
88
-
89
-
90
-
91
-
92
-
93
-
94
-
95
-
96
-
97
-
98
-
99
-
100
-
101
-
102
-
103
-
104
-
105
-
106
-
107
-
108
-
109
-
110
-
111
-
112
-
113
-
114
-
115
-
116
-
117
-
118
-
119
-
120
-
121
-
122
-
123
-
124
-
125
-
126
-
127
-
128
-
129
-
130
-
131
-
132
-
133
-
134
-
135
-
136
-
137
-
138
-
139
-
140
-
141
-
142
-
143
-
144
-
145
-
146
-
147
-
148
-
149
-
150
-
151
-
152
-
153
-
154
-
155
-
156
-
157
-
158
-
159
-
160
-
161
-
162
-
163
-
164
-
165
-
166
-
167
-
168
-
169
-
170
-
171
-
172
-
173
-
174
-
175
-
176
-
177
-
178
-
179
-
180
-
181
-
182
-
183
-
184
-
185
-
186
-
187
-
188
-
189
-
190
-
191
-
192
-
193
-
194
-
195
-
196
-
197
-
198
-
199
-
200
-
201
-
202
-
203
-
204
-
205
-
206
-
207
-
208
-
209
-
210
-
211
-
212
-
213
-
214
-
215
-
216
-
217
-
218
-
219
-
220
 |
 |
25
Recording – Basics
See relevant “Step 1” and “Step 2.”
(
1
)
Remove the lens cap and pull the lens cap string to fix it.
(
2
)
Prepare the power source (p. 15 to 19) and insert the cassette (p. 8).
(
3
)
Set the POWER switch to CAMERA while pressing the small green button.
This sets your camcorder to standby.
(
4
)
Press OPEN to open the LCD panel. The picture appears on the screen.
(
5
)
Press START/STOP. Your camcorder starts recording. The REC indicator
appears. The camera recording lamp located on the front of your camcorder
lights up. To stop recording, press START/STOP again.
— Recording – Basics —
Recording a picture
5
2
4
3
VCR
MEMORY/
NETWORK
CAMERA
OFF(CHG)
POWER
50min
REC
0:00:01
1
LOCK switch
Microphone
Camera recording
lamp